How to use the HC-SR04 Ultrasonic Sensor
Introduction
In this guide, I’ll show you how to use the HC-SR04 ultrasonic sensor to measure distances and detect objects using an Arduino or another microcontroller.
Video
I created a detailed video demonstrating everything I explain on this page. It's very informative and I spent alot of time on it - so you should totally watch it. :)
What is the HC-SR04 Ultrasonic Sensor?
The HC-SR04 ultrasonic sensor is a compact module designed for measuring distances between 2 cm and 400 cm. It works by emitting ultrasonic pulses and measuring the time taken for the echo to return.
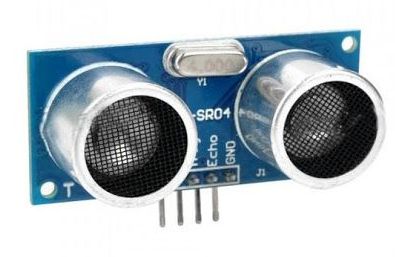
Physical Overview

- Dimensions:~21 mm (H) × 45 mm (W) × 15 mm (D) (excluding pins)
- Front: Houses the transmitter, receiver, and ceramic resonator
- Back: Contains the microcontroller that generates ultrasonic pulses, processes echoes, and outputs the results
- Components:
- Ultrasonic transceiver IC: Drives the transmitter and processes received signals
- Voltage regulator IC: Ensures stable voltage for reliable operation
How It Works
The HC-SR04 emits eight short ultrasonic pulses at 40 kHz. These pulses bounce off nearby objects and return to the sensor. By measuring the time delay between transmission and reception, the sensor calculates the distance to the object.
Pin Configuration
We'll go over the pins in more detail later, but very breifly you'll find the following:
- VCC → 5V power supply
- GND → Ground
- TRIG → Used to trigger the ultrasonic pulse
- ECHO → Outputs the measured distance as a signal
Wiring for Demo
Setting Up the Sensor with an ArduinoLet’s connect the HC-SR04 to an Arduino Uno:
- Connect VCC to the 5V pin on the Arduino.
- Connect GND to GND.
- Connect TRIG to digital pin 9.
- Connect ECHO to digital pin 10.
Uploading the Code
Download the code and paste it into the Arduino IDE. Select your microcontroller board and upload the sketch.
Comments: