
Elegoo Mars 3 4k Resin Printer Review
Elegoo Mars 3 ULTRA 4k Resin Printer
A quick, fantastically detailed and reliable resin printer in a compact and easy to use body. I think it's great and the prints produced are stunning! (See the photos further in the review).
Pros:
- Wallet friendly price considering the quality
- Compact footprint
- Air filters seem to be improved
- Chitubox Pro Slicing Software included
Cons:
- Some mismatch in icons between machine and its manual
- The pro Chitubox software only lasts one year, after which you can pay for it or fall back to the free (non-pro) tier
Where to buy:
What is it?
The Mars 3 is a Mono LCD (liquid crystal display) 3D resin printer from Elegoo. It is the third major revision in their Mars series and this heritage shows. Resin LCD printers create the 3D parts by curing a single layer of resin onto the underside of a submerged build plate. Each additional layer is fused on to the previous with a UV light as the platform rises out of the tank of liquid resin.
Resin printers are ideal for highly detailed models as their layer heights are much smaller than a traditional FDM printer, to the point the layer lines are no longer visible under casual inspection. The trade of is that until cured with exposure to UV light, the not super friendly for you or the environment resin can be hazardous, though if the prints and waste byproducts are treated properly this is not a problem. Further more, more friendly and easier to work with resins are being rapidly developed and put out into the market by both Elegoo and other manufacturers.
Technical Overview
| Printing Technology | Mono LCD Resin |
|---|---|
| Print volume | 89.6 x 143.36 x 175mm |
| Layer height | 0.01 - 0.2mm |
| UV Wavelength | 405nm |
| X/Y Resolution | 0.035 (4098*2560px) |
| Control | 3.5 Inch Touch Screen |
| Connectivity | USB memory stick |
For a more detailed technical table please see the end of this review.
The build volume is 89.6 x 143.36 x 175mm - a very generous build volume given the small footprint of the machine and an improvement on the Mars 2 whilst still maintaining a higher print resolution thanks to its new 4k screen.
This monochrome 4k LCD screen, in partnership with the newly designed COB light source, allows the machine to cure layers in just a couple of seconds (1.5 to 3 seconds depending on the resin and chosen layer height). A huge and noticeable improvement on some of the earlier models.
The sandblasted build plate and second generation FEP (Fluorinated ethylene propylene - and no, I didn't know that of the top of my head) film both increase the ability for prints to adhere to the build plate and release from the vat ensuring more successful prints more often. :)
Shipping and Packing
I've received several machines from Elegoo over time and each and everyone has always been thoughtfully packed. The Mars 3 is no exception. Strong box, dense foam, and protective sheets easily defend the machine from the bumps and jolts the global delivery network might throw at it in transit. There won't be any tears when opening the box.
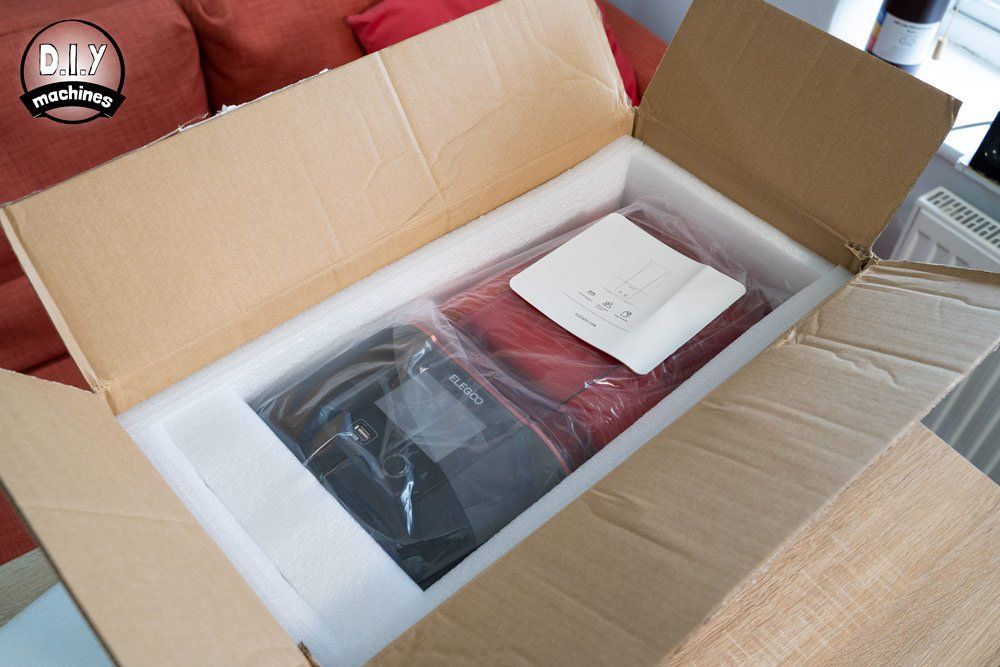


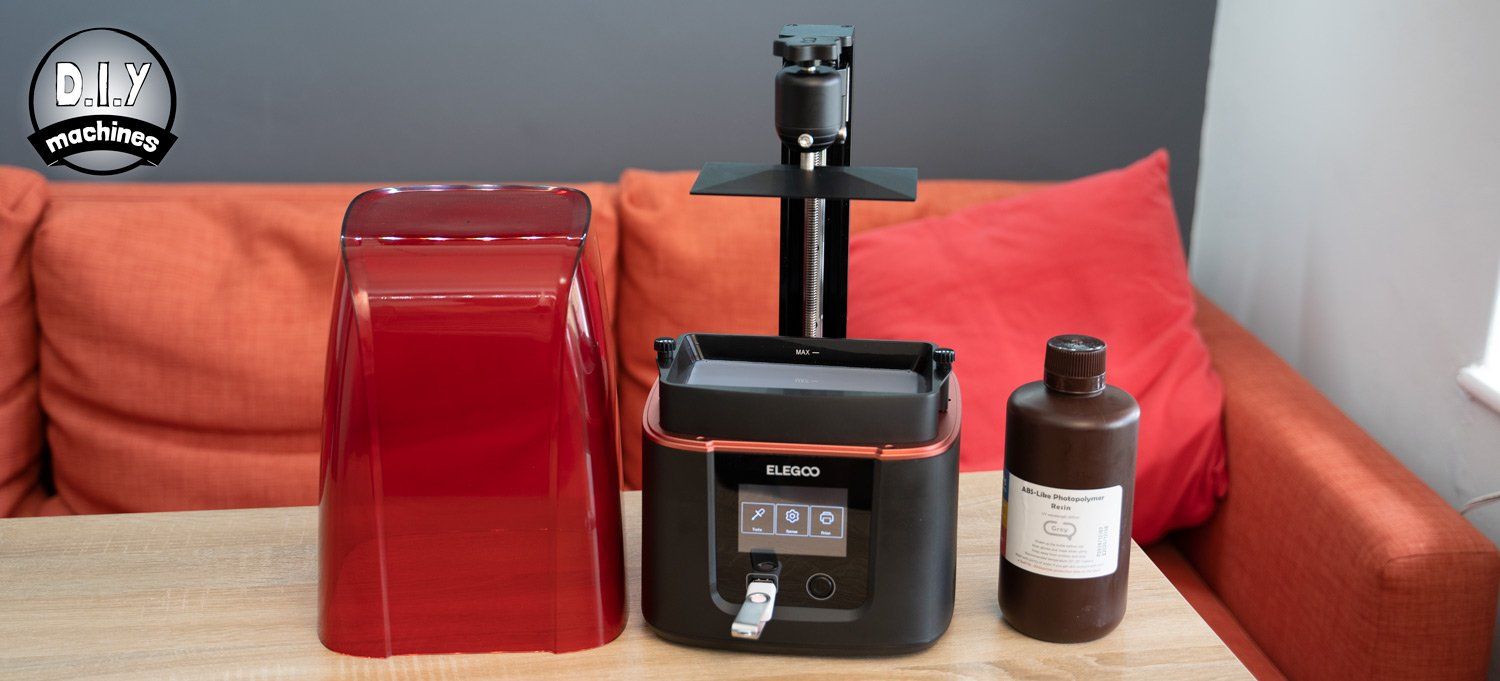
There is also a small box at the base of the printer which includes a selection of well packed accessories...
What else is included?
With the exception of some resin to print with and some alcohol to clean the print with after printing, everything else you will need for your first prints are included. Elegoo and other manufacturers omit the two mentioned liquids as they complicate shipping when bundled in with the electronic device. Here is what they have included with the printer for you:
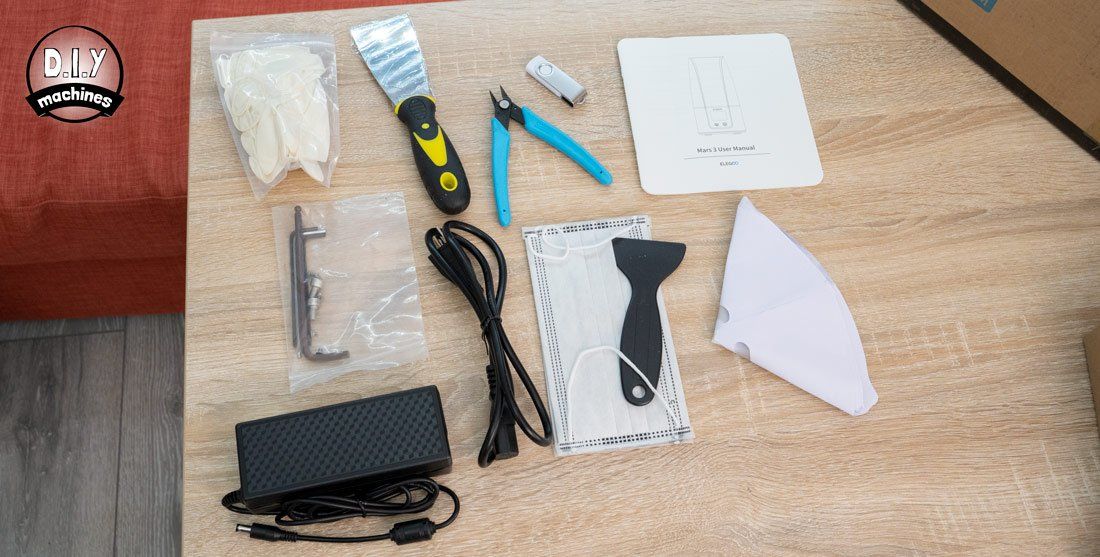
- Protective face mask
- USB Disk (preloaded with demo print, electronic copy of user manual and slicing software)
- Printed setup and user manual
- A few pairs of disposable gloves
- A plastic scraper
- A stainless steel scraper
- Allen keys
- Flush cutters (for removing supports)
- Some resin filter funnels
- Spare screws and bolts
- Stainless steel scraper (for removing prints)
- Power supply
I would also recommend treating yourself to some protective eye wear if you don't already have some. I don't know about you, but I'm already on my last pair of eyes so want to take good care of them.
Assembly
Despite having some allen keys, screws, and bolts included in the package there is almost no assembly to write about. It mostly involves removing the foam sheets and plastic protection from the various parts. Other than having someones else visit your house and unpack the printer for you it doesn't get much easier than this!
Instruction manual
The instructions are swift and concise. Of course you'll find the occasional Chinese to English mistranslation but it's part of the fun. You can download a copy of the instructions to see for yourself if you would like, I've put a link to it adjacent for you. There are also numerous Youtube videos available.
First prints and impressions
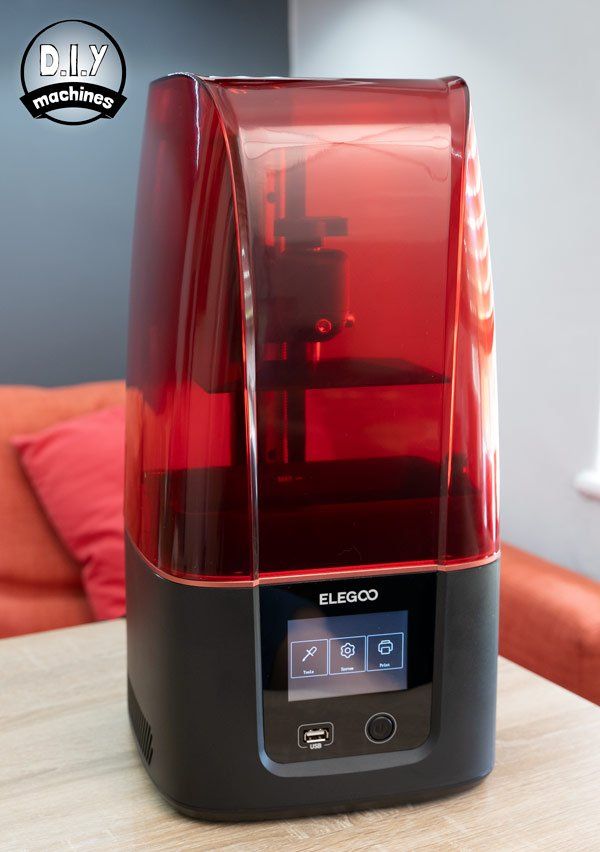
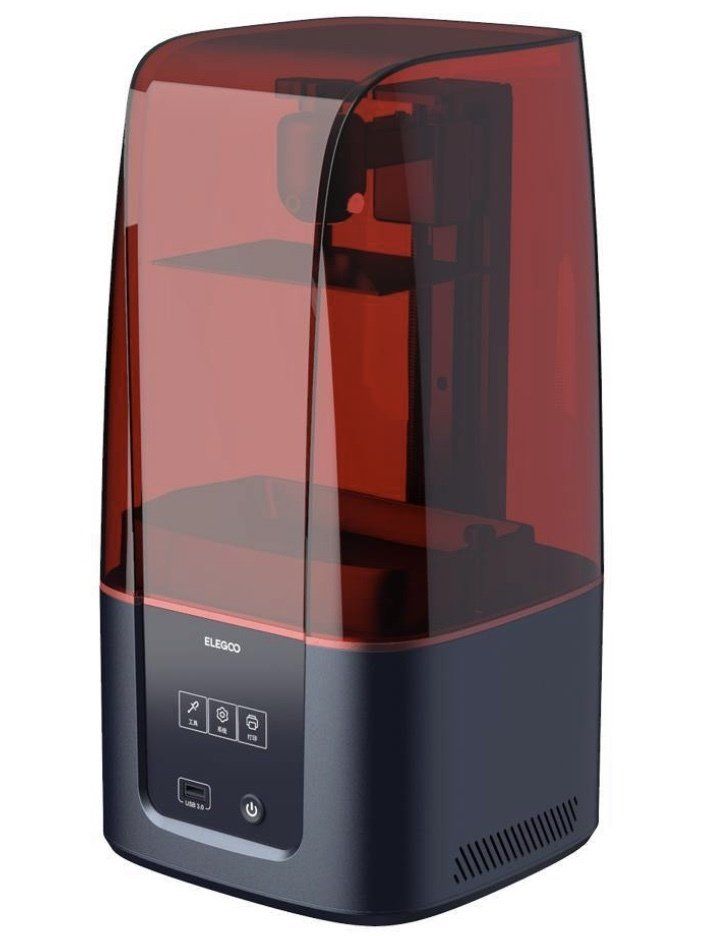
Before turning the printer on I should comment on the shape of this machine. I know the new aesthetic design will divide opinions but I find it a refreshing change from the more boxed shapes of most other resin printers in this price range.
Though despite the added curves and arches making it more reminiscent of Space X's Dragon capsule, the area containing the touchscreen controls, power button, and USB port seems simpler and more prominent.
The power connection is at the rear of the machine and a series of air vents can be found at both sides for keeping the very large and bright COB light source cool while it does its thing.
Fans can be heard at a constant volume immediately after powering on the machine, though they are at a pitch and volume which is easily ignored. I wouldn't want to sleep in the same room as it, but otherwise the volume is acceptable.
Levelling the print bed
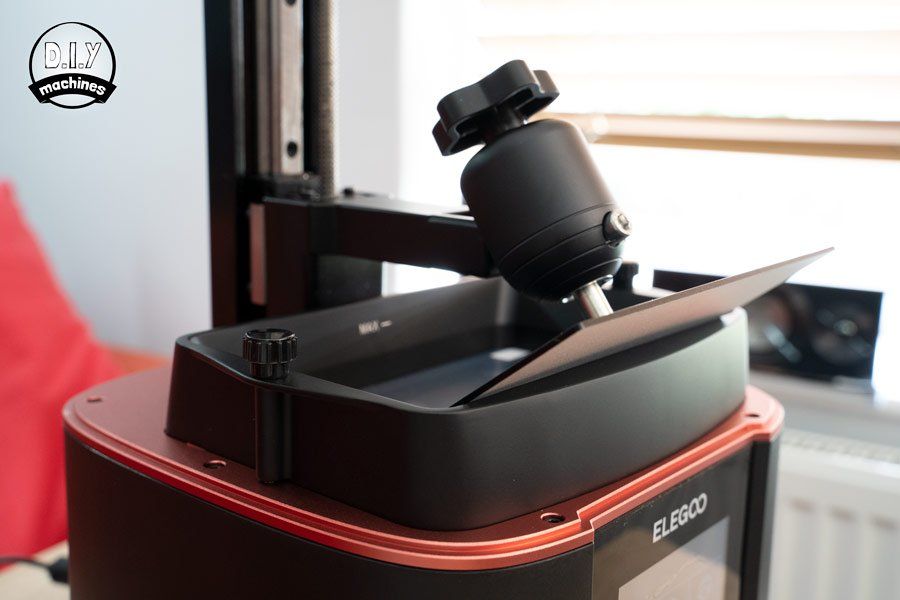
It seems that every printer, no matter its method for creating a 3D object, needs its bed levelled at some stage or another. Thankfully it's a relatively easy affair on the Mars 3.
It's a simple case of removing the resin tank using the two thumbscrews on either side then adding a sheet of paper on top of the screen. Slide the build plate onto the arm of the printer and tighten using the giant knob up top. We can then loosen the two silver bolts just above the build platform so that it can freely move. The Allen key you'll need is included.
Start the homing sequence using the onscreen controls and watch as the machine lowers the platform onto the sheet of paper. Use one hand to hold the platform flat and square onto of the paper as you re-tighten the two bolts.
As long as the paper can be pulled out with some resistance your done. Otherwise raise or lower the platform using the onscreen controls and tug at the paper again until you feel the right level of resistance.

Adding resin and printing
The first print I started was the included rook torture test. As this was already on the memory stick I poured some of Elegoo's own Grey 'ABS-like' resin into the tank (after donning on some gloves) up to just below the max fill line after shaking the contents of the bottle carefully. After navigating to the print on the LCD display I selected it, pressed print and away it went.

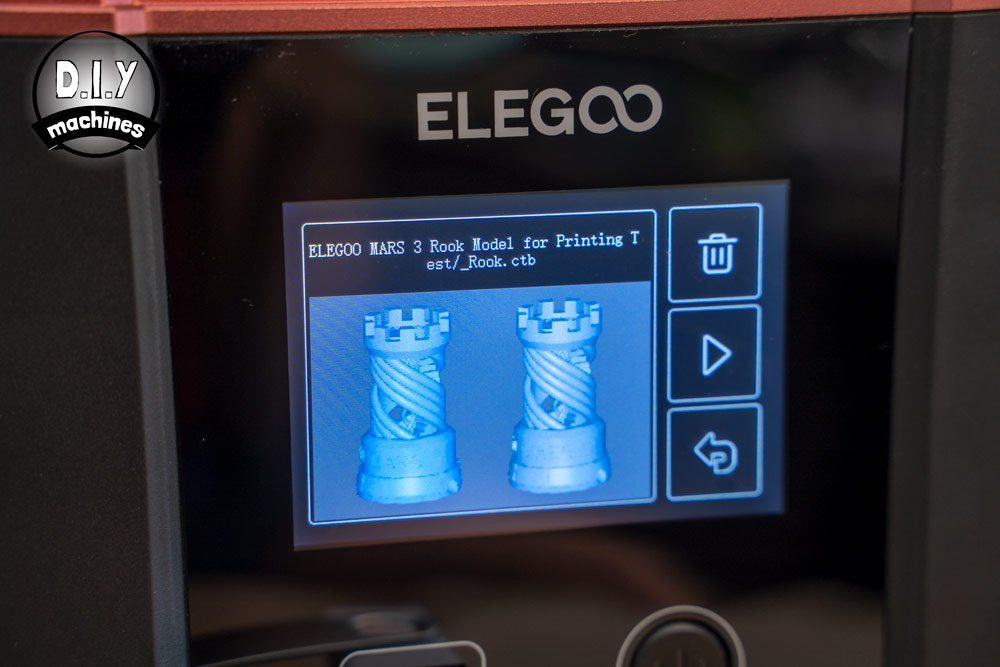
During the printing the display shows the current curing image being emitted on the print screen, the elapsed and remaining time along with the current layer height.
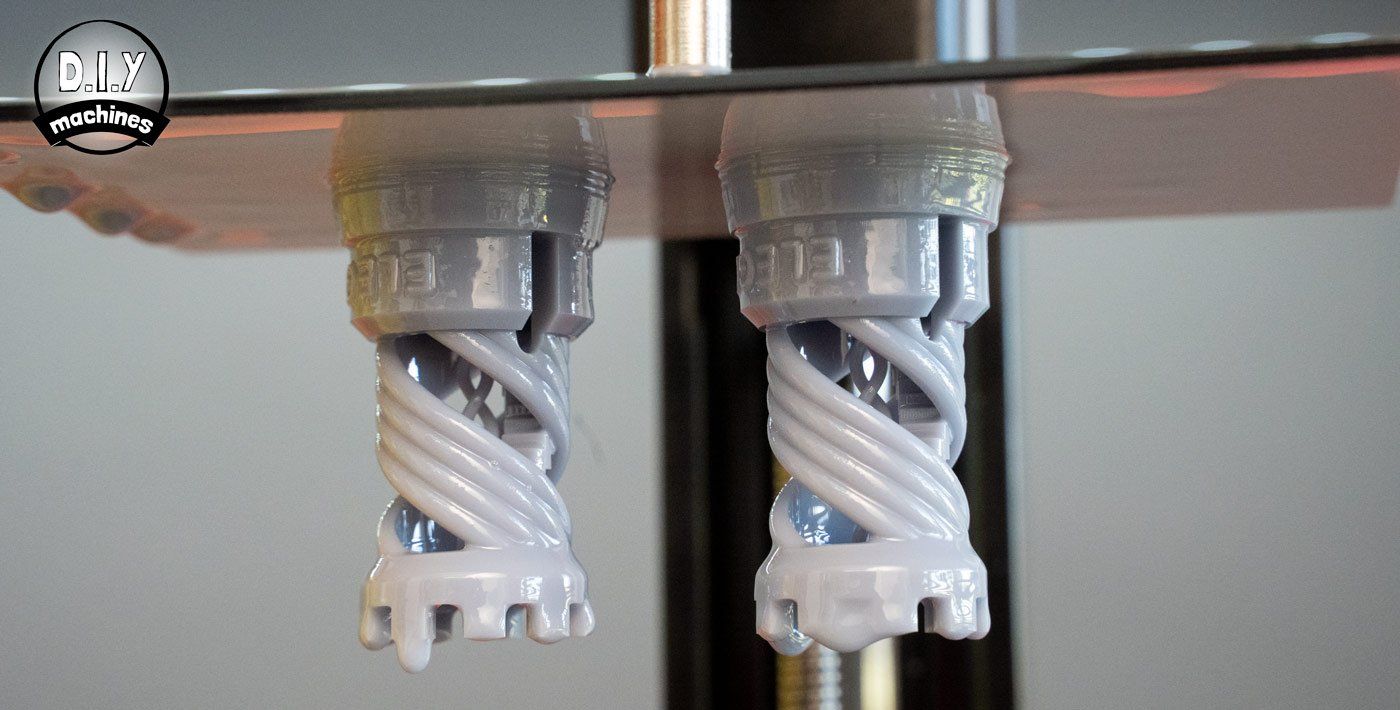
My first attempt at the test print failed after about 30 minutes. Both rooks had detached from the build plate and were attached to the FEP film submerged in the resin tank. To resolve this I used one of the filters to filter the contents of the resin tank back into the bottle whilst catching any miss prints. This revealed the two failed prints (sorry I forgot to take some photos of this stage). I carefully used the included plastic scraper to persuade them to release from the FEP film which was easily done.
Whilst the remaining resin filtered back into the bottle I used some alcohol and tissue to clean the build plate. Once this dried I returned the resin to the vat from the bottle and tried a second time. This was a success and I believe I should have cleaned the build plate with alcohol from my first print, perhaps it had some residue left on it from the manufacturing process. Either way, since the first clean it has not failed since.
After the print has completed the prints can be left to drip back into the resin tray for a short while. They then need further cleaning (with alcohol in the case of this resin) and then curing. Once this is complete you can examine the prints. Take a look at them in the below images and make your own mind up - then I'll tell you what I think. (They can be clicked on to be enlarged so you can really judge them).
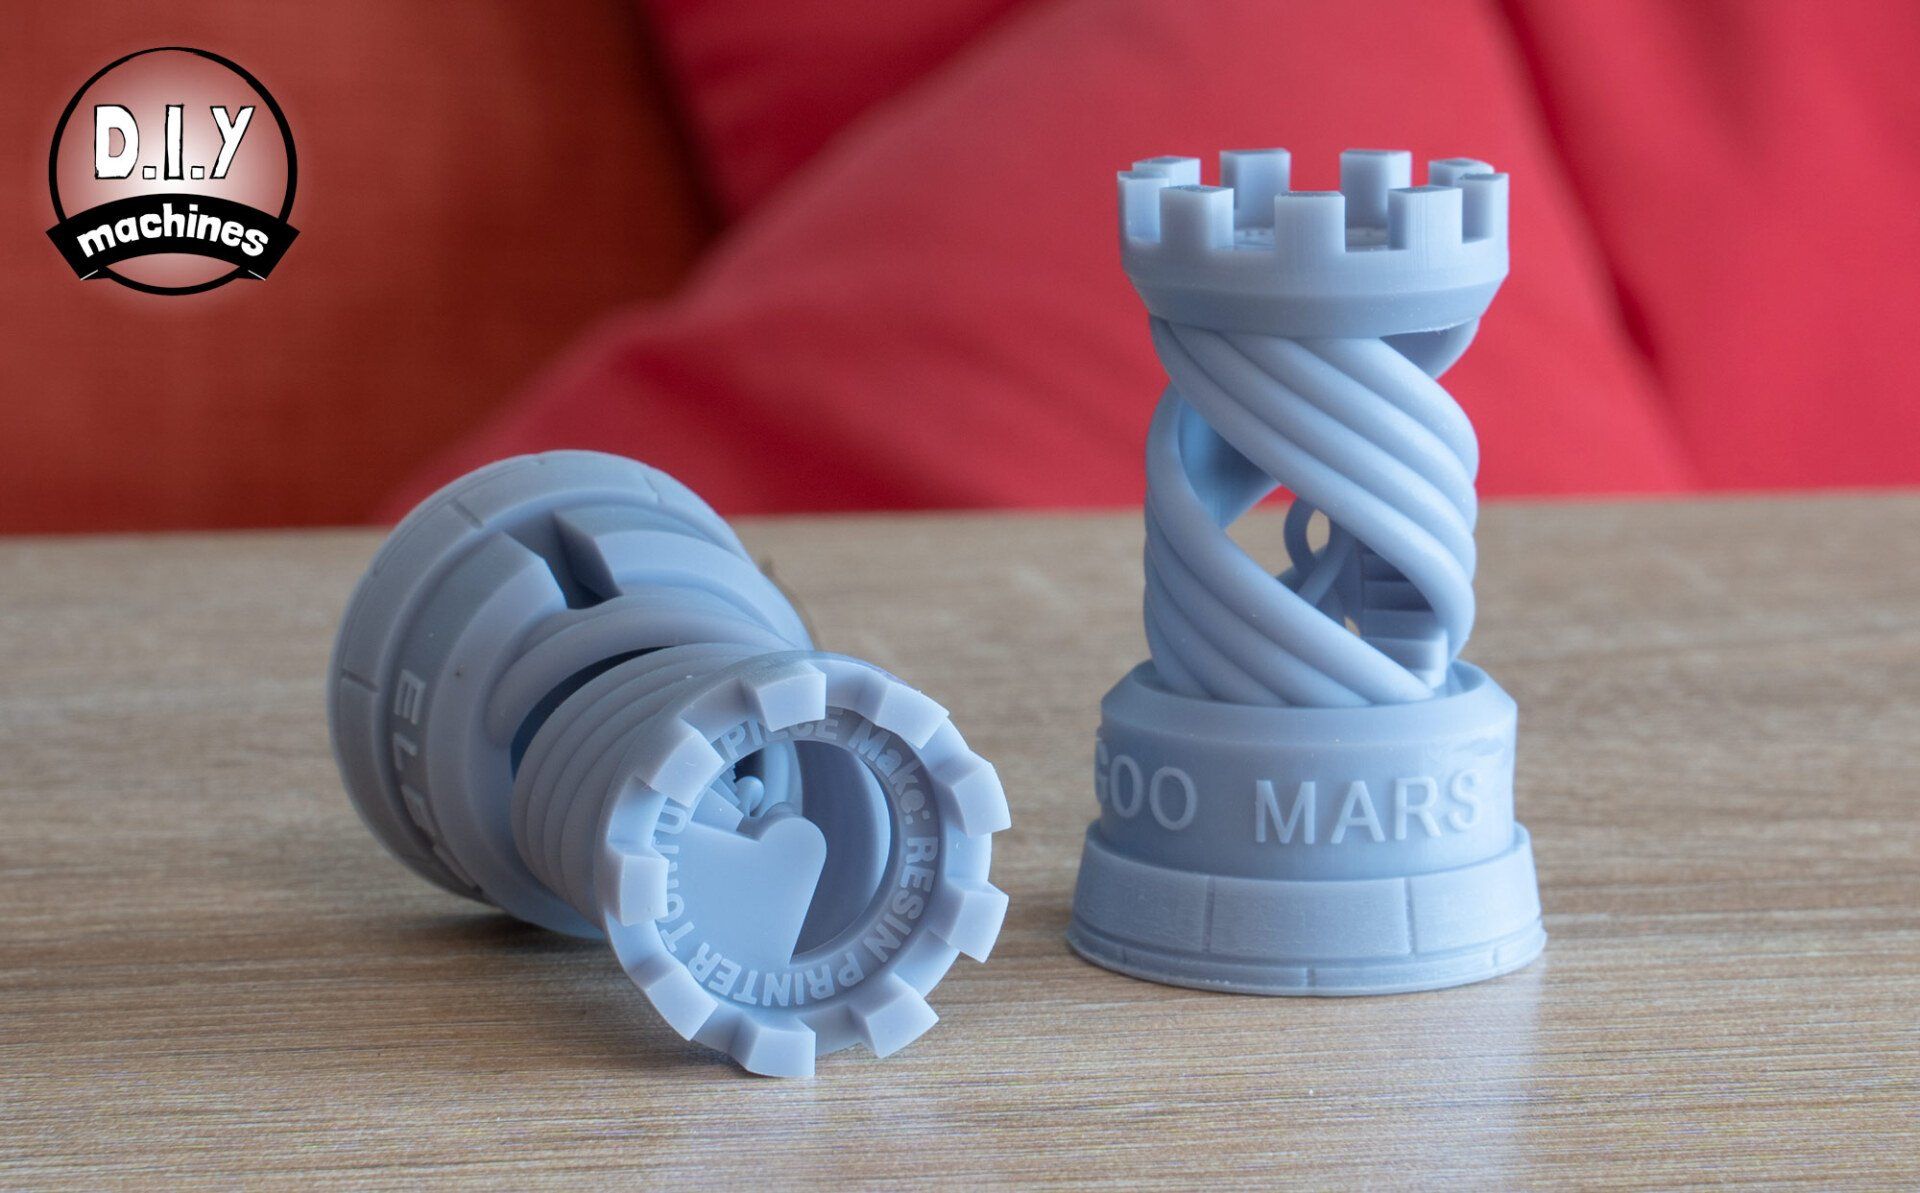
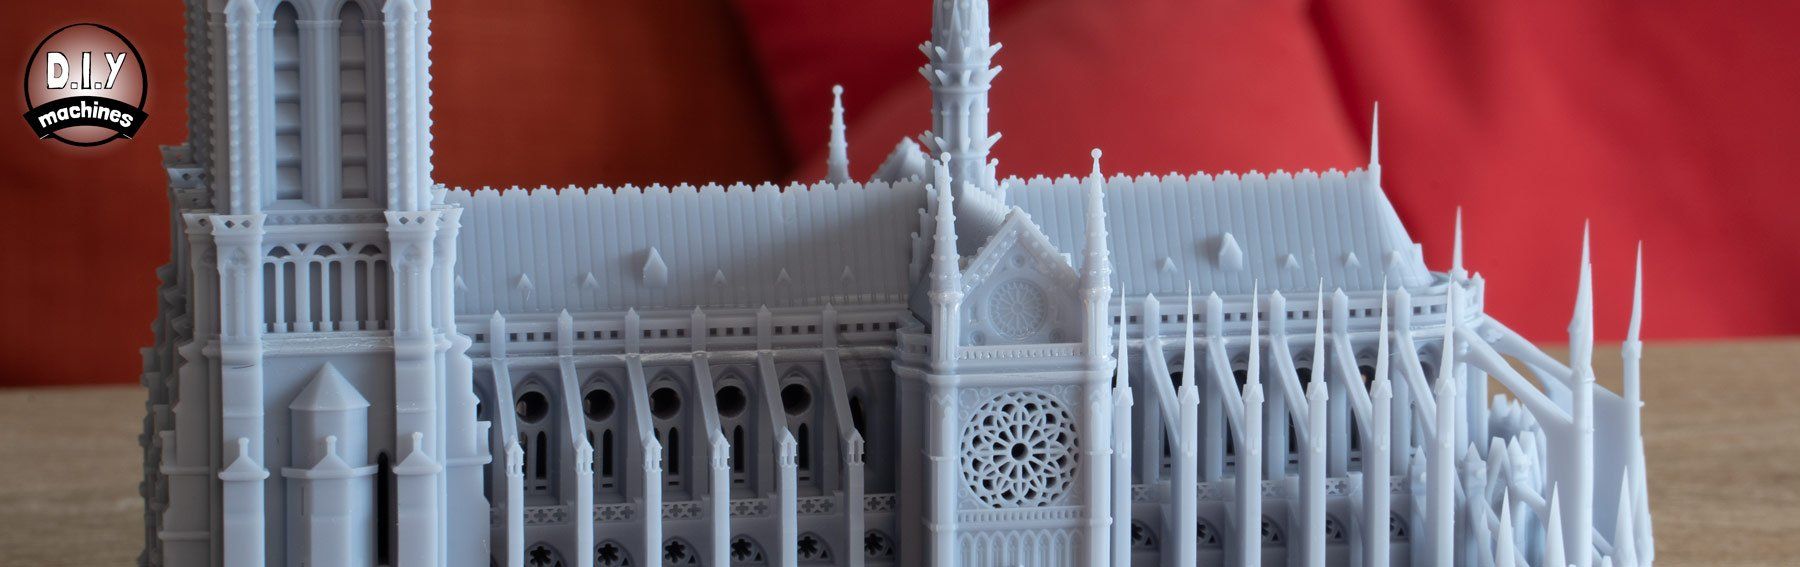
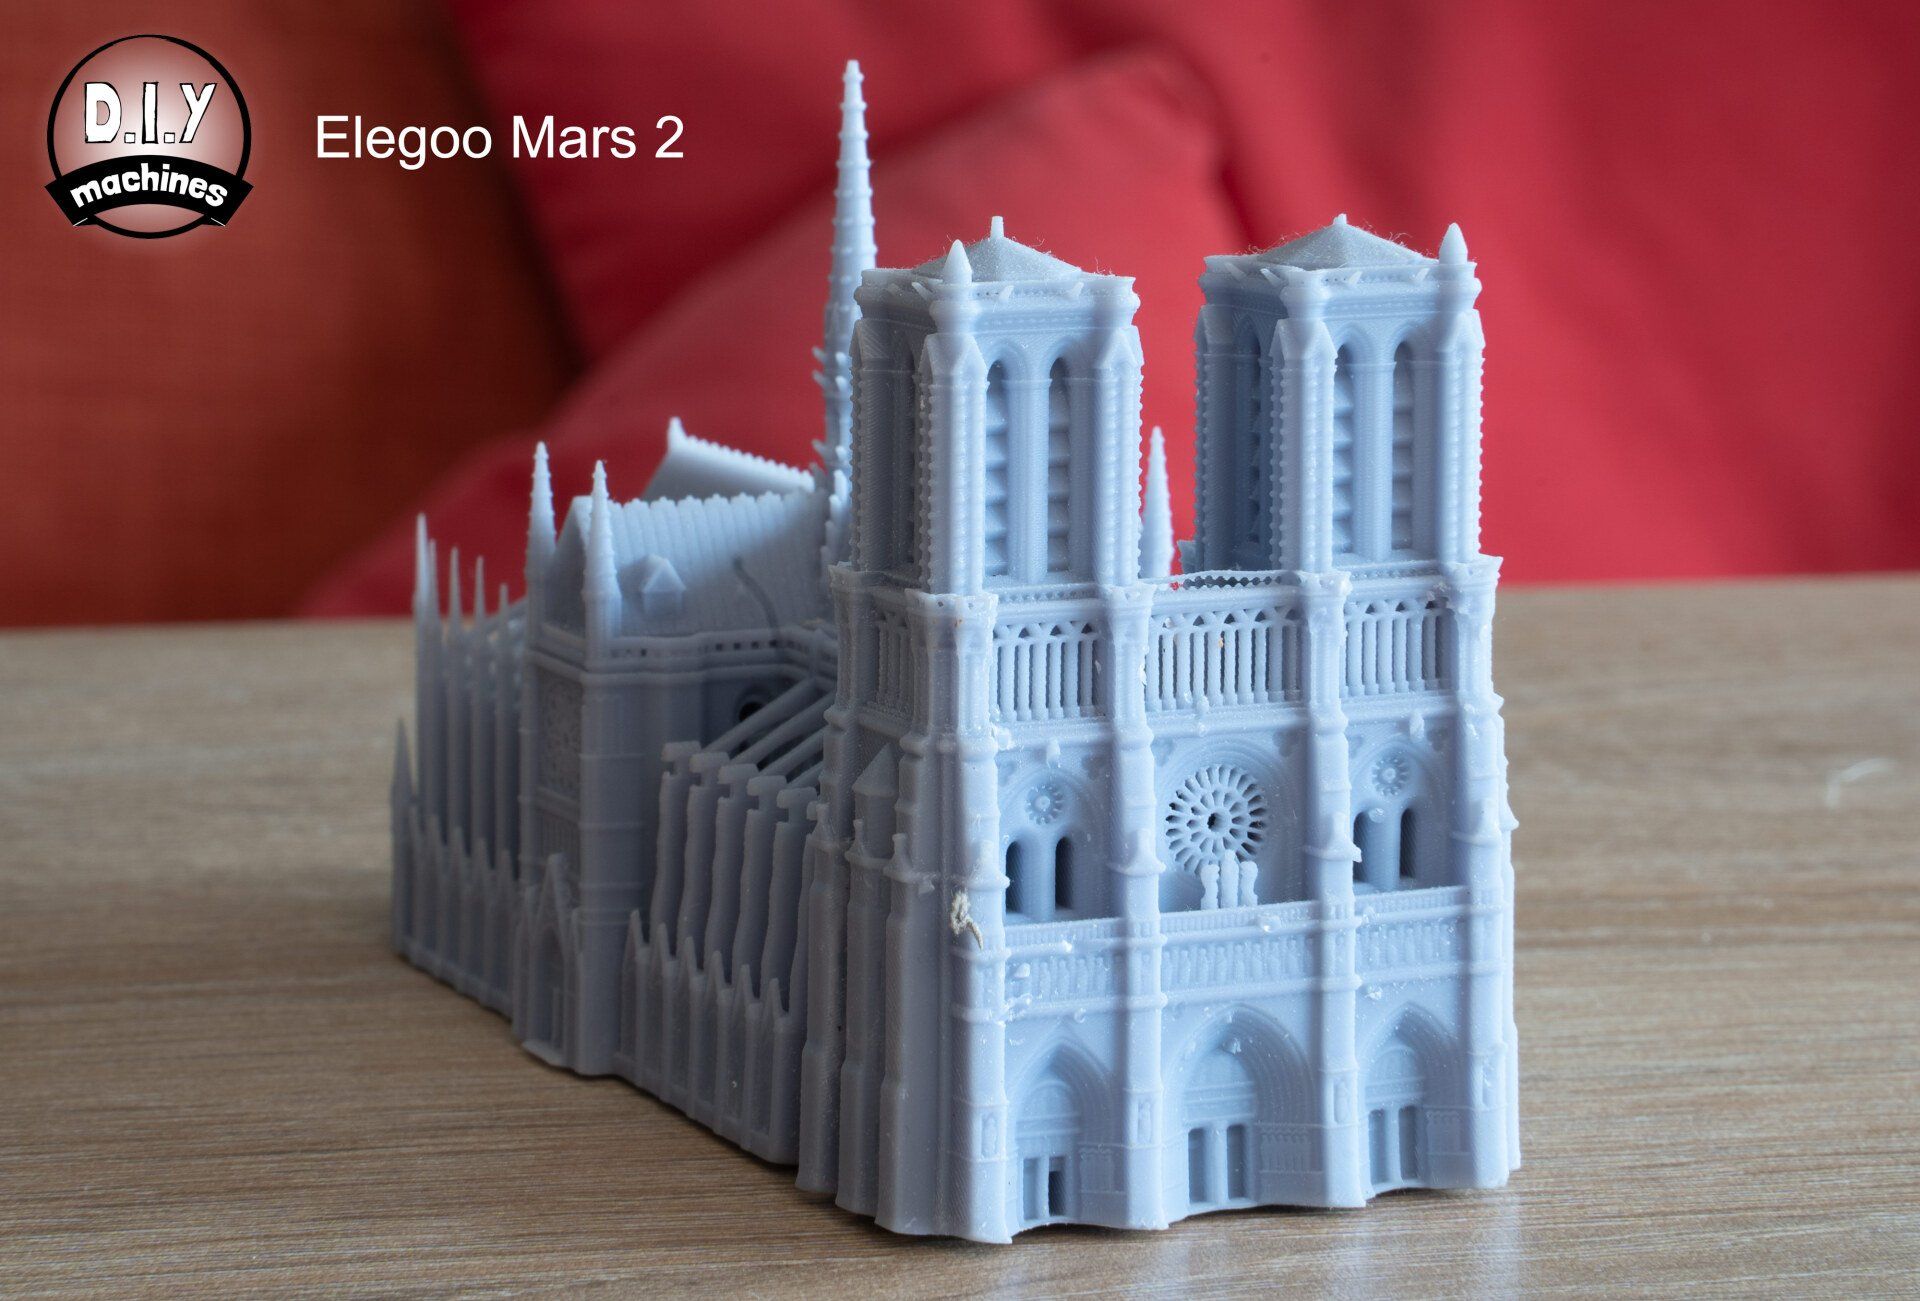
I think they look fantastic - especially the text on the top of the tower. It is very crisp and legible. I decided to print another print - the Cathédrale Notre-Dame de Paris. The model is detailed and I have one which I had printed on the predecessor to this printer - the Elegoo Mars 2. An ideal comparison for anyone who wants to know if it's worth making the upgrade. (Again click to see larger images).
Elegoo Mars 3 ULTRA test prints of Cathédrale Notre-Dame:
Printed with default profile, washed and cured with Elegoo Mercury X bundle


Elegoo Mars 2 test print of Cathédrale Notre-Dame:
Printed with default profile, washed and cured by hand (and a little dusty - sorry)
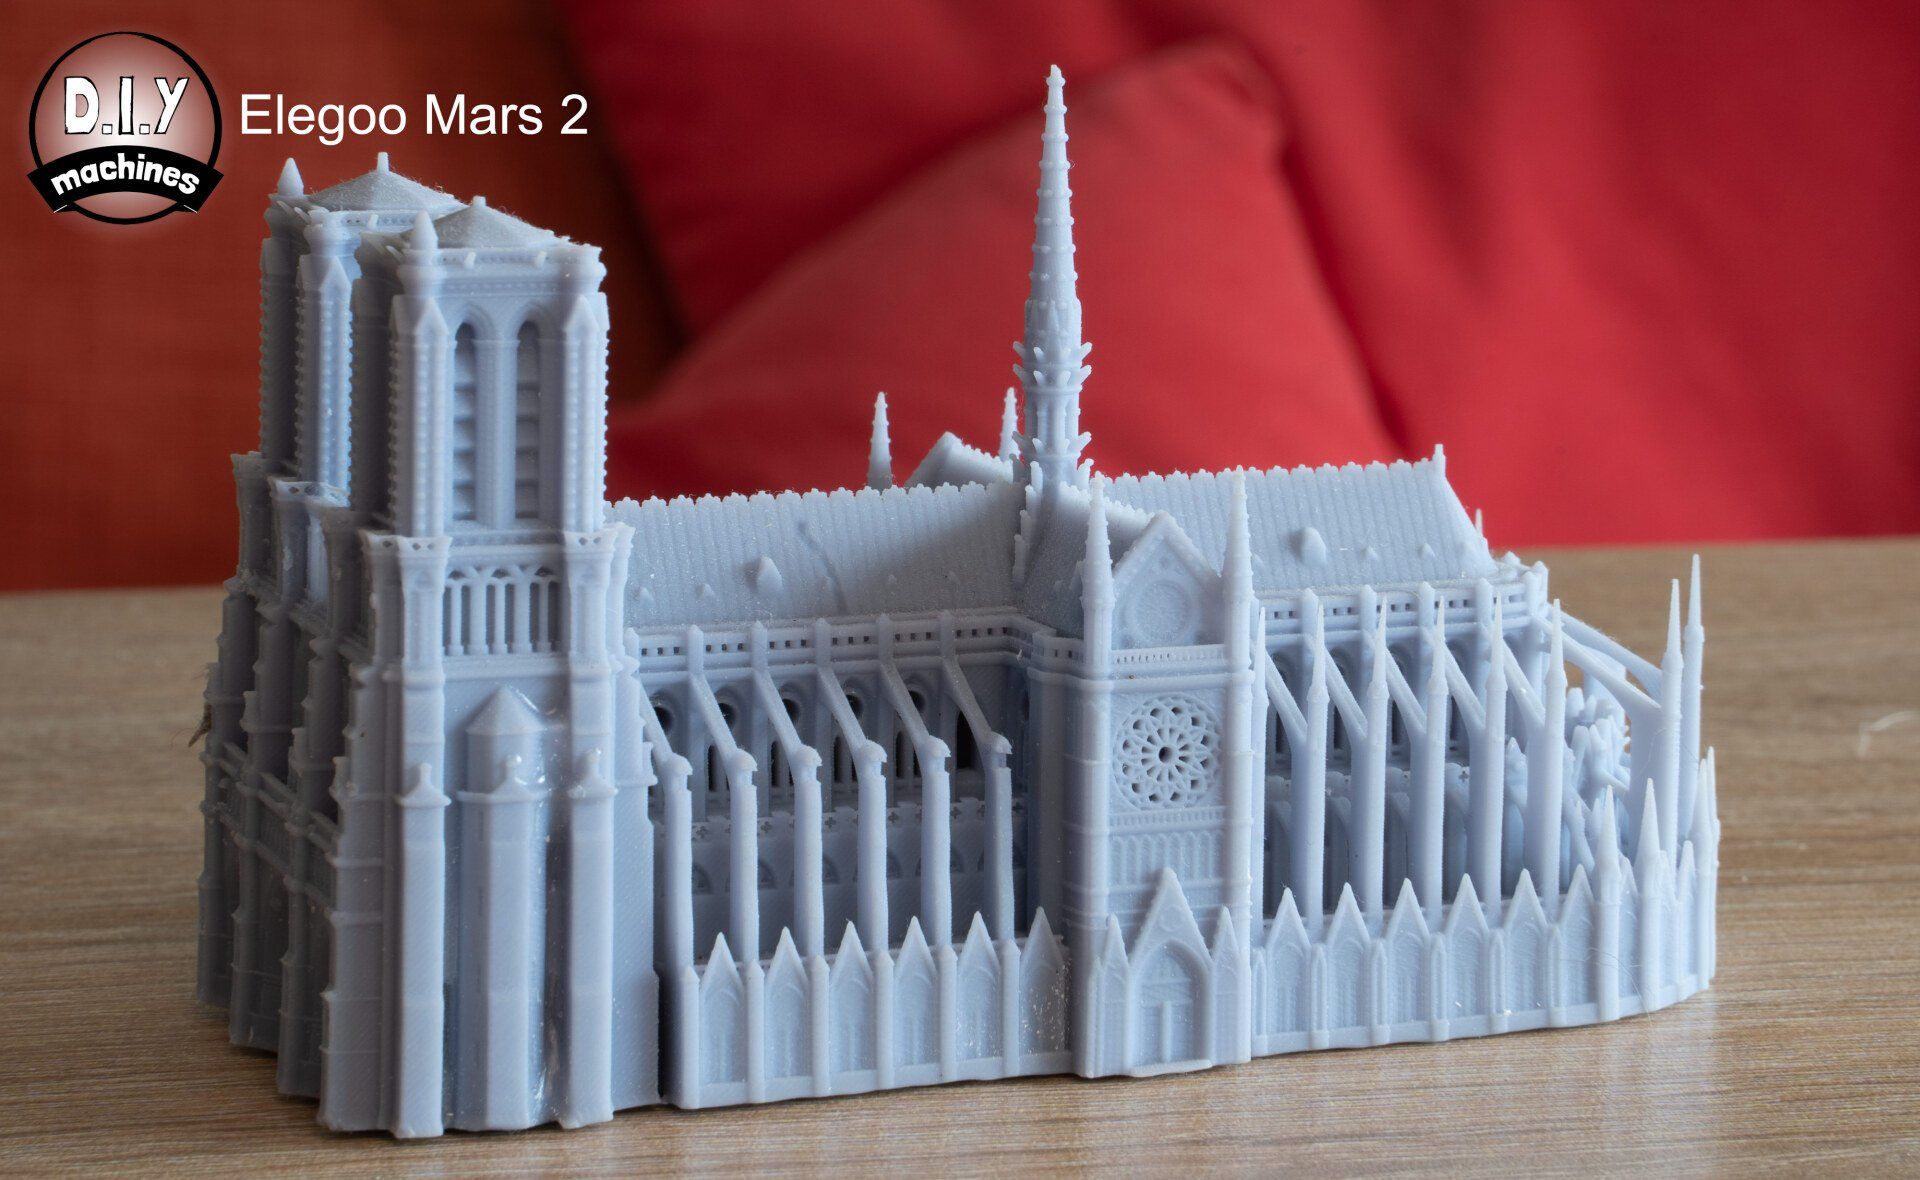

And a side by side comparison:

Something untoward happened in the lower layers of the Mars 3. I'm not sure what caused this but the remainder of the print was unaffected.
It should be mentioned that I have also become more apt at cleaning and curing my resin prints since the model printed on the Mars 2, so bare this in mind when comparing the two. Either way, the improvement in clarity is easily noticeable.
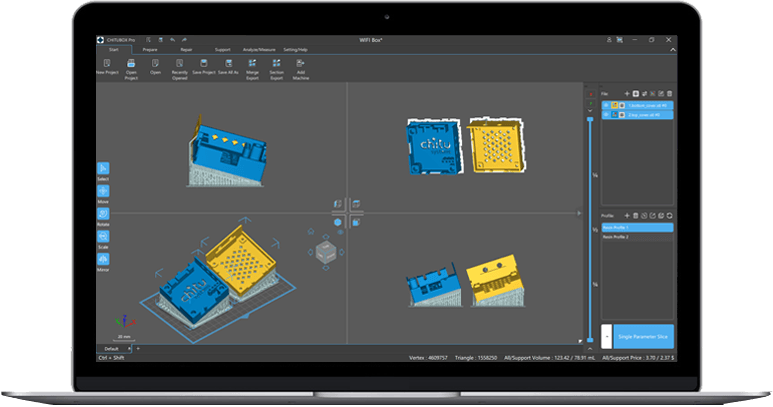
Software - Chitubox Pro (for now)...
A copy of Chitubox Pro (usually 169 USD a year at the time of writing) is included with the printer. The Pro license lasts only for the first year, after which you can either pay the ongoing upgrade fee to keep it or fall back to the standard free tier of Chitubox.
I've used the basic version of Chitubox for several models on my Elegoo Mars 2 and I found it perfectly adequate for preparing the models for printing. However, having tried the Pro version it does have some notable and welcome improvements. Here are a few upgrades in usability:
- The 'Auto Layout' and 'Hollow' tools are more capable when automatically performing the task. The Auto Layout will weaves parts around one another instead of treating each item as filling it's bounding box.
- New tools such as 'Add Tag' allows you to easily add modelled text to an imported 3D file whilst the Boolean Operations allow you to to use more than one model to join too or subtract from another.
- Chitubox pro is more able to process and repair less than perfect models including closing small undesired holes.
- Overhang and island detection is improved.
- Tools have been added for measuring and analysing your model inside the slider with greater accuracy.
These features are welcome and worthwhile if you use your printer regularly or for high value modelling. Personally I will be falling back to the free tier, I love resin printing but don't do it often enough to warrant the higher price tag after the first year.
Currently, Chitubox is the only slicer that can prepare files for printing on the Elegoo Mars which is something Elegoo are looking to change. Read more about this here: https://www.elegoo.com/blogs/news/elegoo-official-statement-of-the-chitubox-board-firmware-on-mars-3
Final thoughts
I'm primarily a FDM printer user with my Prusa i3 Mk3 being my main workhorse so my experience with resin printers is that of a complete beginner who is about 6 months it on their journey of discovery and awe a what these can achieve.
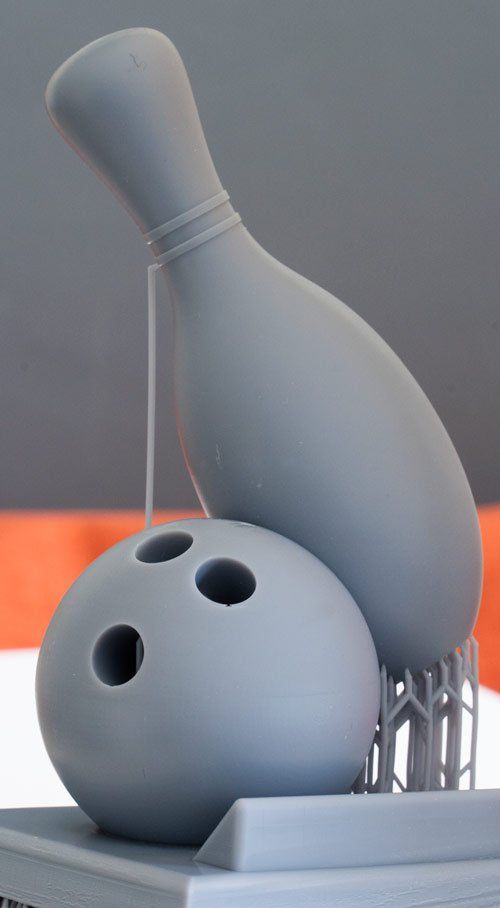
I'm still producing prints. This morning I printed a bowling trophy for a friend and am still astonished at just how smooth and professional the print quality is. This would take many hours of post processing if I had done this on my FDM printer to get the same level of smoothness. It's instantly ready for painting and then gifting.
Anyone who produces miniatures for painting, or is mostly concerned with very high levels of detail should absolutely be using a resin printer, and I can certainly recommend this one. I hope this equivalent resolution per cm is carried over to the larger Elegoo Saturn range.
As for all resin printers, you’ll of course need some items for cleaning and curing the print after printing. So if this is your first foray into resin printing it's not a case of buying just the resin printer, you will also need to figure out how you intend to wash and cure the model to realise it's full potential - but this review is on the resin printer not resin printing in general.
Elegoo and other manufacturers do make machines that can both wash and cure your prints for you. This makes the process much easier. As mentioned earlier, they are also working extremely hard to be the first to market with a non-toxic, easy to print and high quality resin. When this has been achieved I'm sure many more people will adopt a resin printer.
Where to buy:
Technical Details:
| Printing Technology | Mono LCD Resin |
|---|---|
| Print volume | 89.6 x 143.36 x 175mm |
| Layer height | 0.01 - 0.2mm |
| UV Wavelength | 405nm |
| X/Y Resolution | 0.035 (4098*2560px) |
| Control | 3.5 Inch Touch Screen |
| Connectivity | USB |
| Slicing Software | Chitubox Pro (1 year) |
| Printing time | 1.5-3s |
| Z Axis Accuracy | 0.00125mm |
| Weight | 5.2kg |
| Printer Size | 22.7cm x 22.7cm x 43.85cm |


