
Kinetic Sand Art Coffee Table - Self drawing
Easily Build a
MACHINE THAT DESTROYS WHAT IT CREATES
(Kinetic Sand Art Coffee Table)
I’m going to show you exactly how you can easily make your own super cool automated kinetic sand art table step-by-step. Including smart LED lighting
https://www.youtube.com/diymachines
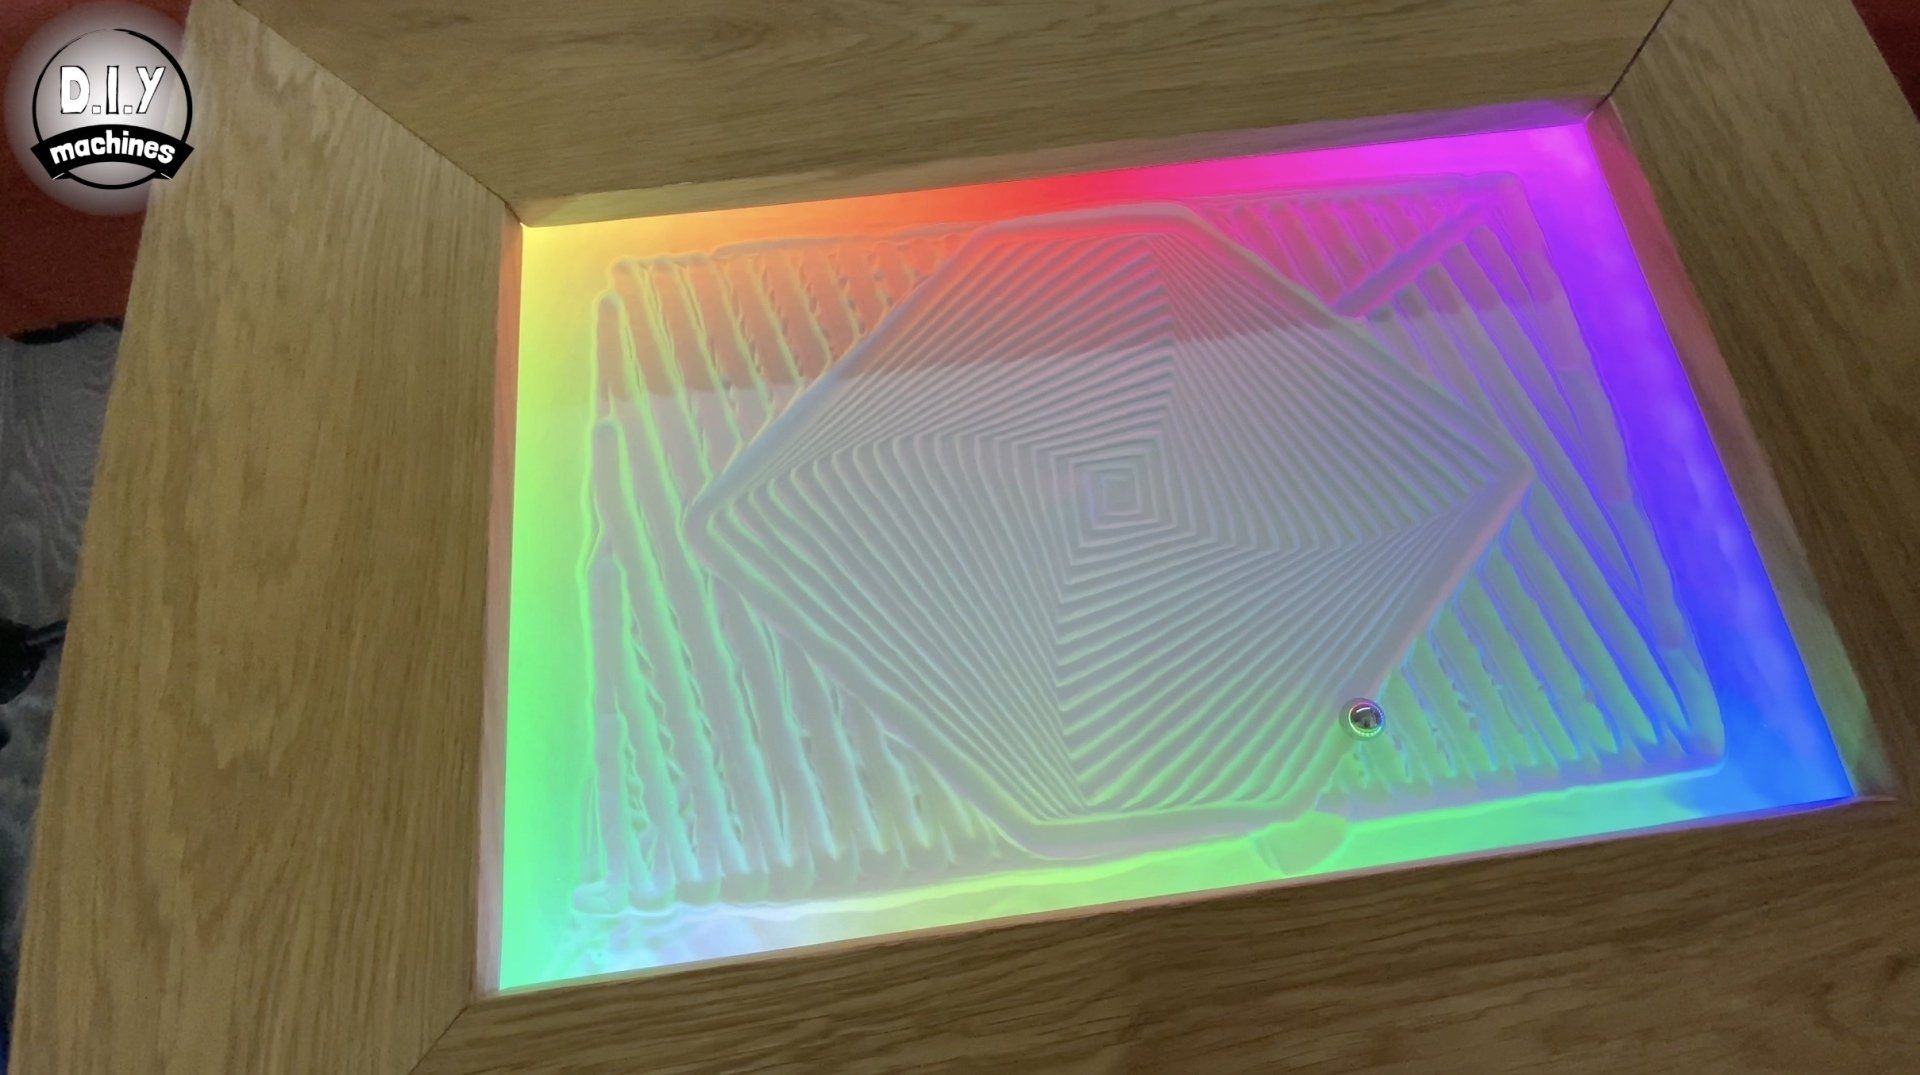
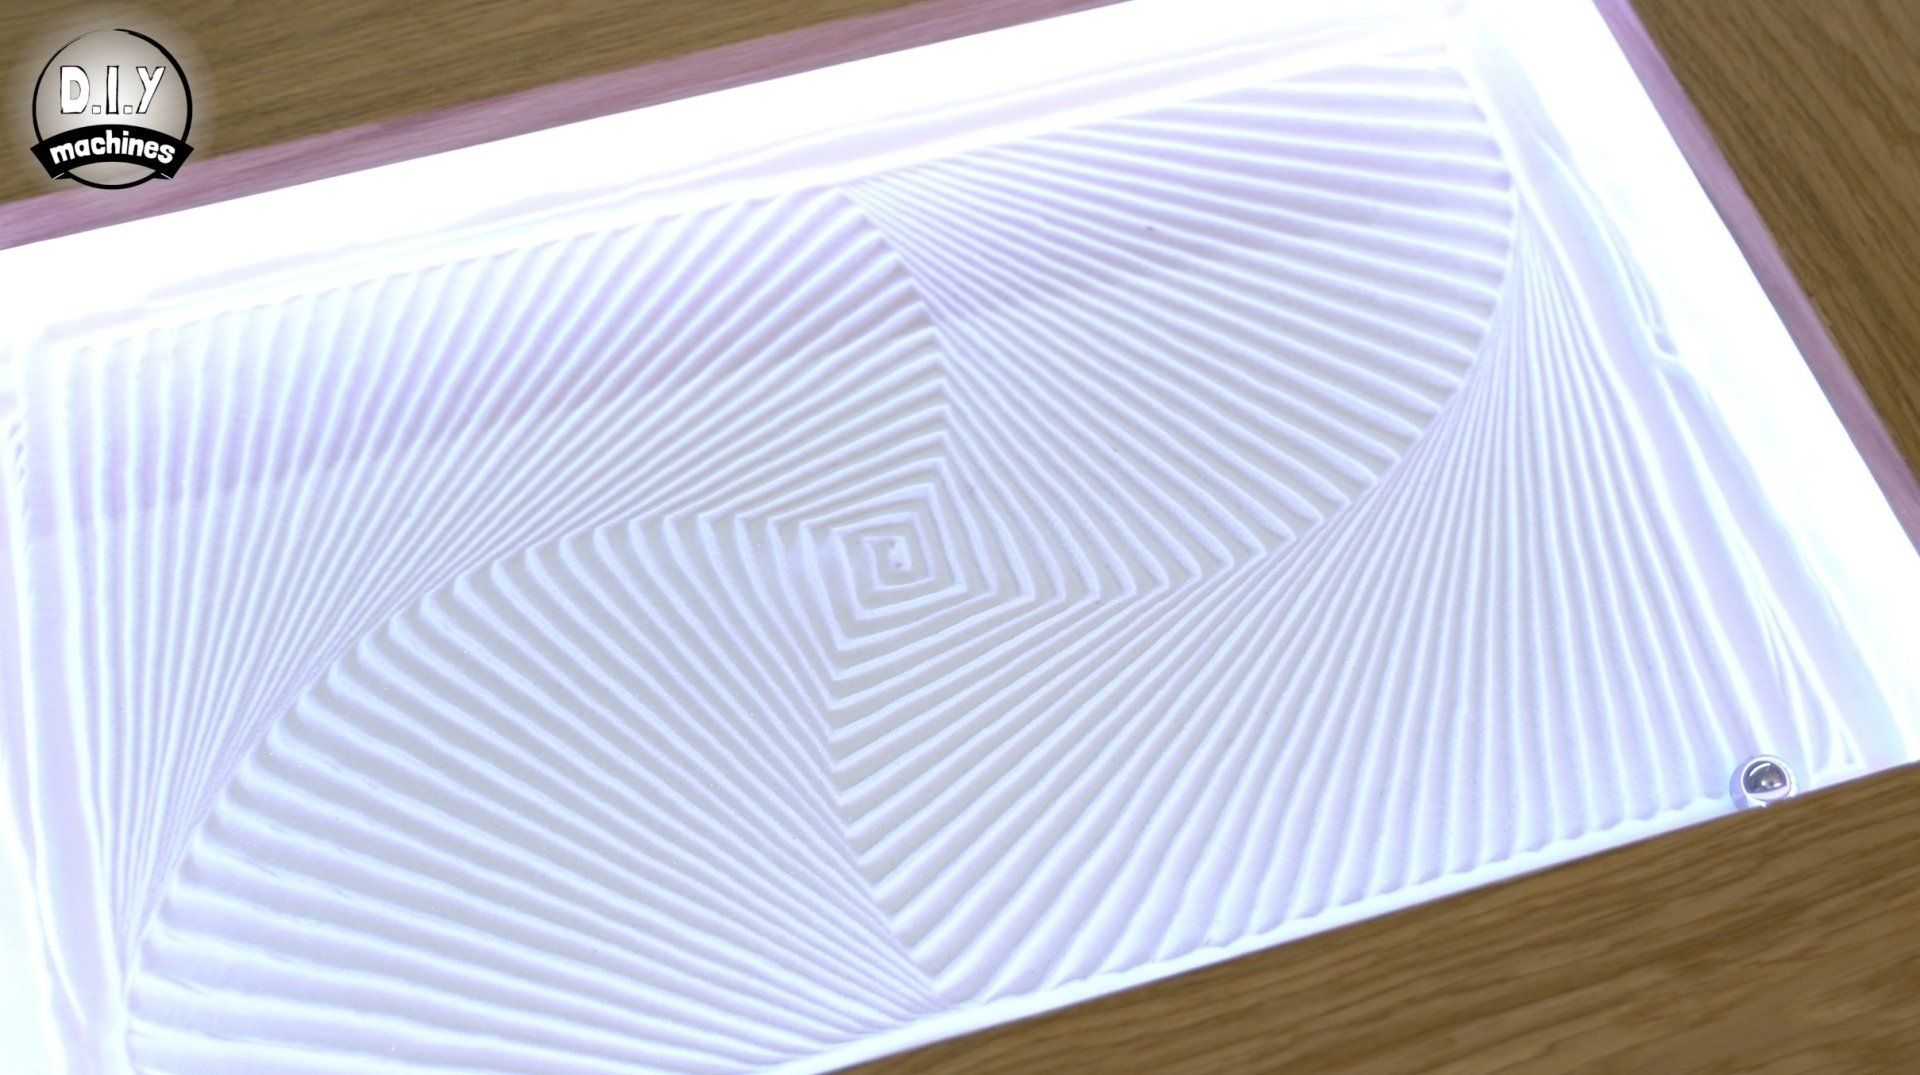
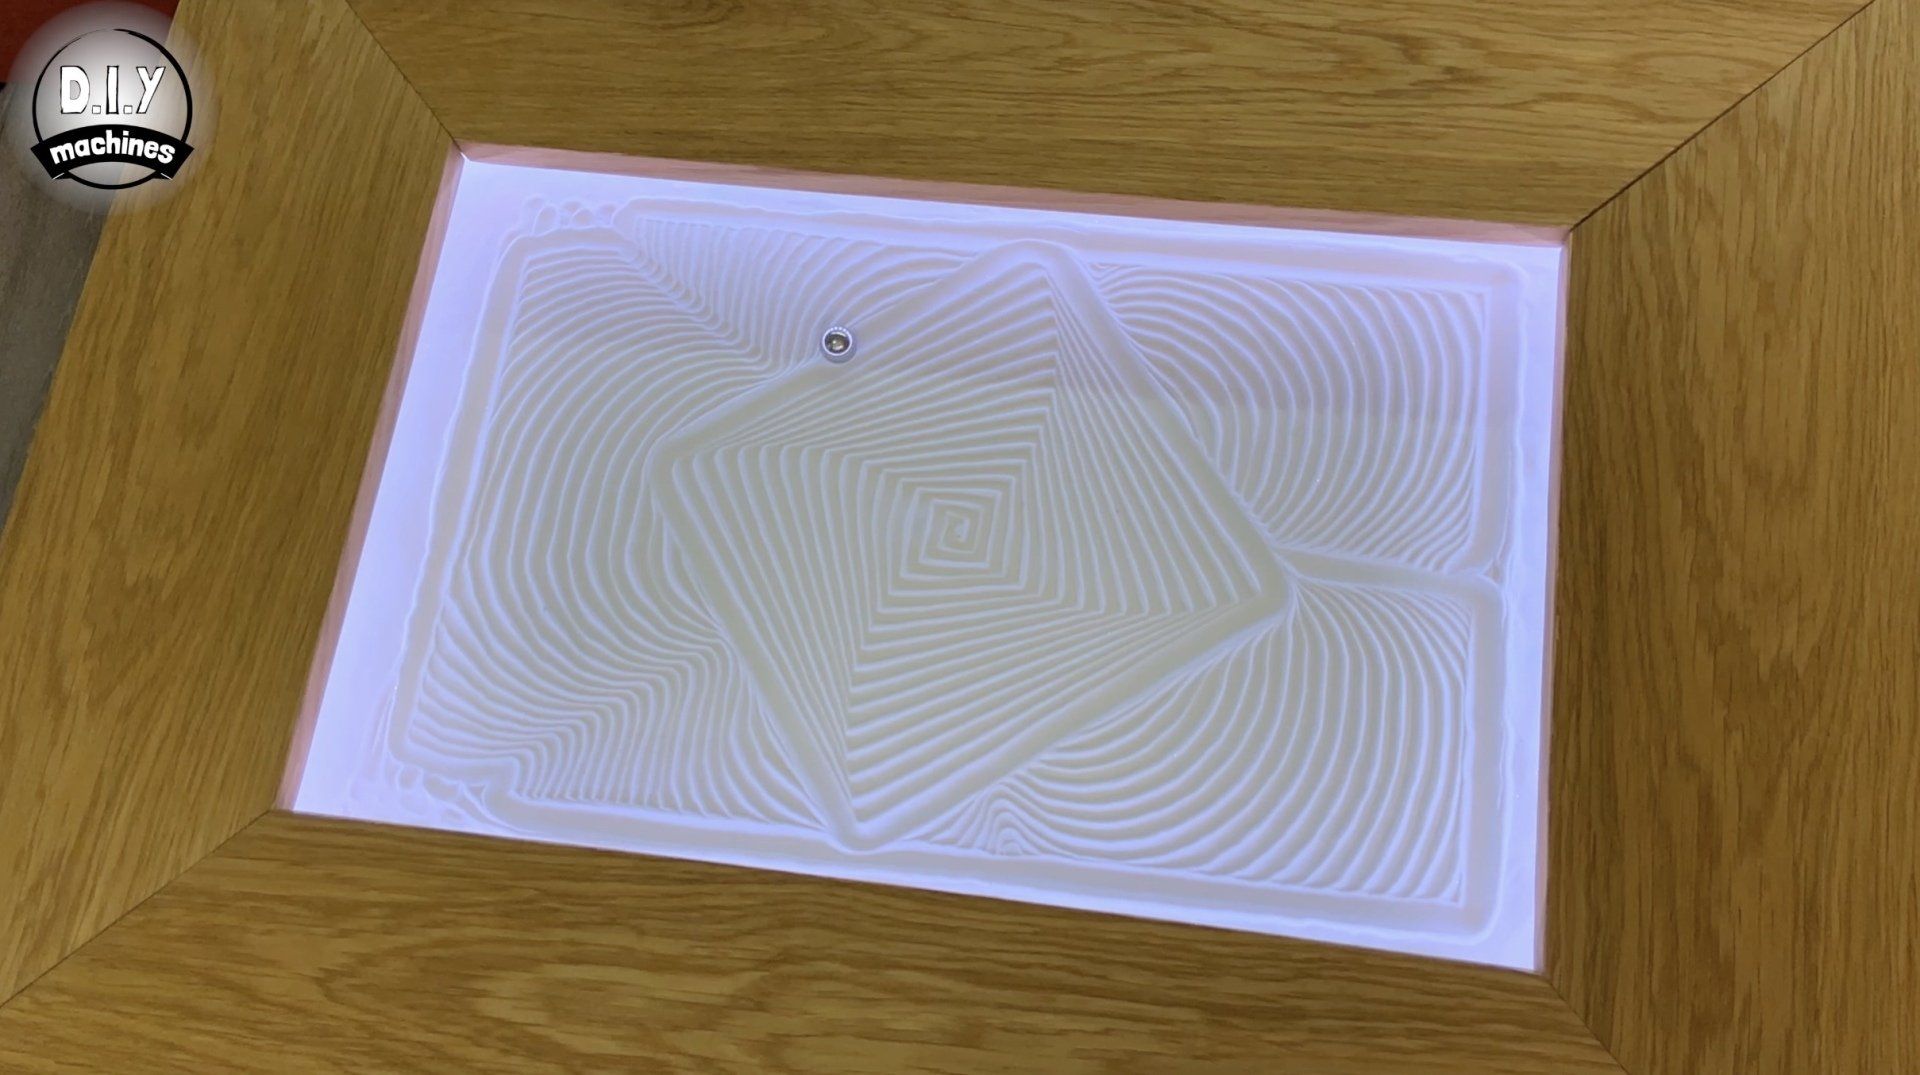
It is incredibly captivating to be beside this simple DIY wooden table as the steel ball magically carves out an endless and ever changing series of beautiful geometric patterns in the sand.


Downloads:
3D models for printing: https://bit.ly/3h34OT0
Fusion 360 model: https://a360.co/3eT8mr3
Code for project and sample drawings: https://github.com/DIY-Machines/Kinetic-Sand-Art-Table
Quantity of 3D printed parts required:
- BaseBoardMount.stl (x1)
- BeltGrip.stl (x1)
- ComputerCase.stl (x1)
- ComputingLid.stl (x1)
- ControlPanel.stl (x1)
- GRBLCase.stl (x1)
- GRBLCaseLid.stl (x1)
- IdleSupport.stl (x2)
- LED-Corner.stl (x4)
- MagnetMount.stl (x1)
- MotorBaseLeft.stl (x1)
- MotorBaseRight.stl (x1)
- PowerPanelCase.stl (x1)
- PowerPanelLid.stl (x1)
- WireLoop.stl (x4)
- X-CarriageMount.stl (x2)
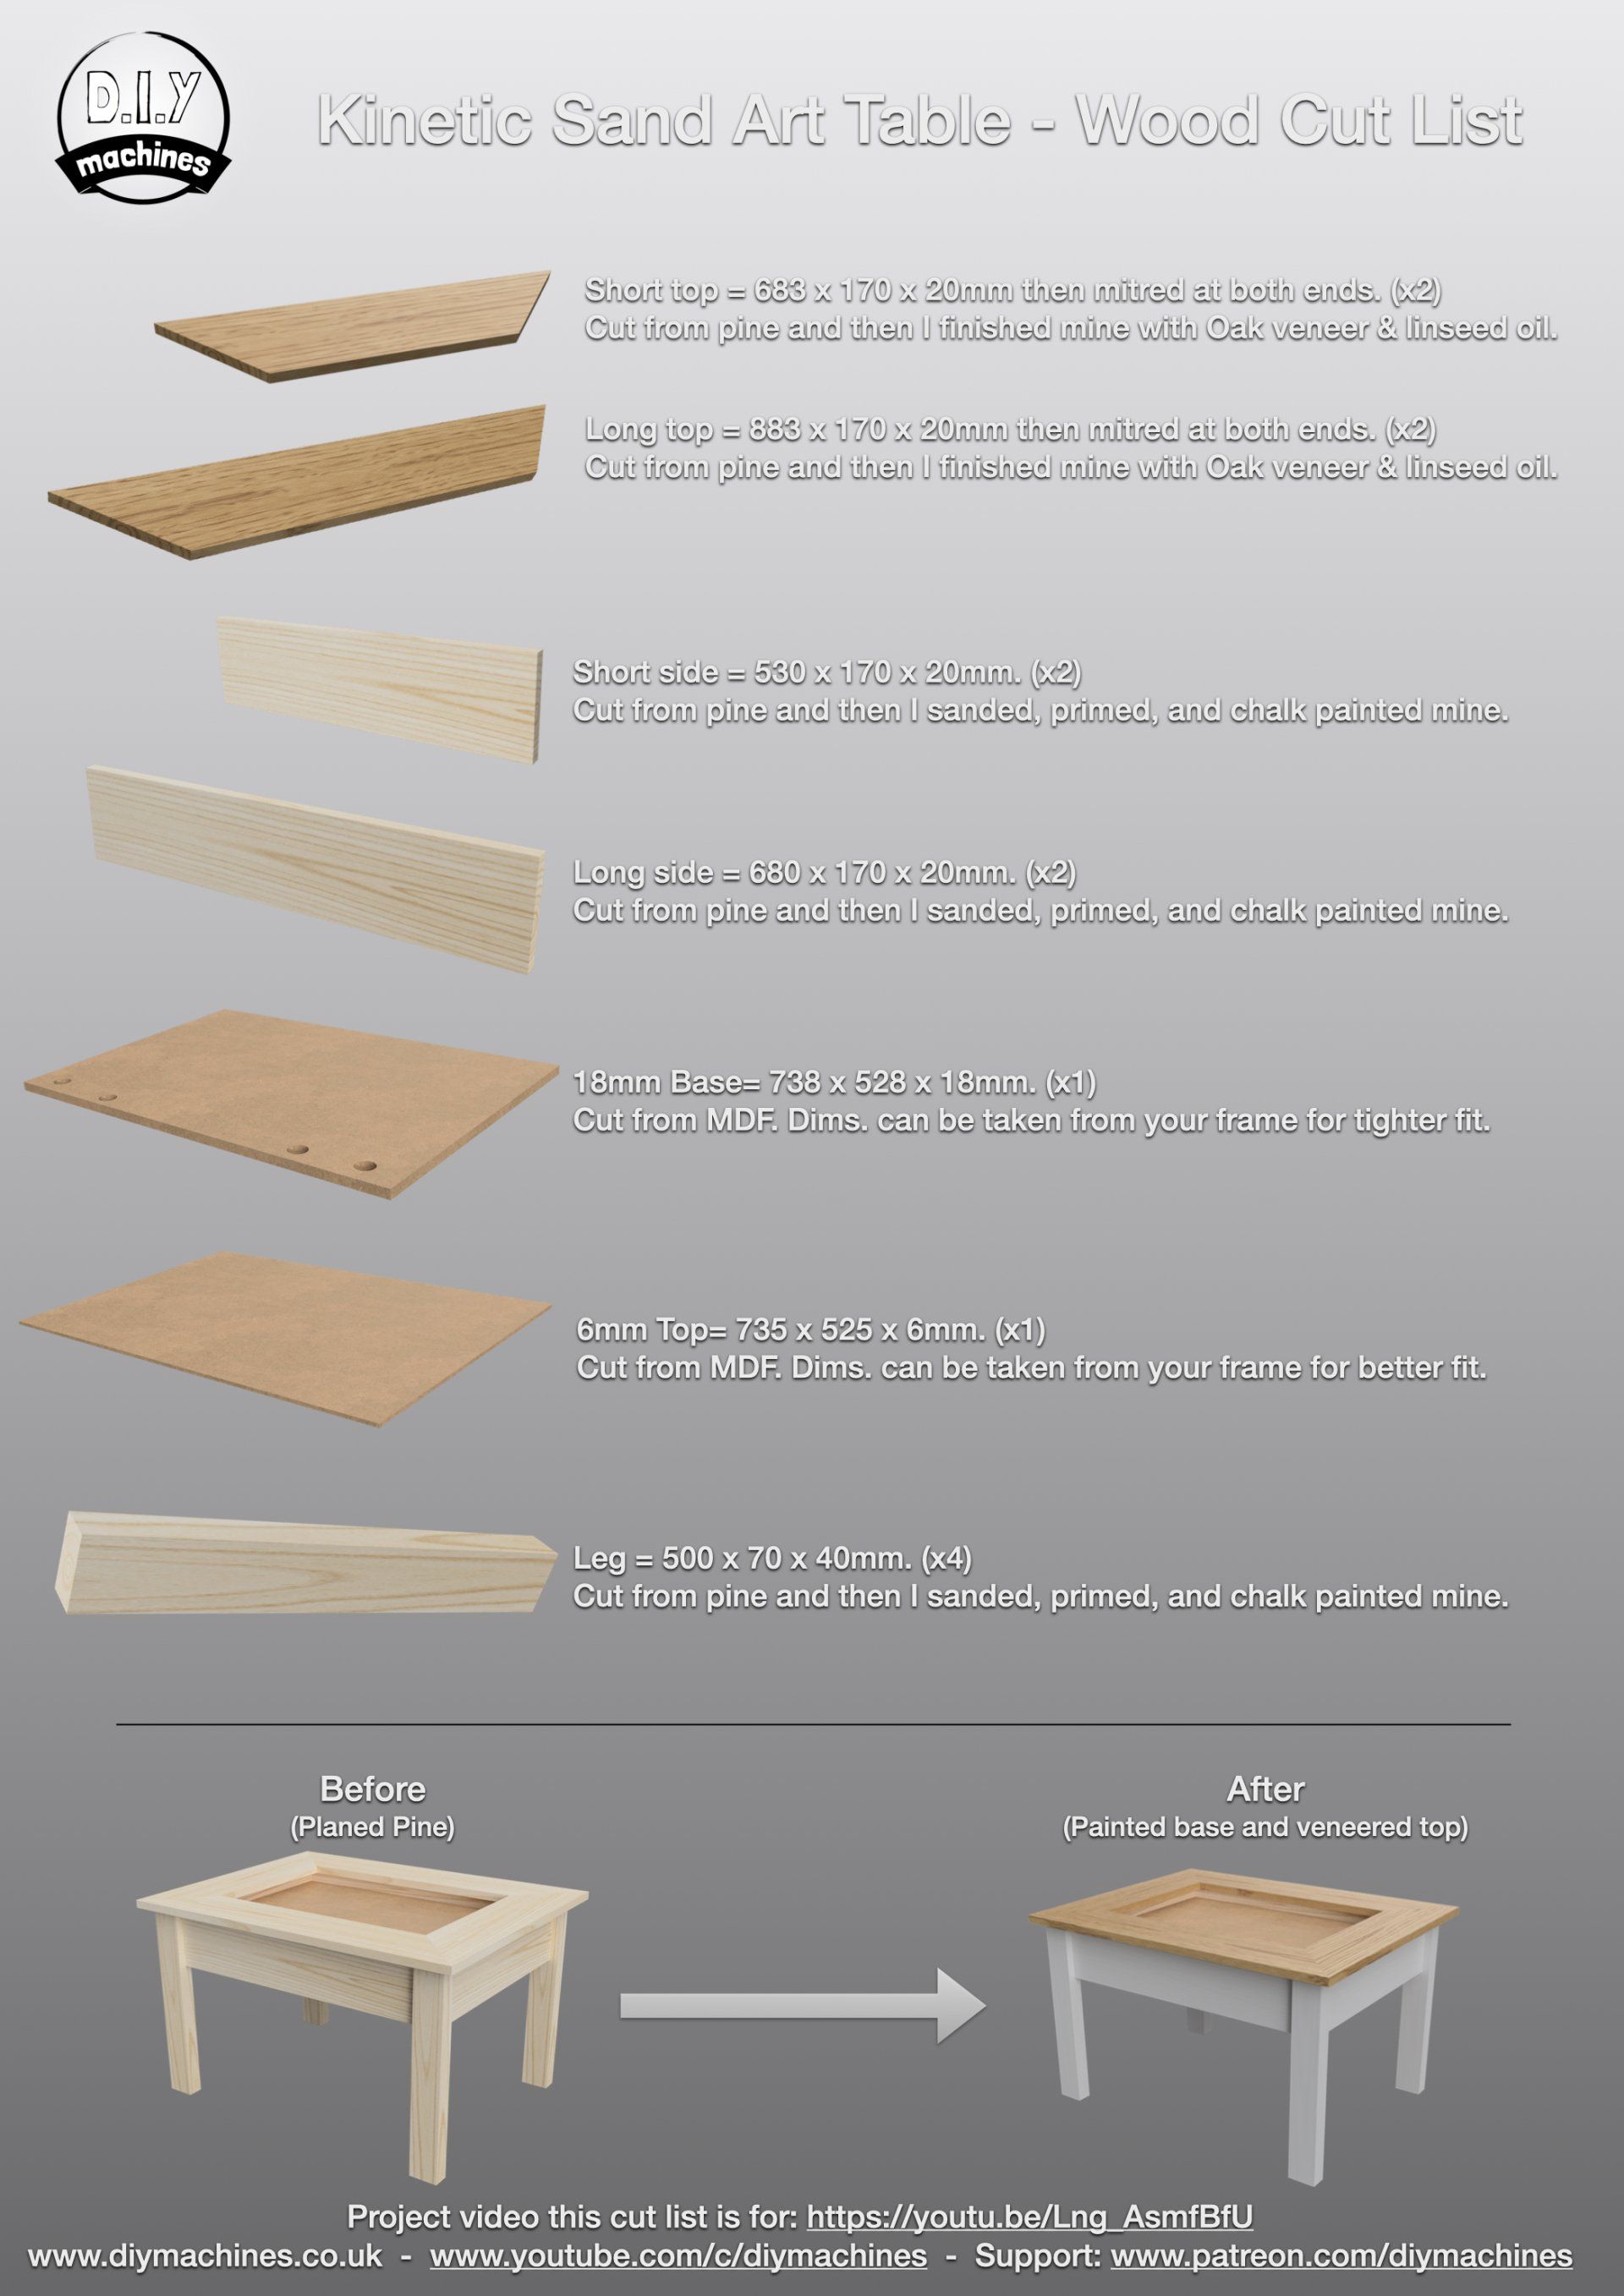
Wiring Diagram and wood cut list:
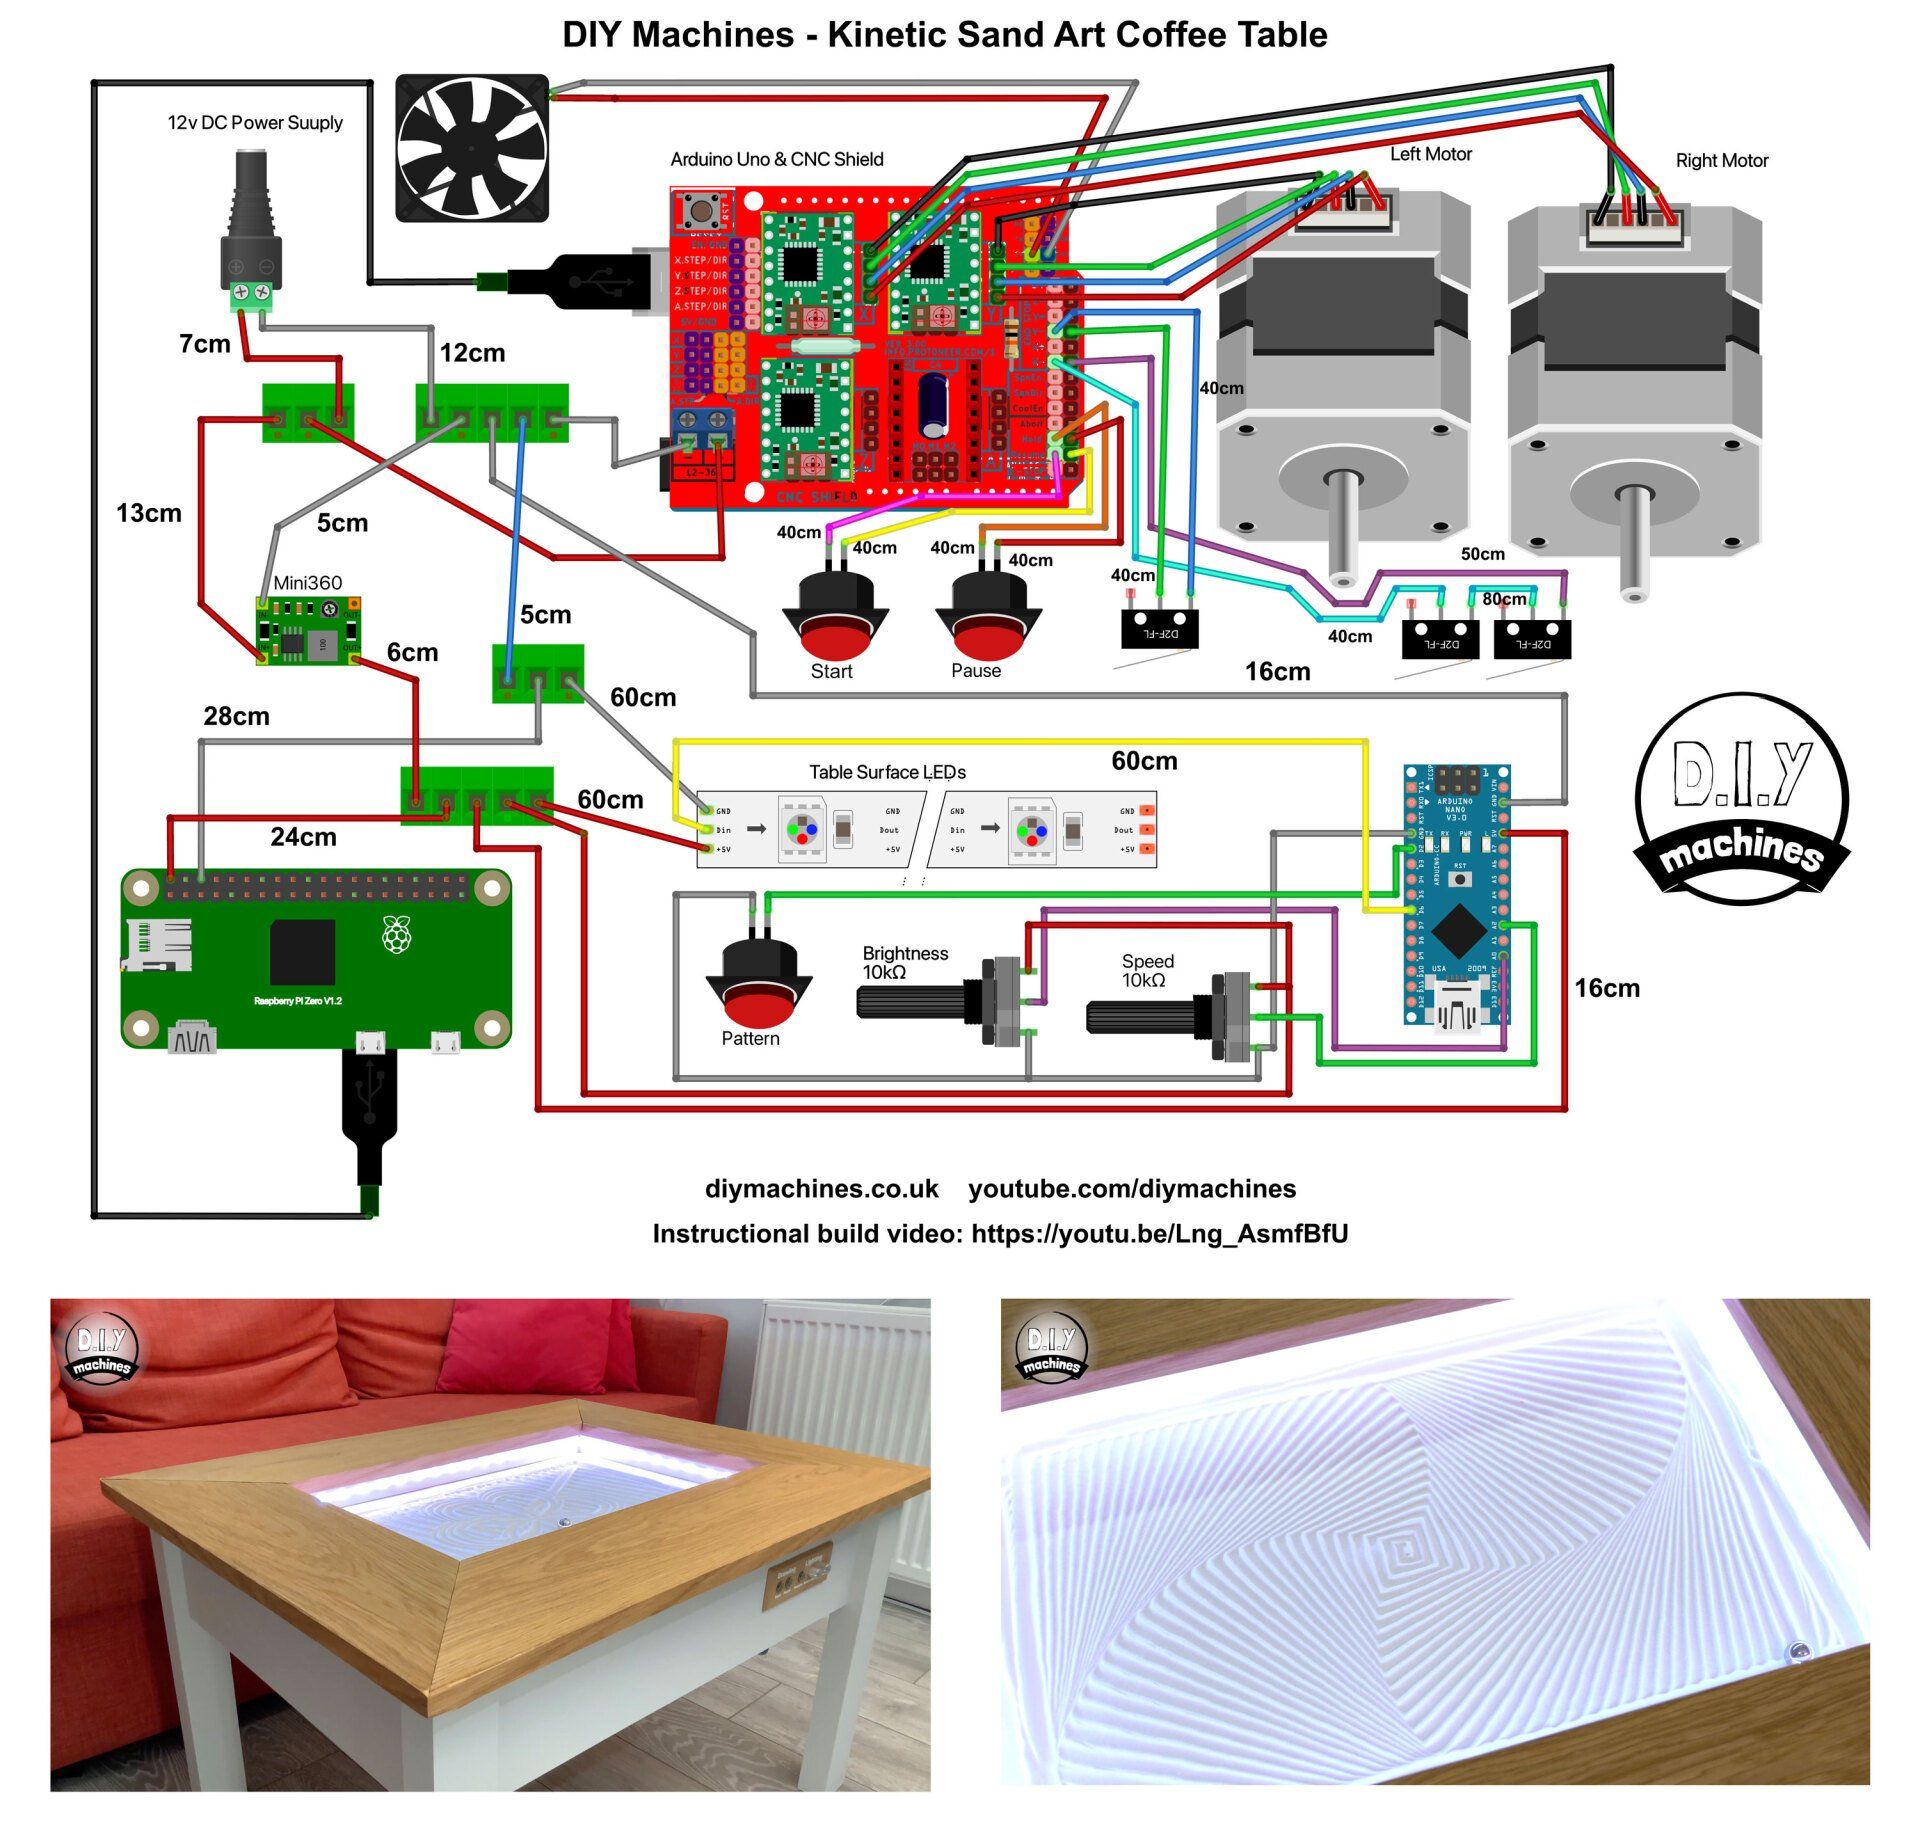
List of items used in this project and where to find them / BOM:
(As an Amazon Associate I earn from qualifying purchases.)
- 12v Nema 17 stepper motors (x2): https://geni.us/StepperMotor
- GT2 Timing belt (3m was used in the video): https://geni.us/TimingBelt5m
- 5mm bore idler, 6mm or 10mm width, 20 teeth (x2): https://geni.us/6mmIdler5mmBoreToothed
- 5mm bore idler, 6 or 10mm width, toothless (x4): https://geni.us/6mmIdlerWheel5mmBore
- Elegoo Arduino Uno (x1): https://geni.us/ArduinoUno
- Nuts, bolts and screws (See list below): https://geni.us/NutsAndBolts
- M2.5 x 6mm bolts (for securing Raspberry Pi) (x4) - https://geni.us/PiBolt
- Stepper drivers - TMC2208 (x2): https://geni.us/TMC2208
- Contact switch (x3): https://geni.us/ContactSwitch
- Arduino CNC Shield (x1): https://geni.us/ArduinoCNCShield
- Magnets, I used three x 15x3mm and one countersunk 20x7mm all high strength: https://geni.us/CountersunkMagnet https://geni.us/N52Magnets
- 30mm 5V Fan (x1): https://geni.us/30mm5vFan
- Micro SD Card 8Gb or higher for Raspberry Pi (x1) - https://geni.us/Micro-SD
- Neopixels/WS2812b on a 30 per meter roll. - https://geni.us/5mWS2812B30m
- 12mm momentary push button (x3): https://geni.us/MomentaryPush12mm
- Some filament for the printed parts (I used PLA, including the wood infused LumberJake from 3D Jake) - https://www.3djake.com
- Wiring blocks - five wires (x2) and three wires (x2). I used the Wago 221 series - https://geni.us/Wago221
- Mini360 Buck Converter (x1): https://geni.us/Mini360
- Faux leather fabric (enough to cover the surface): https://geni.us/FauxLeather
- Steel ball - 20mm:
- Sand (I used around 600g):
To make a table frame which measures roughly 80 x 60cm:
- 40cm long linear rail with block - MGN12H (x2): https://geni.us/LinearRail400mm
- 60cm long linear rail with block - MGN12H (x1): https://geni.us/LinearRail600mm
See www.diymachine.co.uk for instructions on how to build a larger or smaller version.
- Arduino Nano (x1): https://geni.us/ArduinoNanoV3
- Electrical wire: https://geni.us/22AWGWire
- 12v power supply - 2A or greater (x1): https://geni.us/12VPowerSupply2A
- Barrel Connector - Female (x1): https://geni.us/FemalePowerBarrel
- Pocket hole jig: https://geni.us/PocketHoleJig
Nuts, bolts and screws needed:
- M5 x 20mm (x6)
- M3 x 8mm (x18)
- M3 x 12mm (x19)
- M3 nuts (x6)
- M2.5 bolts for Pi (x4)
- Short wood screws (x45)
- Optional pocket hole screws (x24)
Discord Community Server
You will find a very active group of makers who are currently building or have built one of their own kinetic sand tables on the Discord channel for this project: https://discord.gg/JxM3jxFhv8
FAQ
Comments


