
DIY Interactive Performing Pumpkins.
How to 3D print, wire, and program this trio of interactive performing pumpkins. 🎃🎃🎃
These three singing squashes are driven by a RaspberryPi and low-cost projector. Your guests pick either a song, scare or haunting tale using the 3D printed control panel and its illuminated arcade buttons. This is housed securely alongside a waterproof speaker and all stands at the end of your drive/garden. This keeps the mains electricity and your projector safely indoors.
List of items used in this project and where to find them:
(As an Amazon Associate I earn from qualifying purchases.)
- RaspberryPi: https://geni.us/RaspberryPiV4
- 3.5mm jacks (x2): https://geni.us/3-5mmJacks
- Suction Cups (x6): https://geni.us/SuctionCups
- Illuminated Momentary Buttons (x3): https://geni.us/IllumMomentButtons
- 'Hook-up' Wire: https://geni.us/22AWGWire
- Resistors (220 Ohms) (x3) : https://geni.us/Ufa2s
- Budget Projector: https://geni.us/BudgetProjector
- Sony Budget friendly Waterproof Speaker (optional but fits the housing x1): https://geni.us/Sony-SRS-XB01
- PLA Filament: https://geni.us/PLAFilament
- M3 nuts and bolts: https://geni.us/NutsAndBolts
- Wago Connectors (optional, two-way x6 and four-way x1): https://geni.us/WagoConnectors
Downloads
Further down this page are the instructions for configuring the software on the Raspberry Pi.
3D printed parts can be downloaded from here: https://www.thingiverse.com/thing:4628211
Sample animations (provided by AtmosFX.com) and configuration profiles can be downloaded here.
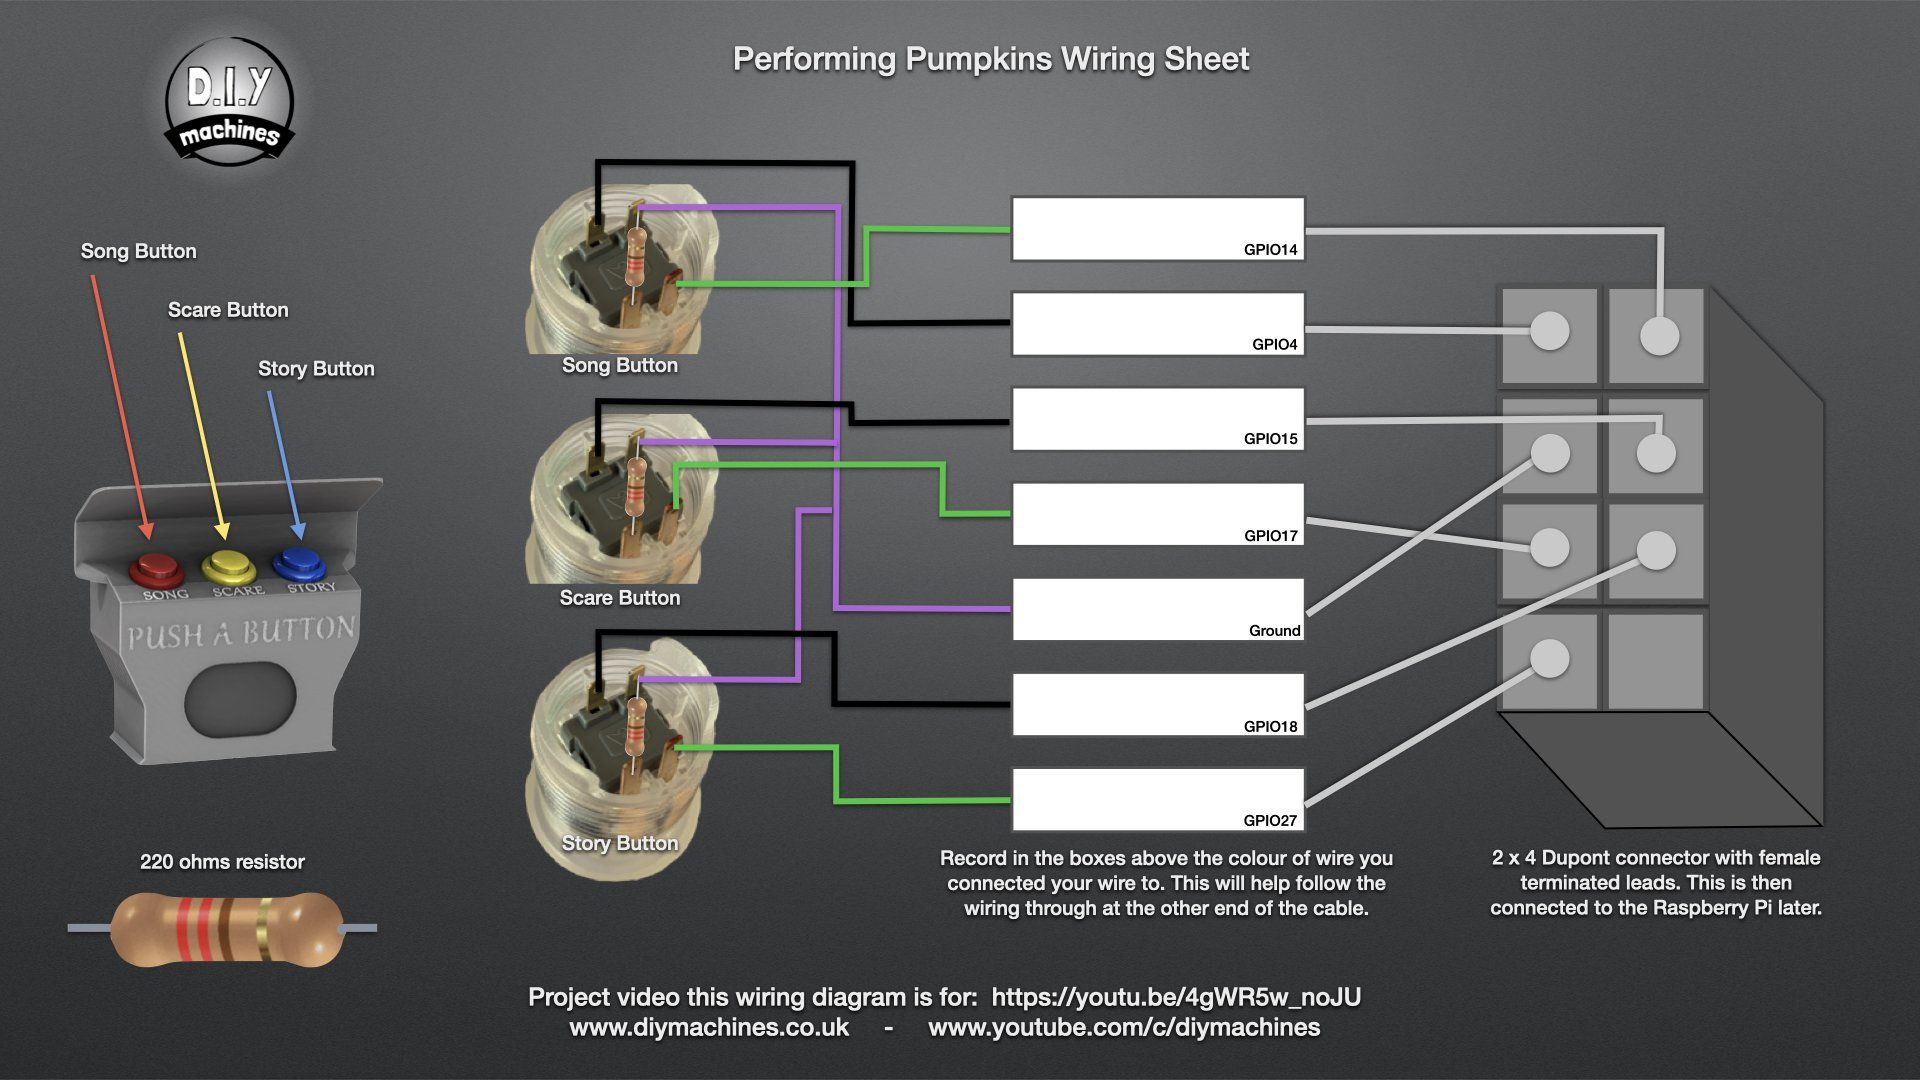
Wiring record sheet
Setting up the Raspberry Pi
I recommend using a Raspberry Pi model 3 or 4 for this to ensure smooth operation of the video files playback.
We will be going through the following steps one-by-one:
- Installing and configuring Raspbian / Pi OS on to your SD card
- Installing Pi Presents and supporting software
- Copy across some pre-prepared profiles and sample video files
- Setting the show to start automatically at power on
- Adding your own video files
Installing and configuring Raspbian / Pi OS on to your SD card
To begin with you will need to download the Raspberry Pi Imager from the foundations website: https://www.raspberrypi.org/downloads/
Once you have downloaded and installed the software you can insert your Micro SD card into your PC and select 'Choose OS' followed by 'Raspberry Pi OS (32 bit)'.


Choose your SD card and then press 'Write'. If you have not installed this OS before then the program will spend a little time downloading the image file before proceeding with writing it to your SD card and then verifying.
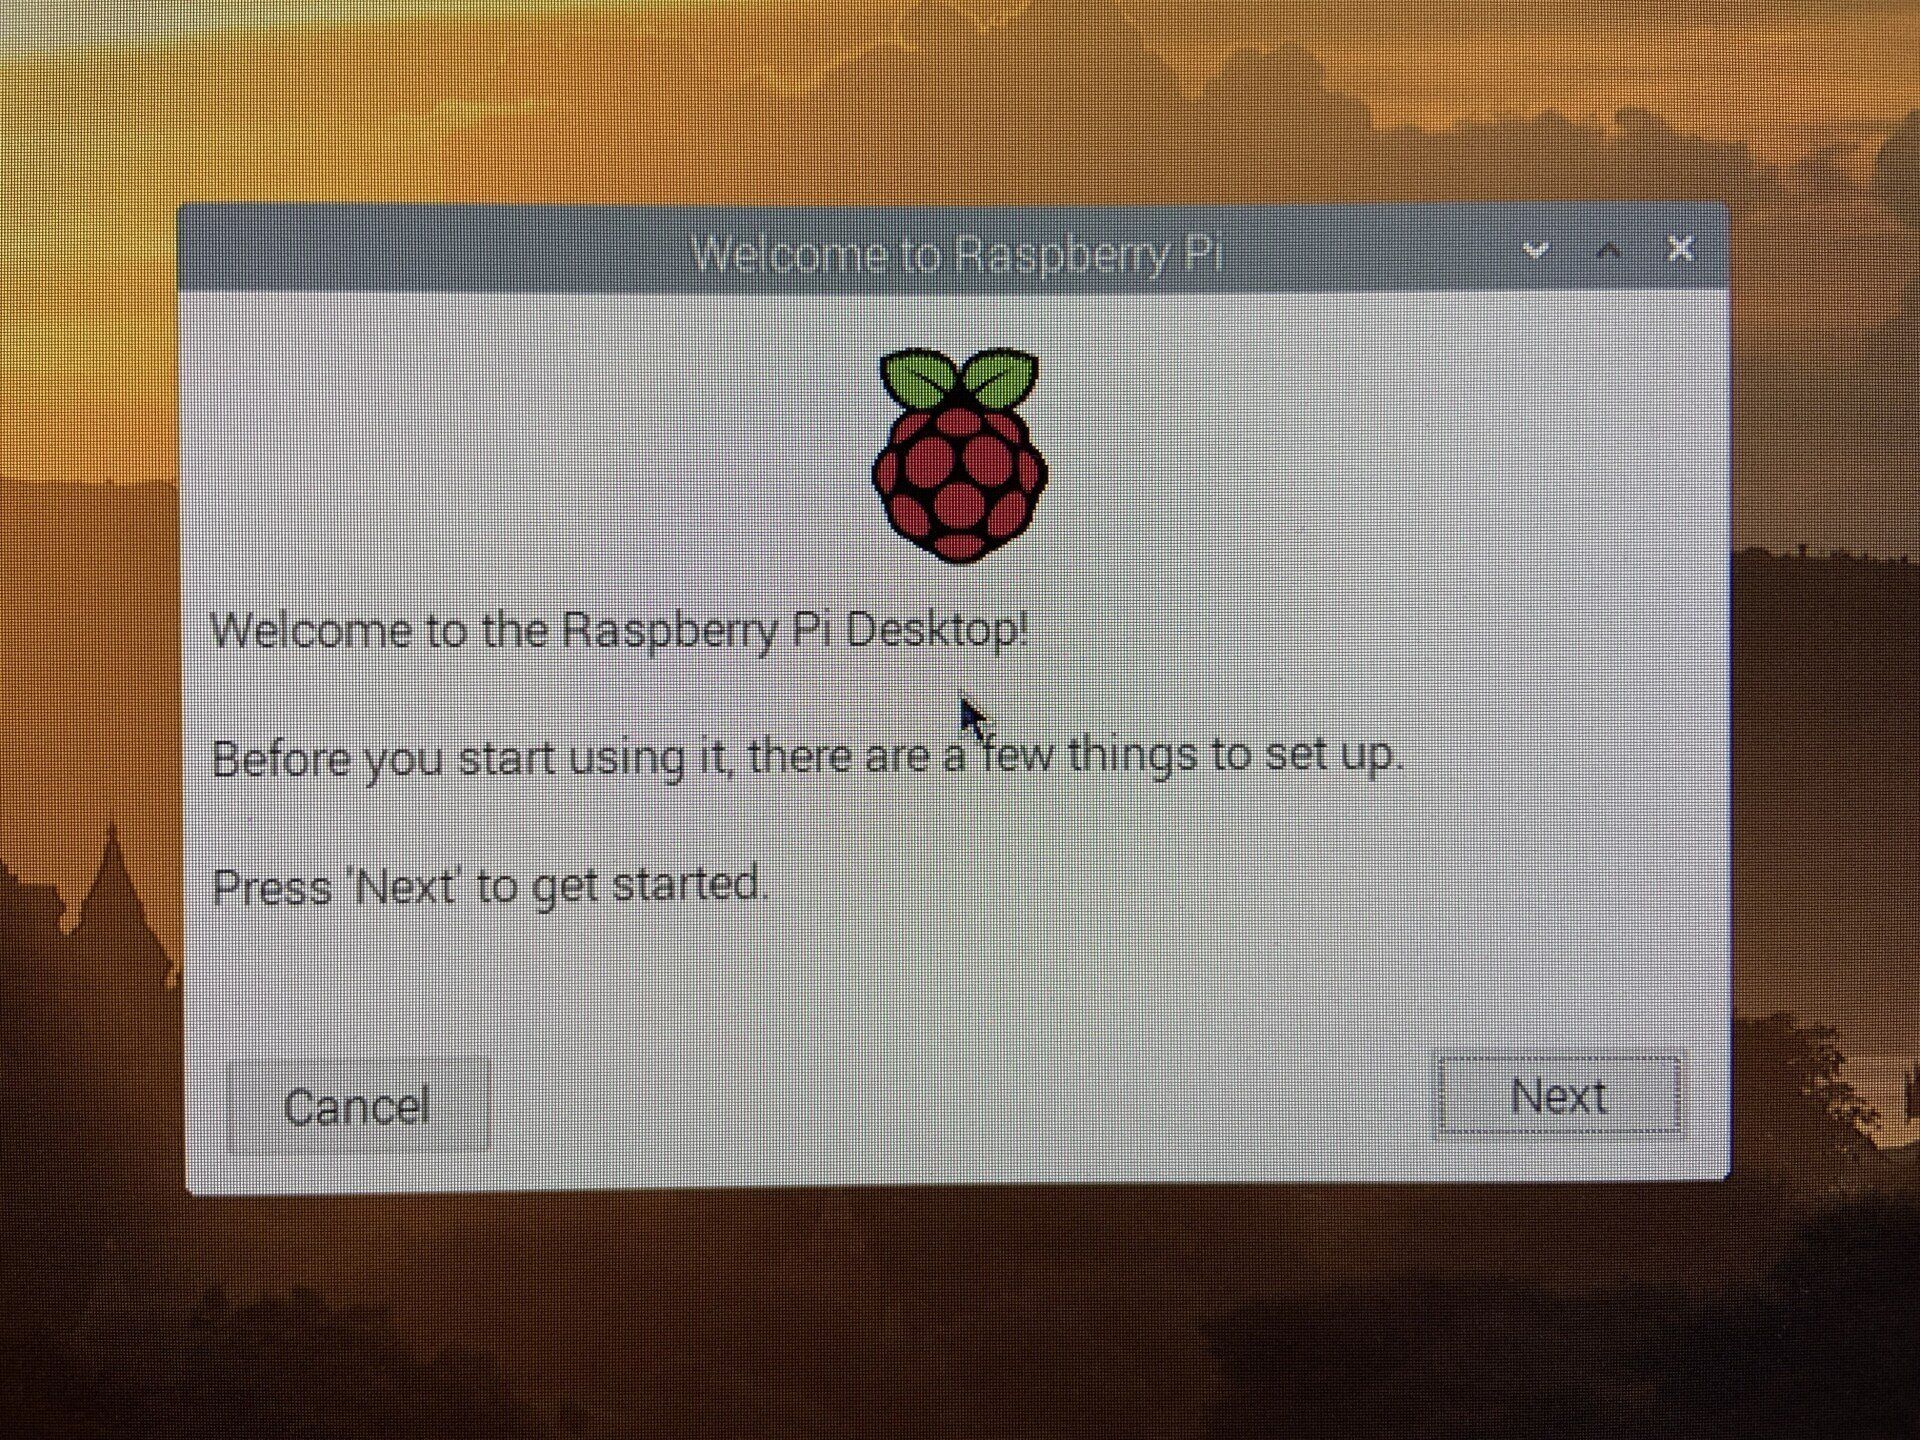
Once complete pop the SD card into your Raspberry Pi, connect the Pi to a monitor, keyboard, mouse and power supply and wait for the first boot sequence to complete. You know it's ready when you see the following prompt:
At this point you can proceed through the set up pages and:
- set your county, language, and timezone settings.
- choose a password if you want to sue something other than the default 'raspberry'.
- change the screen settings if you're getting a black border around your image.
- connect your Pi to wireless (I recommend doing this).
- checking the software for updates and automatically applying them.
Checking for and downloading updates may take some time but I recommend it updating your software. Once this is all complete you should restart your Pi.

Installing Pi Presents and supporting software
We can now install Pi Presents software. This is written by Ken Thompson and you can find out more about his project here: https://github.com/KenT2/pipresents-gapless
Using the Raspbian menu head to 'preferences' --> 'raspberry pi configuration' --> 'Performance' and then increase the 'GPU Memory' to 256.You will then be prompted to reboot your Pi to make these changes, which you should do before proceeding.


We can then ensure all he software is up-to-date by issuing the following two commands one after another in the terminal:
sudo apt-get update
sudo apt-get upgrade
The second command above may take a few minutes.
Now we know the software we already have is up-to-date we can install the other required packages by issuing the below commands one at a time:
sudo apt-get install python-pil
sudo apt-get install python-imaging-tk
sudo apt-get install unclutter
sudo apt-get install mplayer
sudo apt-get install uzbl
sudo apt-get install python-pexpect
sudo pip install evdev
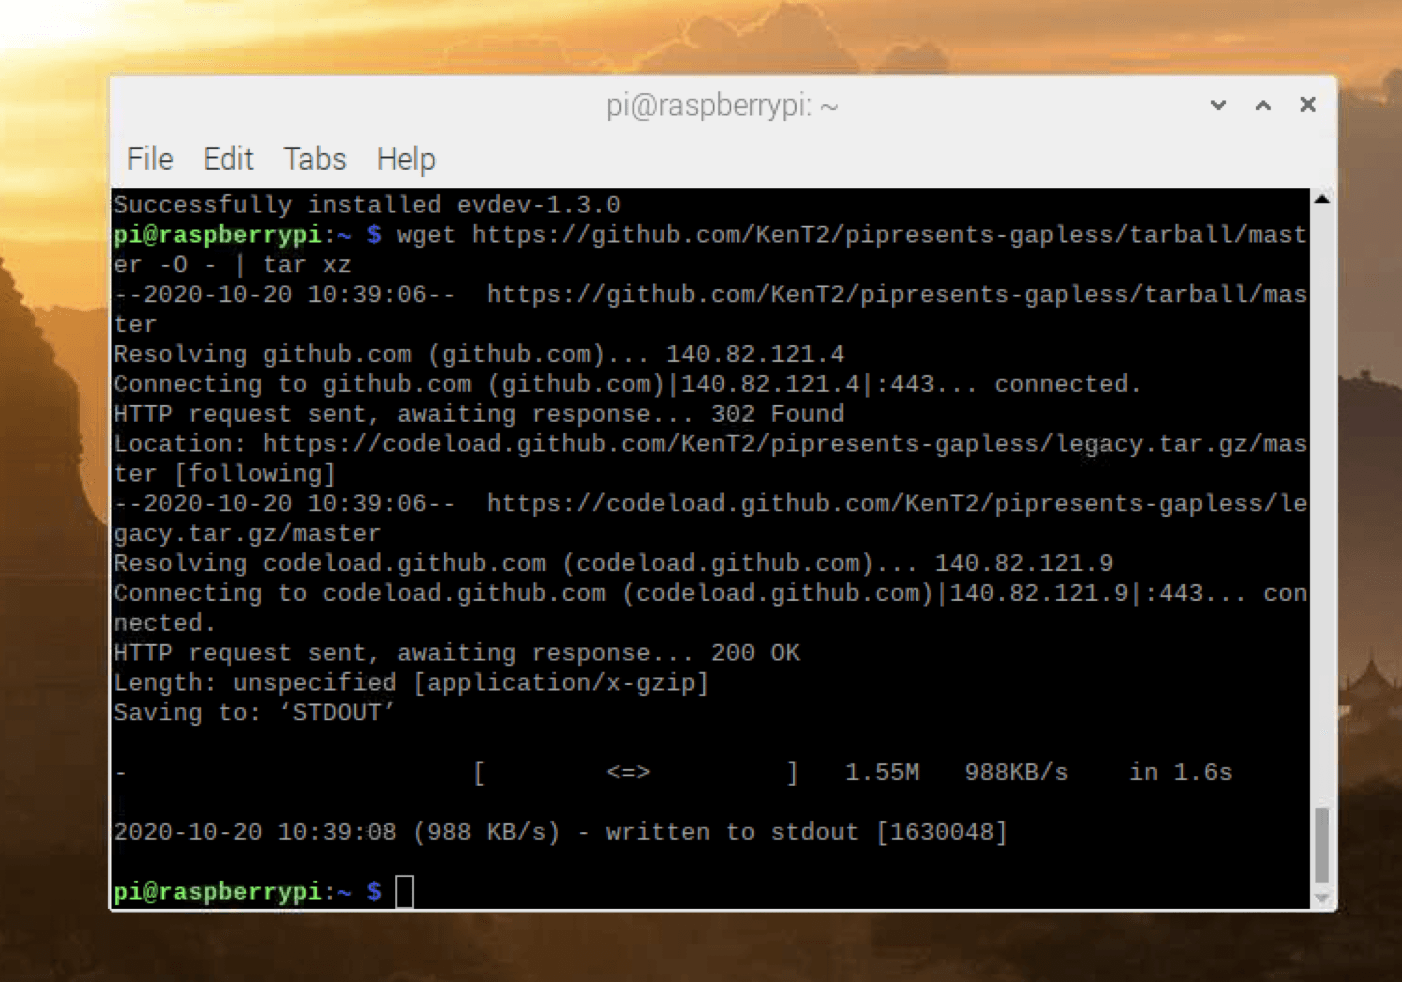
To install PiPresents itself issue the following command (the -O towards the end of the command is a capital letter O):
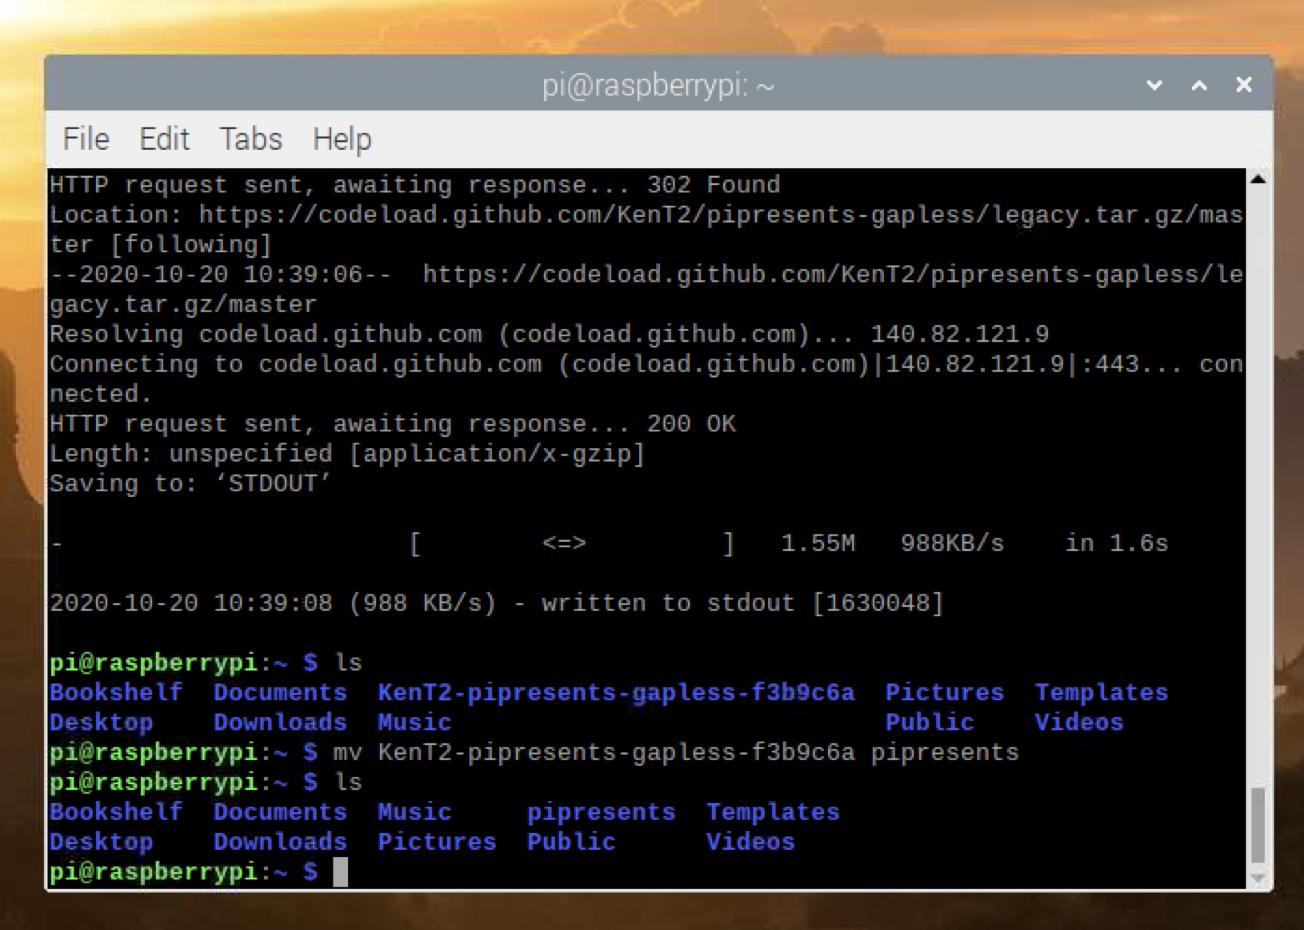
wget https://github.com/KenT2/pipresents-gapless/tarball/master -O - | tar xz
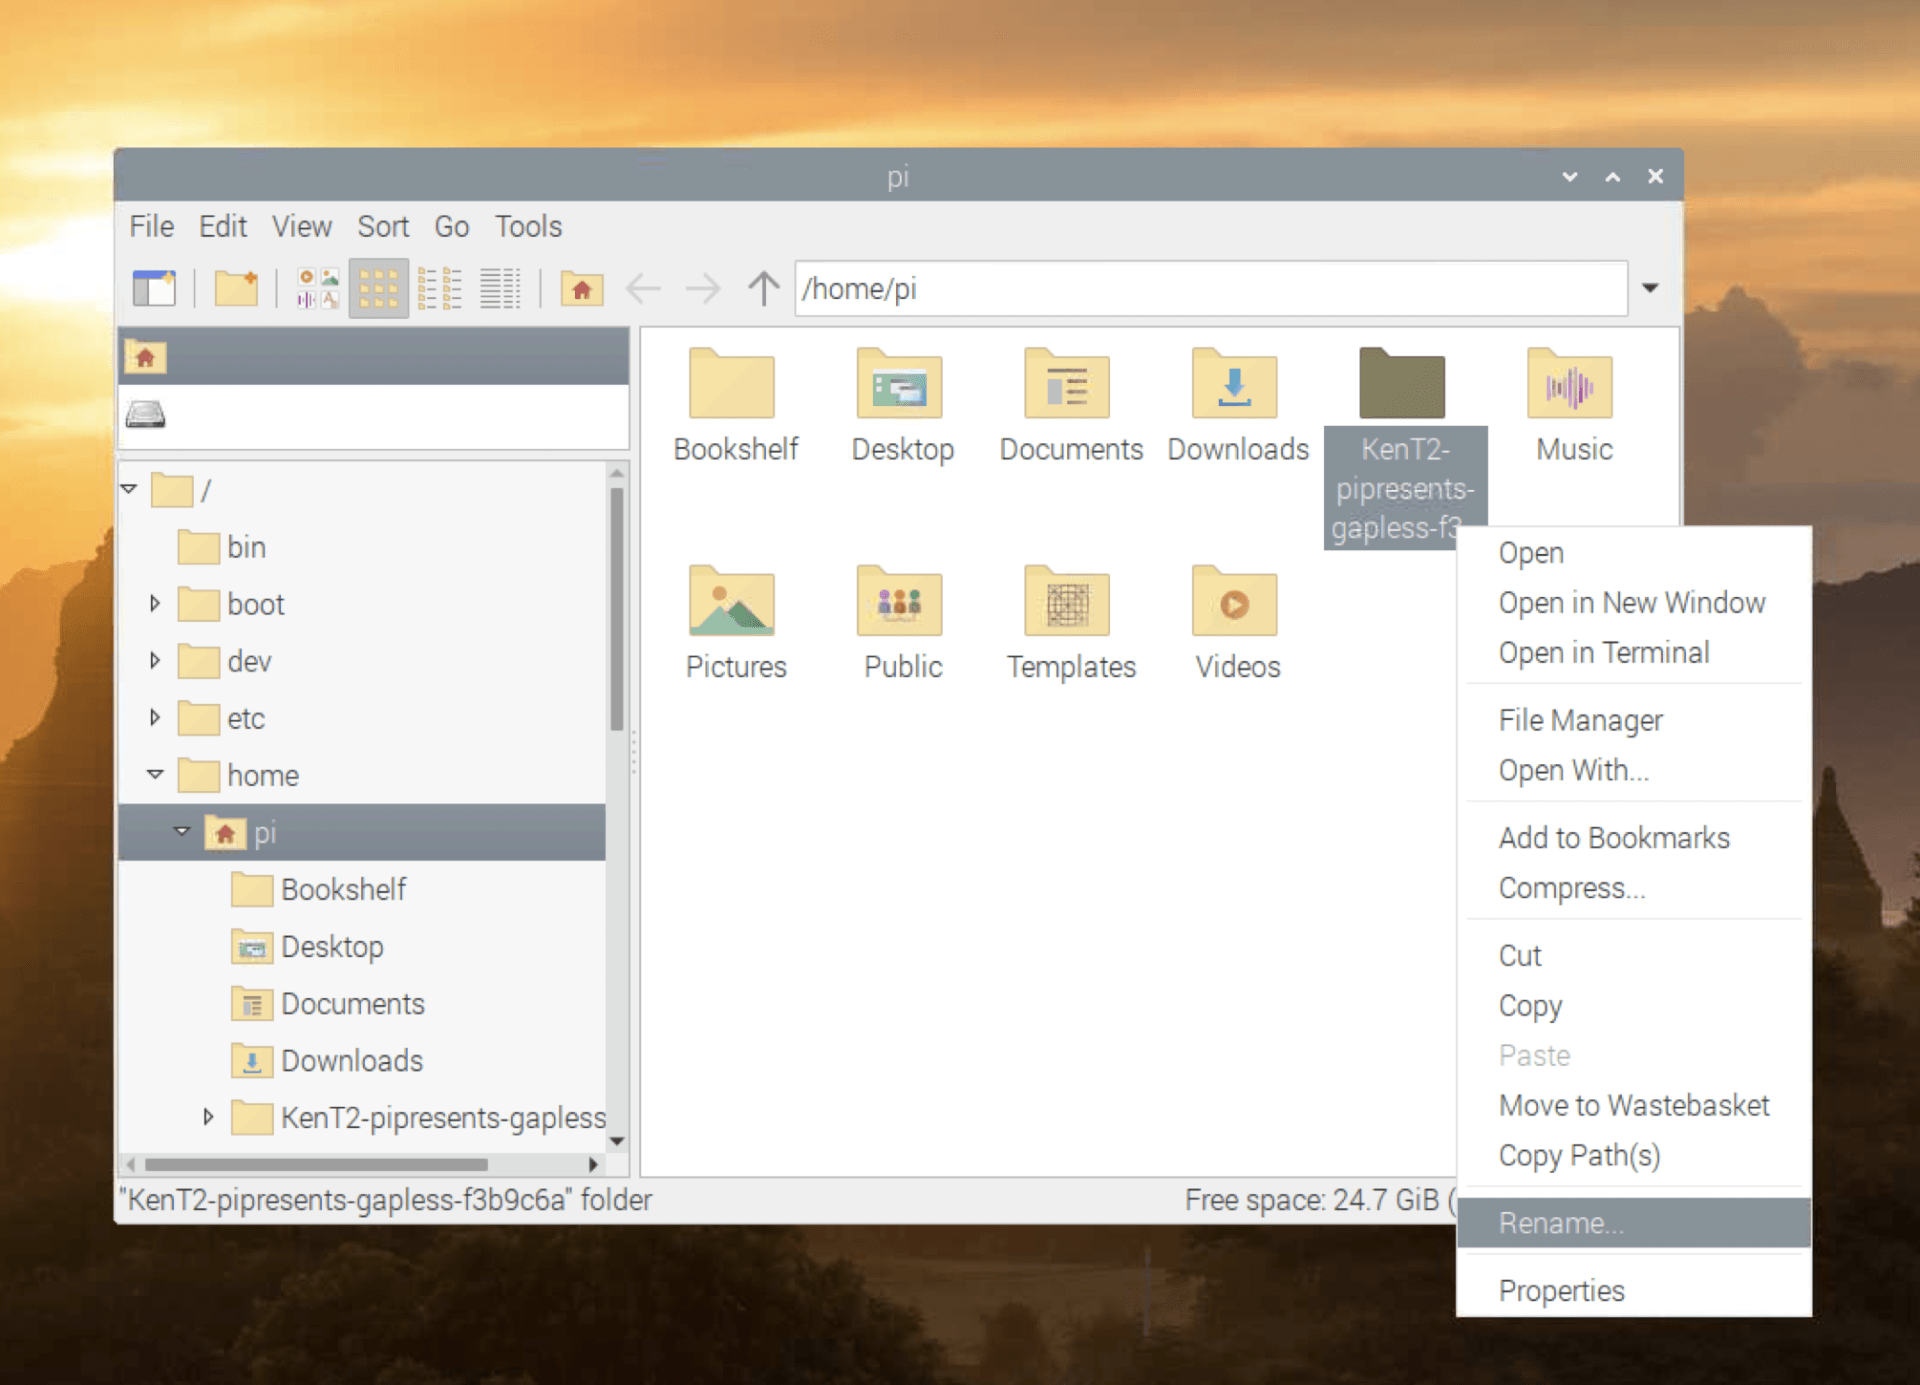
This will create a directory called 'KenT2-pipresents-gapless-xxxx' in your /home/pi directory. We need to rename this to 'pip resents'. You can either do this by using the GUI, right clicking on the folder and renaming it or you can issue the following command to achieve the same though the terminal:
mv KenT2-pipresents-gapless-xxxx pipresents
The 'xxxx' should be substituted with whichever combination of letters and numbers follows your installation.
We can check if what we have done so far is working by issuing the following command:
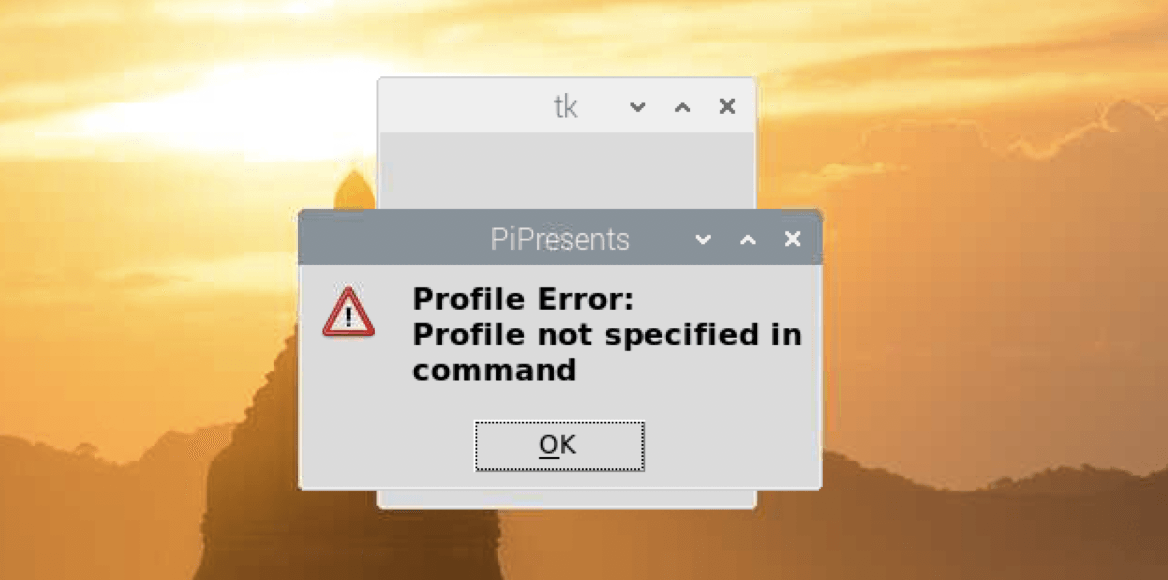
python /home/pi/pipresents/pipresents.py
If you have managed to successfully install PiPresents then you should be greeted by a Profile Error message. This is because we have yet to install any profiles to run our Halloween show.
Copying across some pre-prepared profiles and sample media
We can now copy across some profile which I have preprepared for you along with some sample media clips provided by AtmosFX.
Download the profiles and media files here: Profile and Media Files
Once you have the files, unzip the folder and a us a USB drive (or other means) to copy the 'pp_home' folder and all its contents to '/home/pi/'.
To test our set up so far you can open a terminal and run:
python /home/pi/pipresents/pipresents.py -p DIYM -f -b
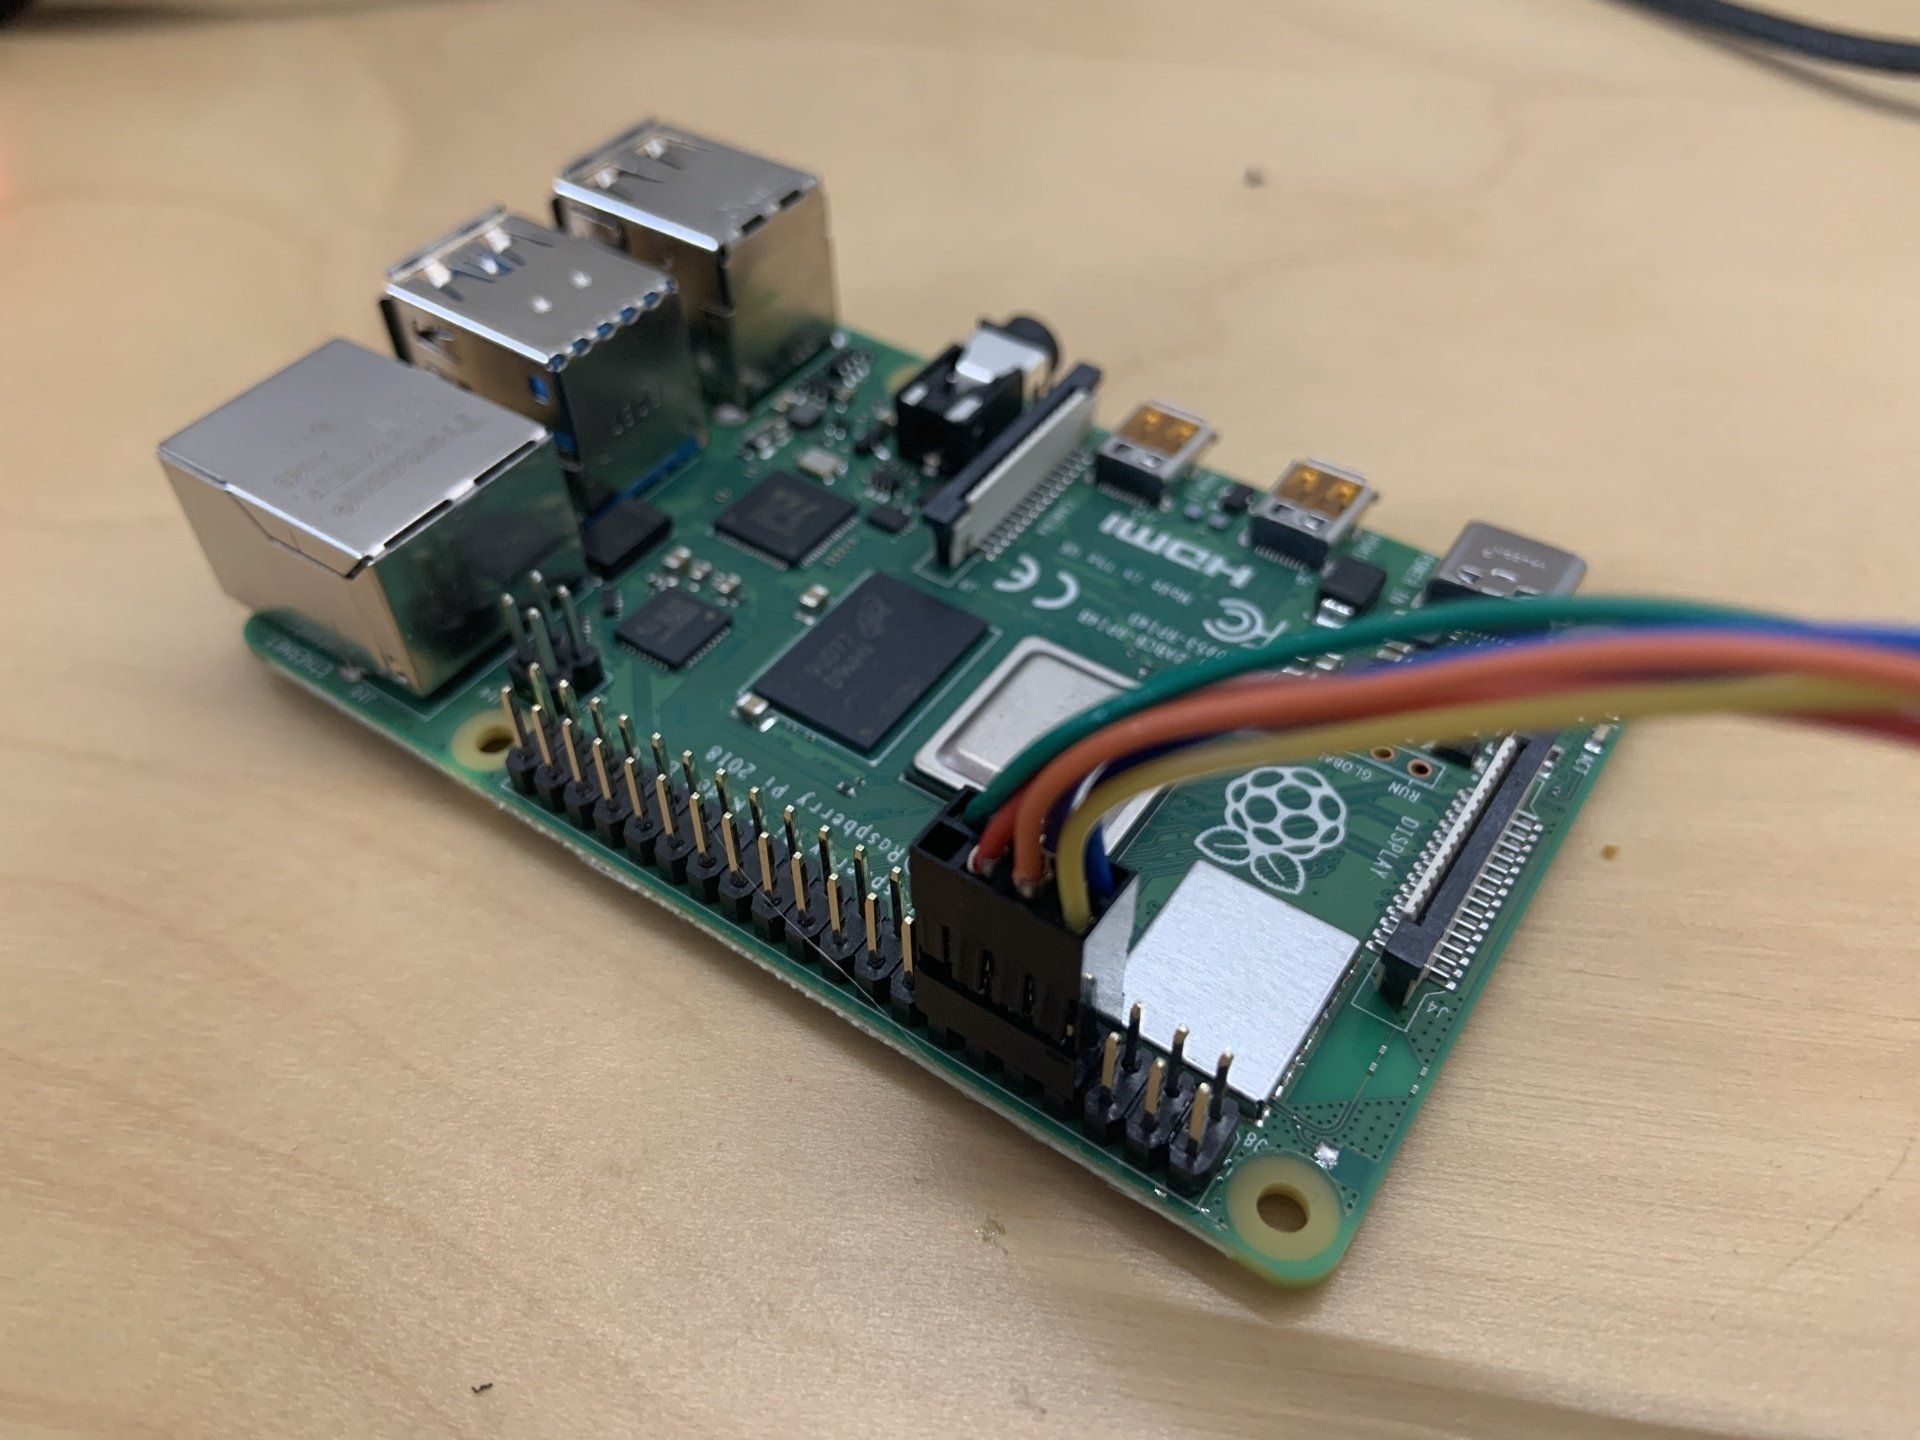
This should result in three familiar pumpkins taking up your screen fullscreen. If you have already built your physical button controller as shown in the project video at the top of the page then you can now connect it to your Pi and take your project for a spin. When connecting the Dupont connector and wires to the pi it should be positioned three pins along from the LH side and with the corner missing a wire towards the top right as shown below.
Setting the show to start automatically at power on
Now we can set the show to start up automatically when the Raspberry Pi boots up instead of having to rely on having a keyboard to hand to start the show (or connecting via VNC to achieve the same).
Before we do this you will need to turn on viewing hidden item in the view options of the Pi file explorer. You could also use the keyboard shortcut of 'Ctrl' + 'H'.

Now navigate to: /etc/xdg/lxsession/LXDE-pi/ and copy the file 'autostart' to your clipboard.
Next, navigate to: /home/pi/.config. In this folder create a new folder called 'lxsession', and inside this folder create one called 'LXDE-pi'. We can now paste our copy of 'autostart' into this folder.
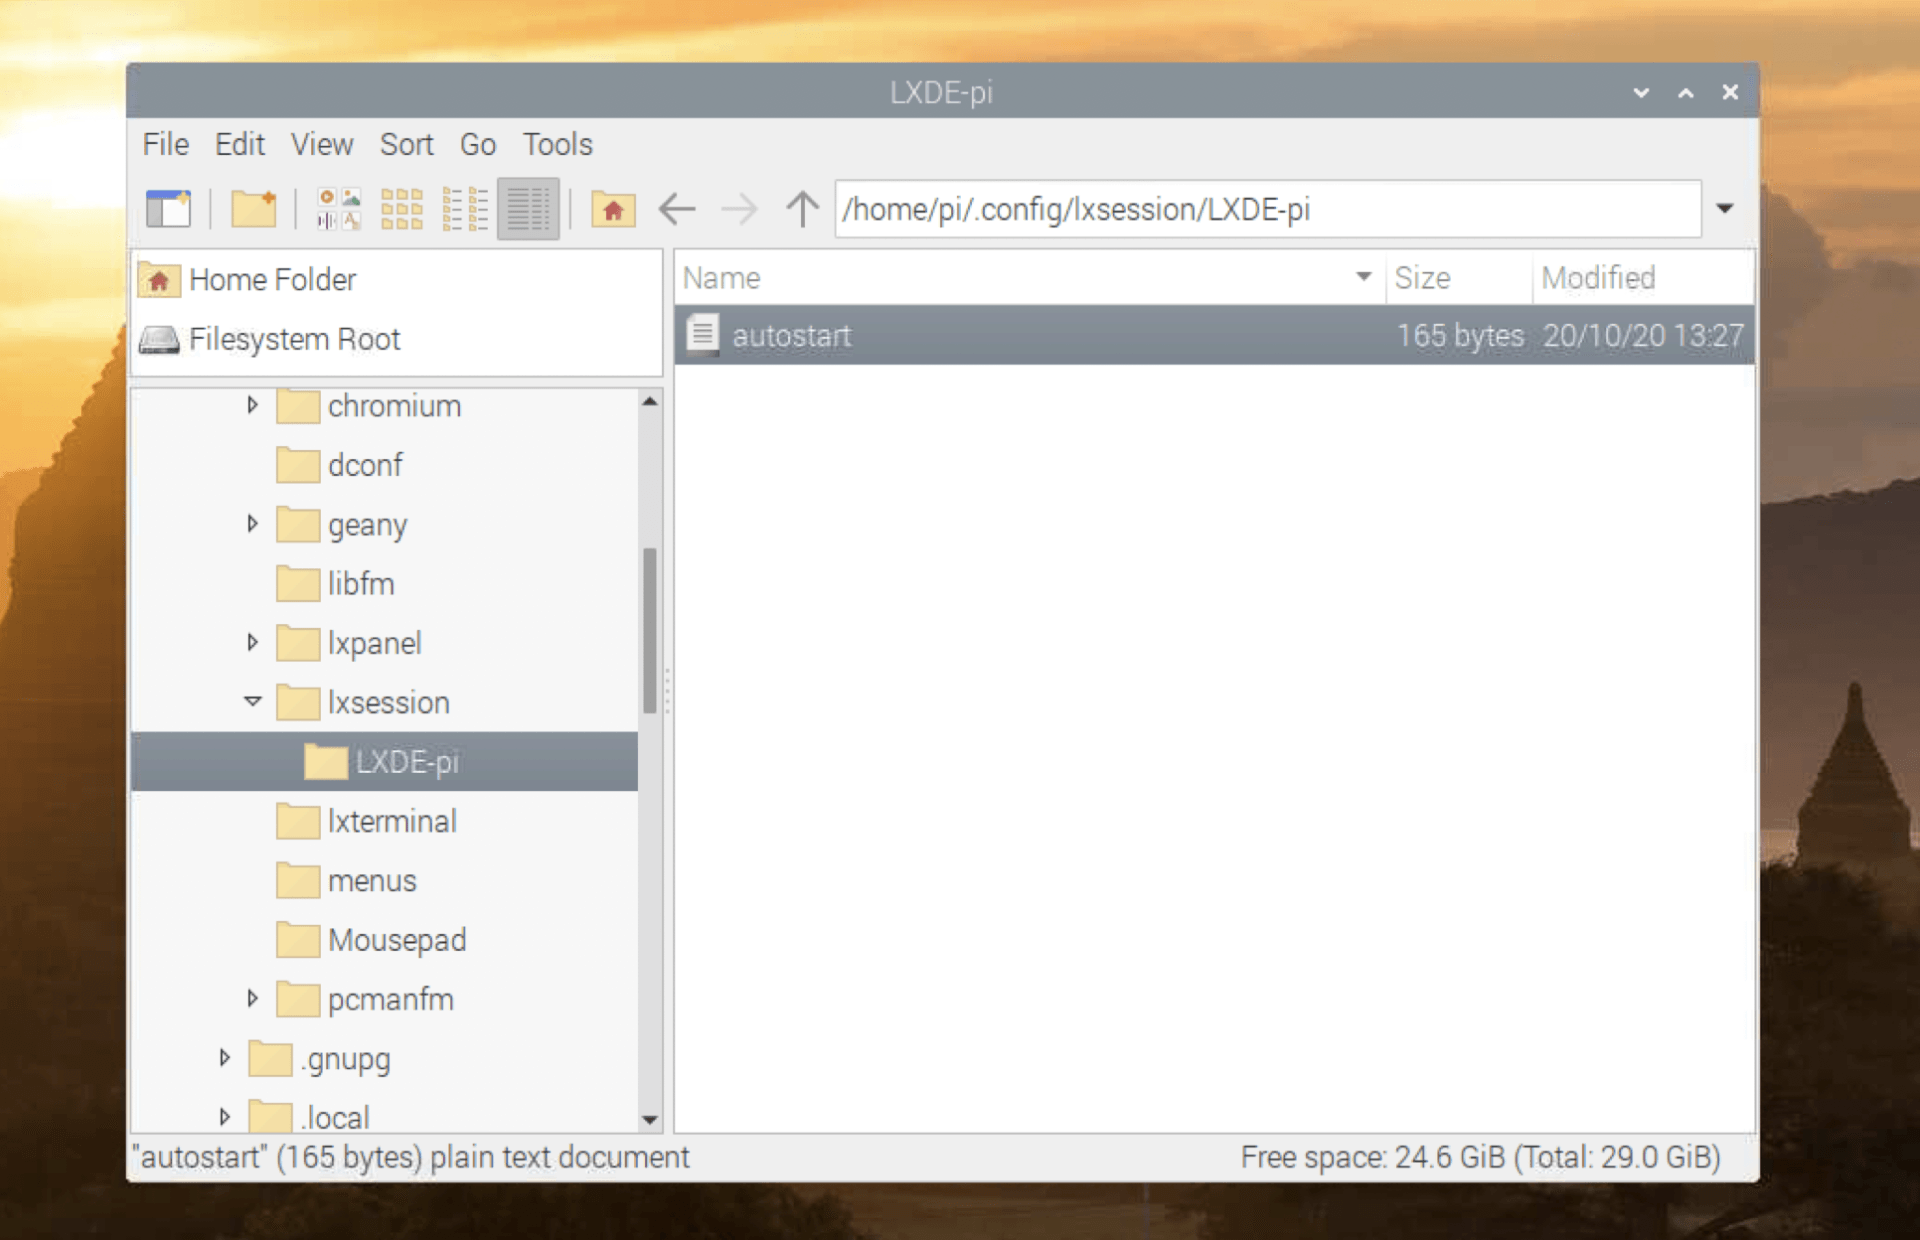
We can now open and edit the 'autostart' file found in /home/pi/.config/lxsession/LXDE-pi/autostart
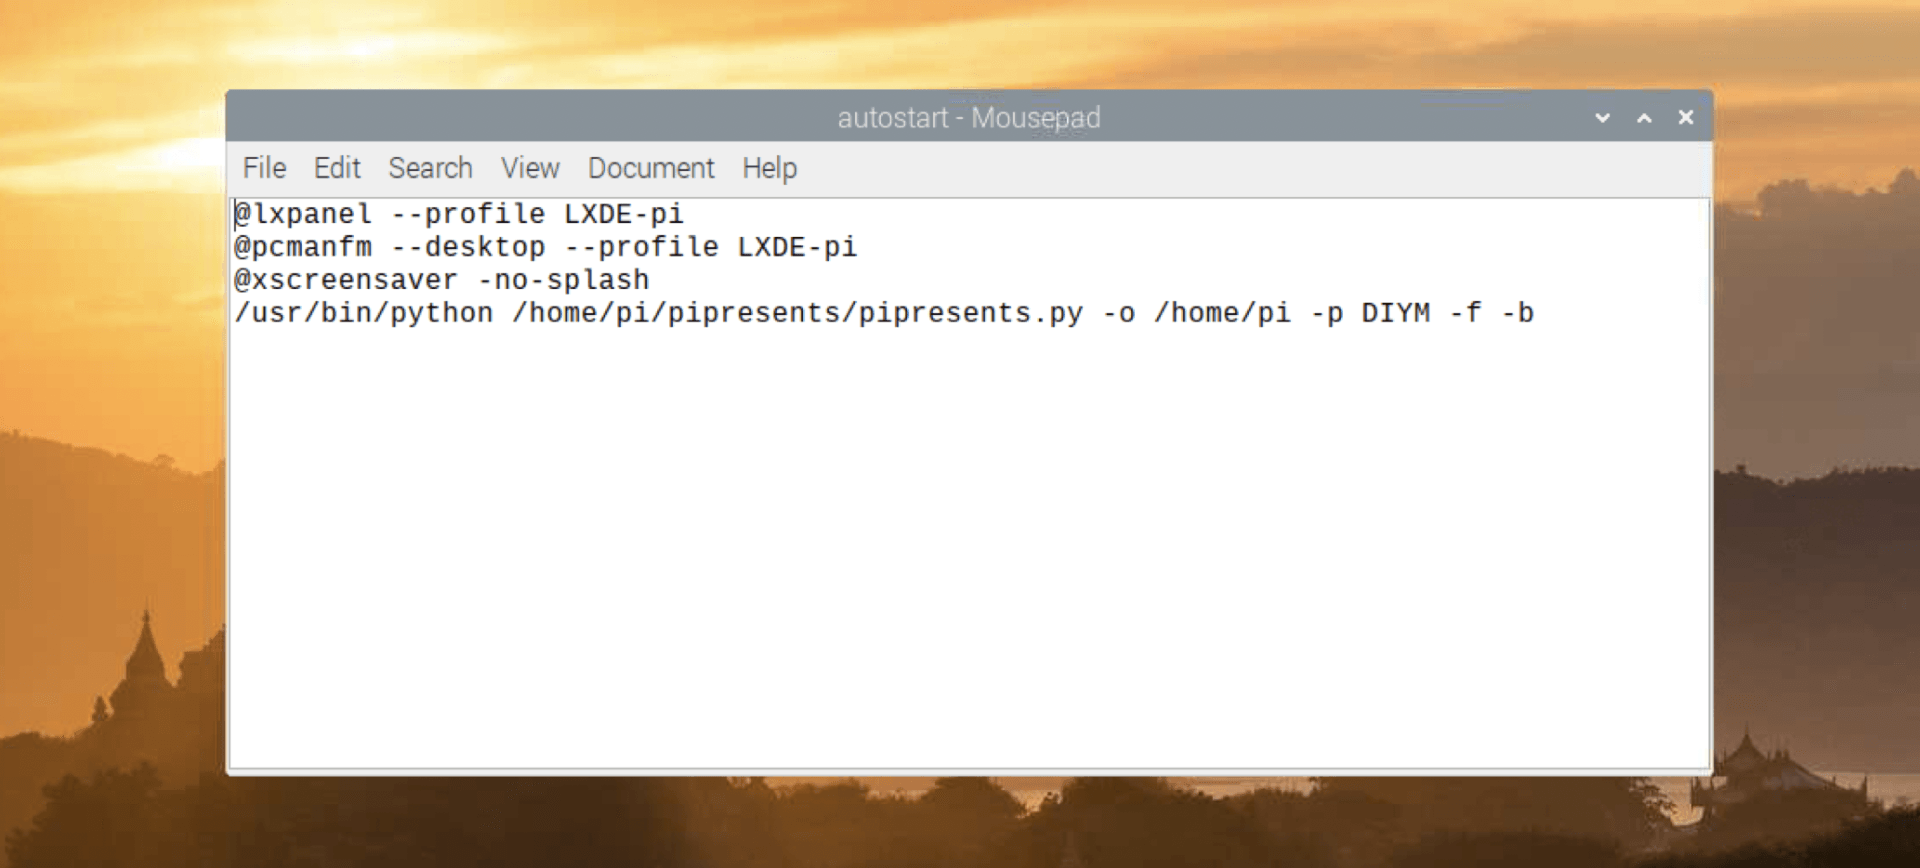
You need to append the following line at the bottom of the document:
/usr/bin/python /home/pi/pipresents/pipresents.py -o /home/pi -p DIYM -f -b
Once done you can save the document and reboot your Pi. The show should start automatically shortly after the desktop has loaded.
Adding your own video files
It easy enough to add additional video files to the project. I'll explain how to add new files to the category of either song, scare, or story. When a viewer chooses one of the options with the arcade style buttons than a random video from the category will be played before returning to the 'buffering' video clip. This just shows an animation of pumpkins with moving/flickering candles inside.
I can recommend the animations available at atmosfx.com. These are the ones used in the moan project video and they work very well. Head over to their site to purchase more.
After you have downloaded the video clips you need to copy them onto your Raspberry Pi to the directory: /home/pi/pp_home/media/DIYM.
Once you have done this we can launch a handy web-editor designed by Ken Thompson to tweak the configuration file to include your new clips. This can be launched from a terminal on the Pi with the following command:
python /home/pi/pipresents/pp_web_editor.py


Head to 'Profile' --> 'Open'. Single click on the text of DIYM so it turns bold and then press 'Open.
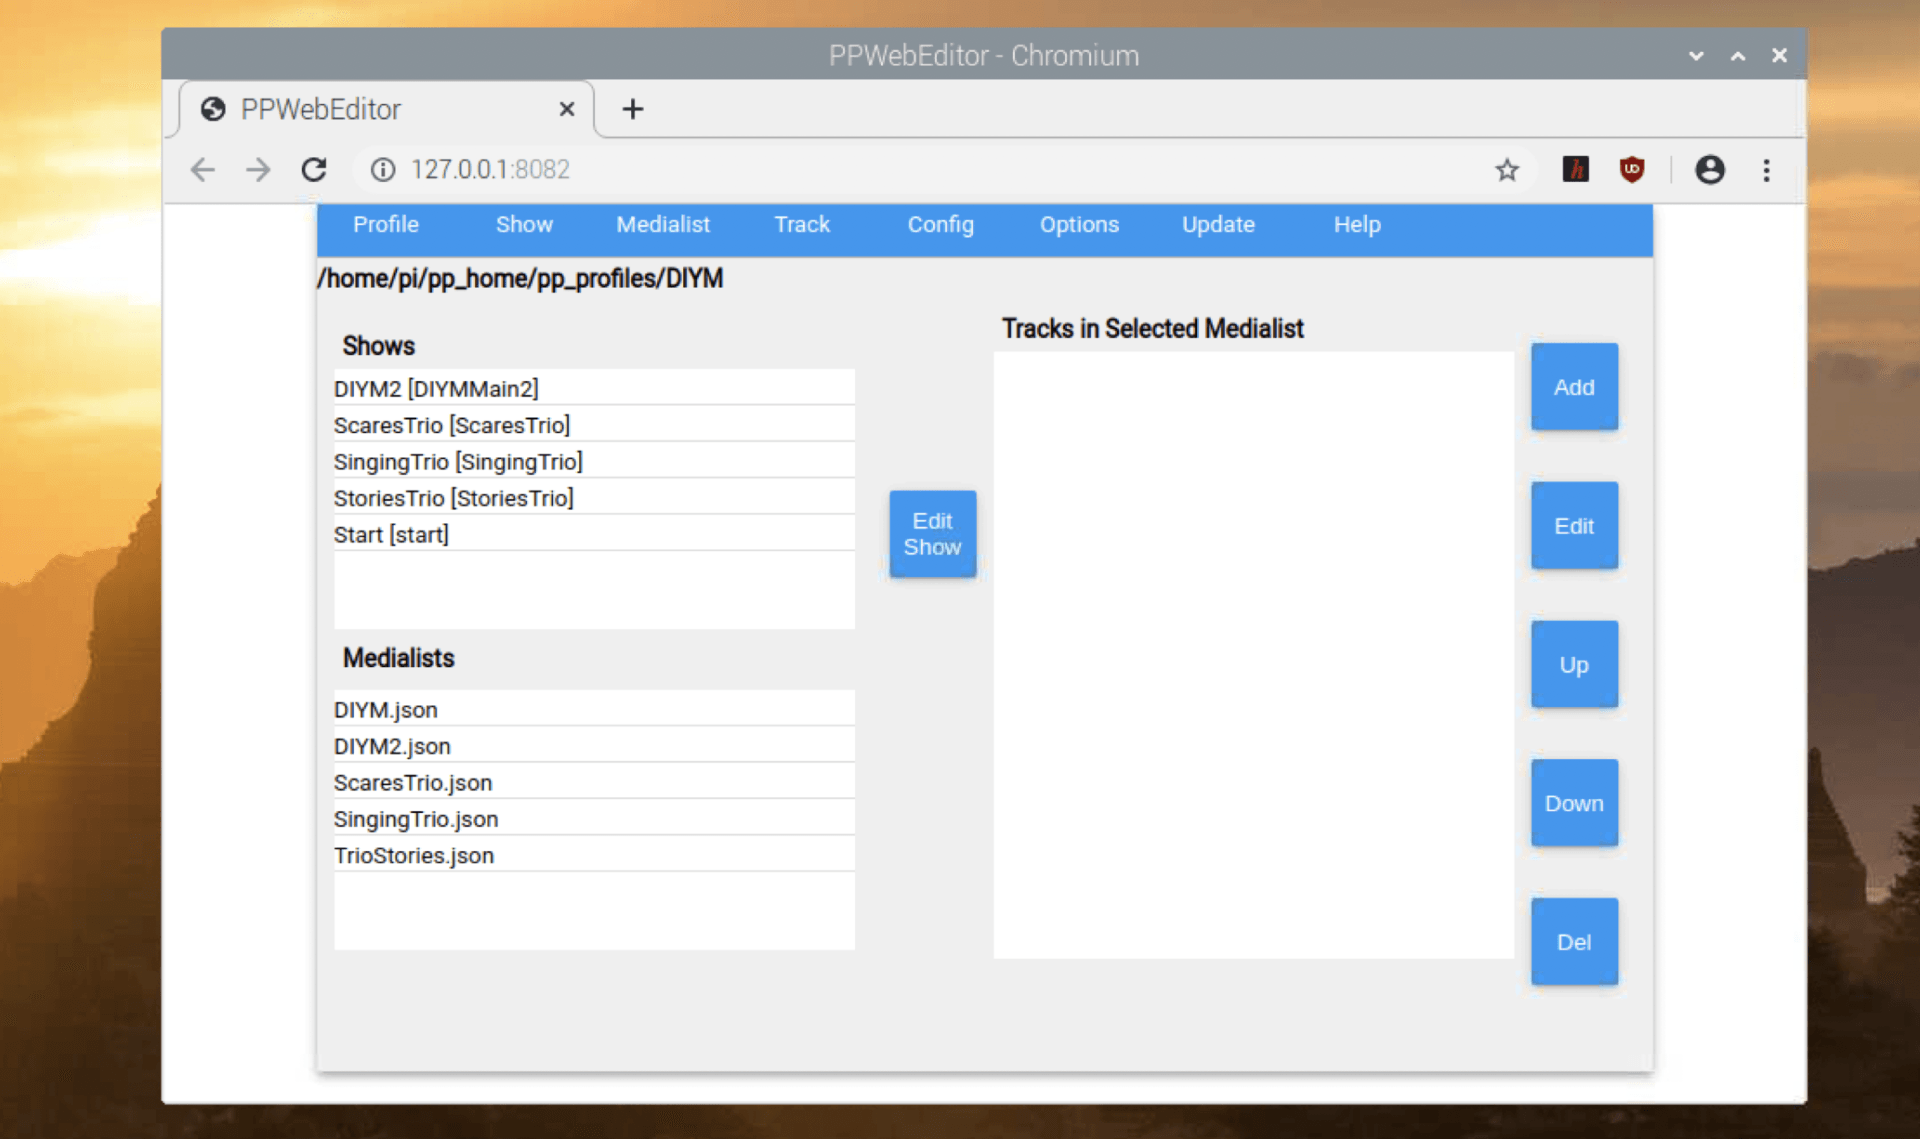
In the list of shows are three show files which contain a list of tracks for each topic. They are:
- ScaresTrio (This contains the tracks for the 'scare' button)
- SingingTrio (This contains the tracks for the 'song' button)
- StoriesTrio (This contains the tracks for the 'story' button)
Each track is a reference to the video file itself.
I will explain how to add an additional song file step-by-step. The steps are almost identical for the other categories.
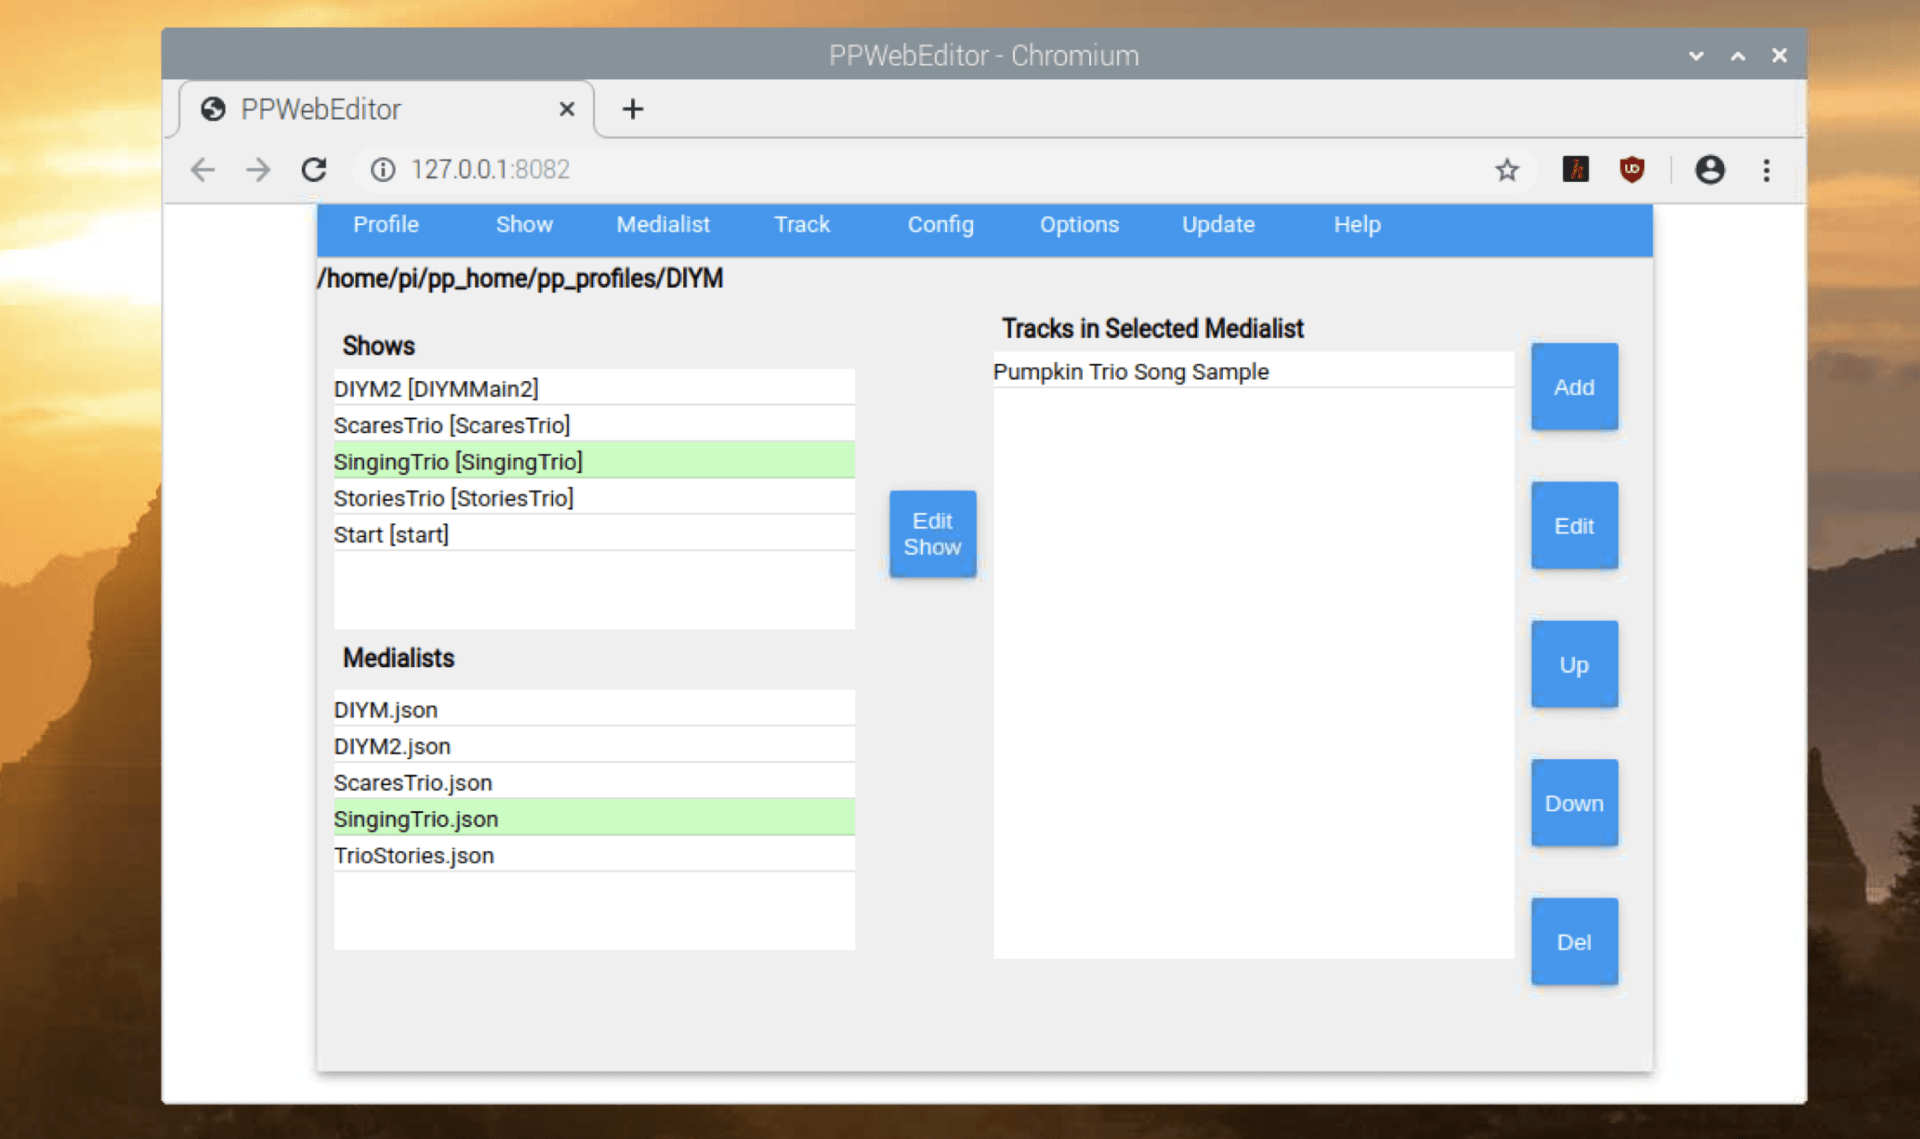
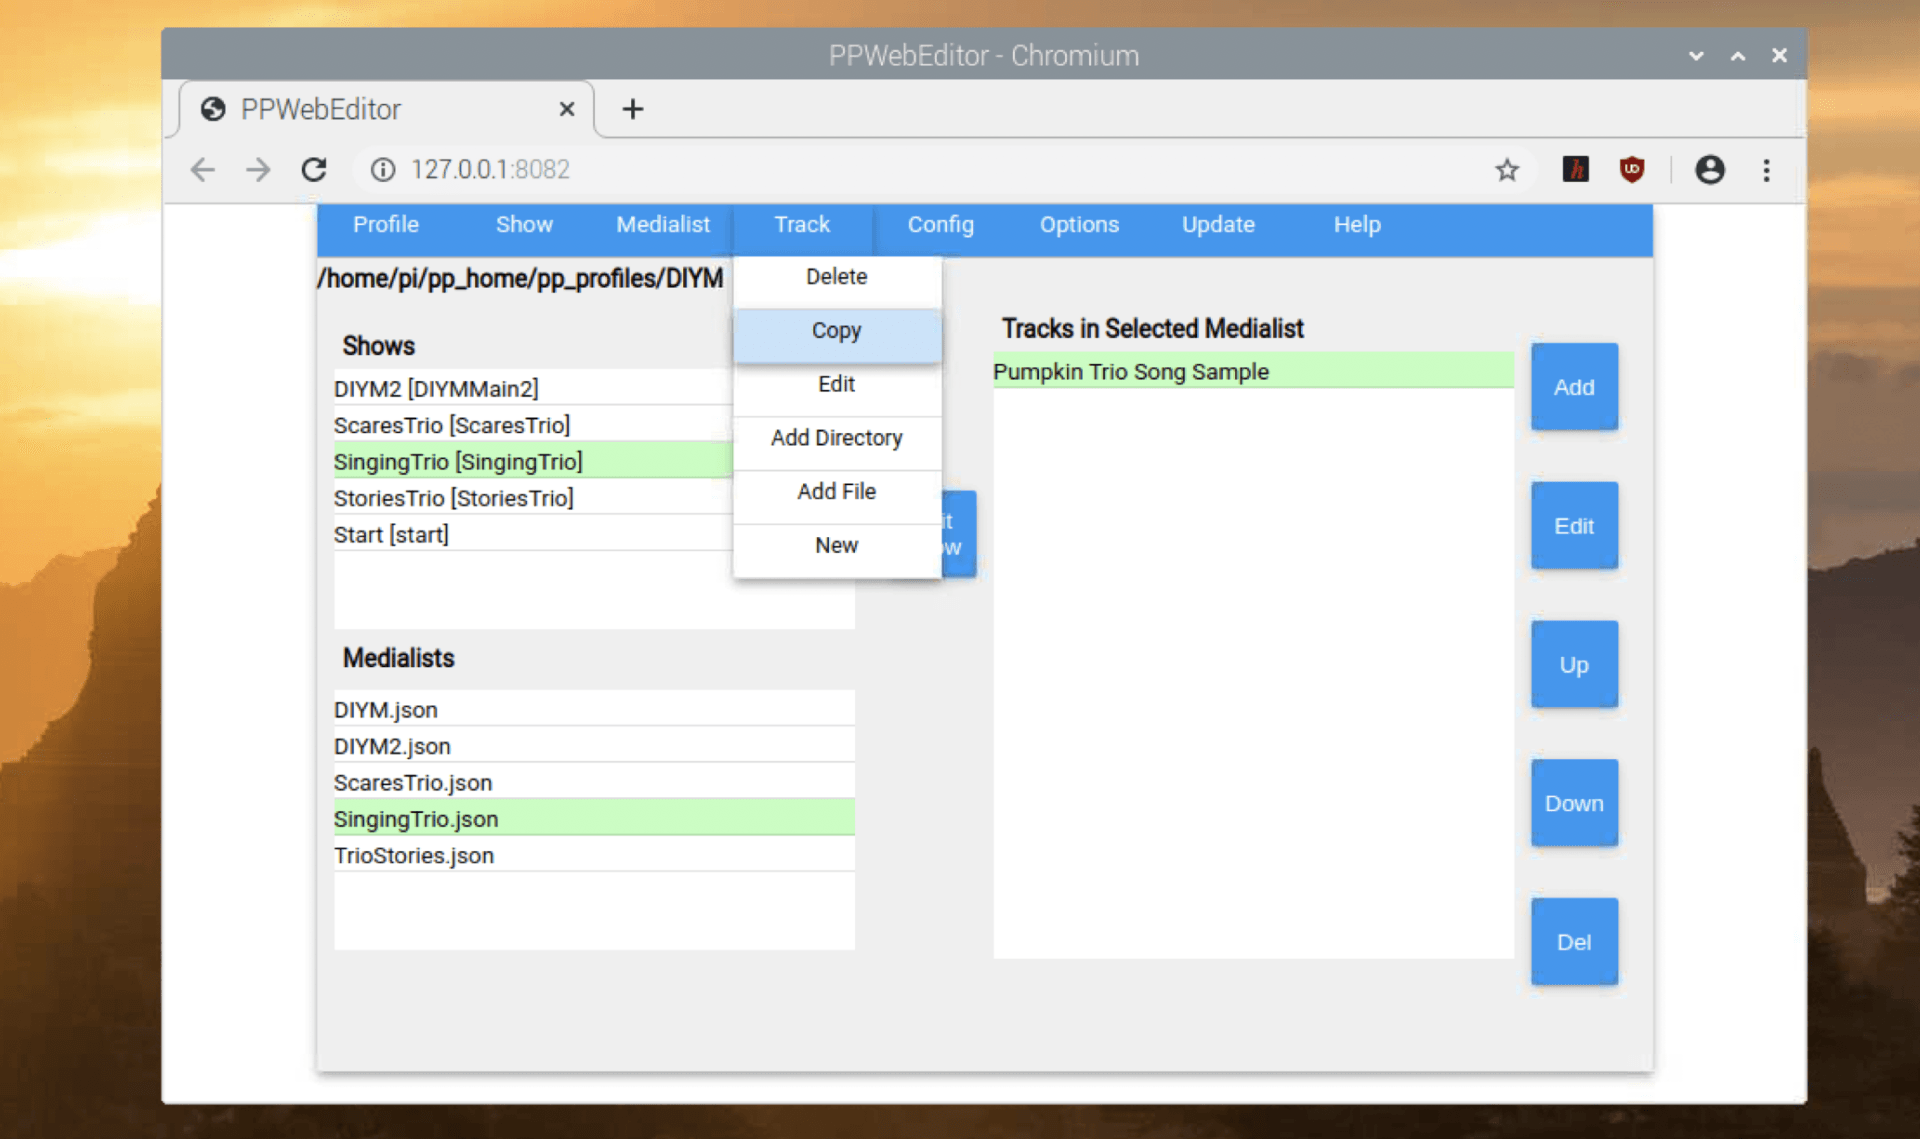
Single click on the show file for 'SingingTrio [SingingTrio]'. This will list the tracks for this show in the right most window.
To use the existing track as a template, single click on it and then choose 'Track' --> 'Copy' from the menu bar along the top of the window.
With the new track selected press 'Edit' from the blue buttons on the right hand side.
In the track editor window which appears there are just two fields which you should update.
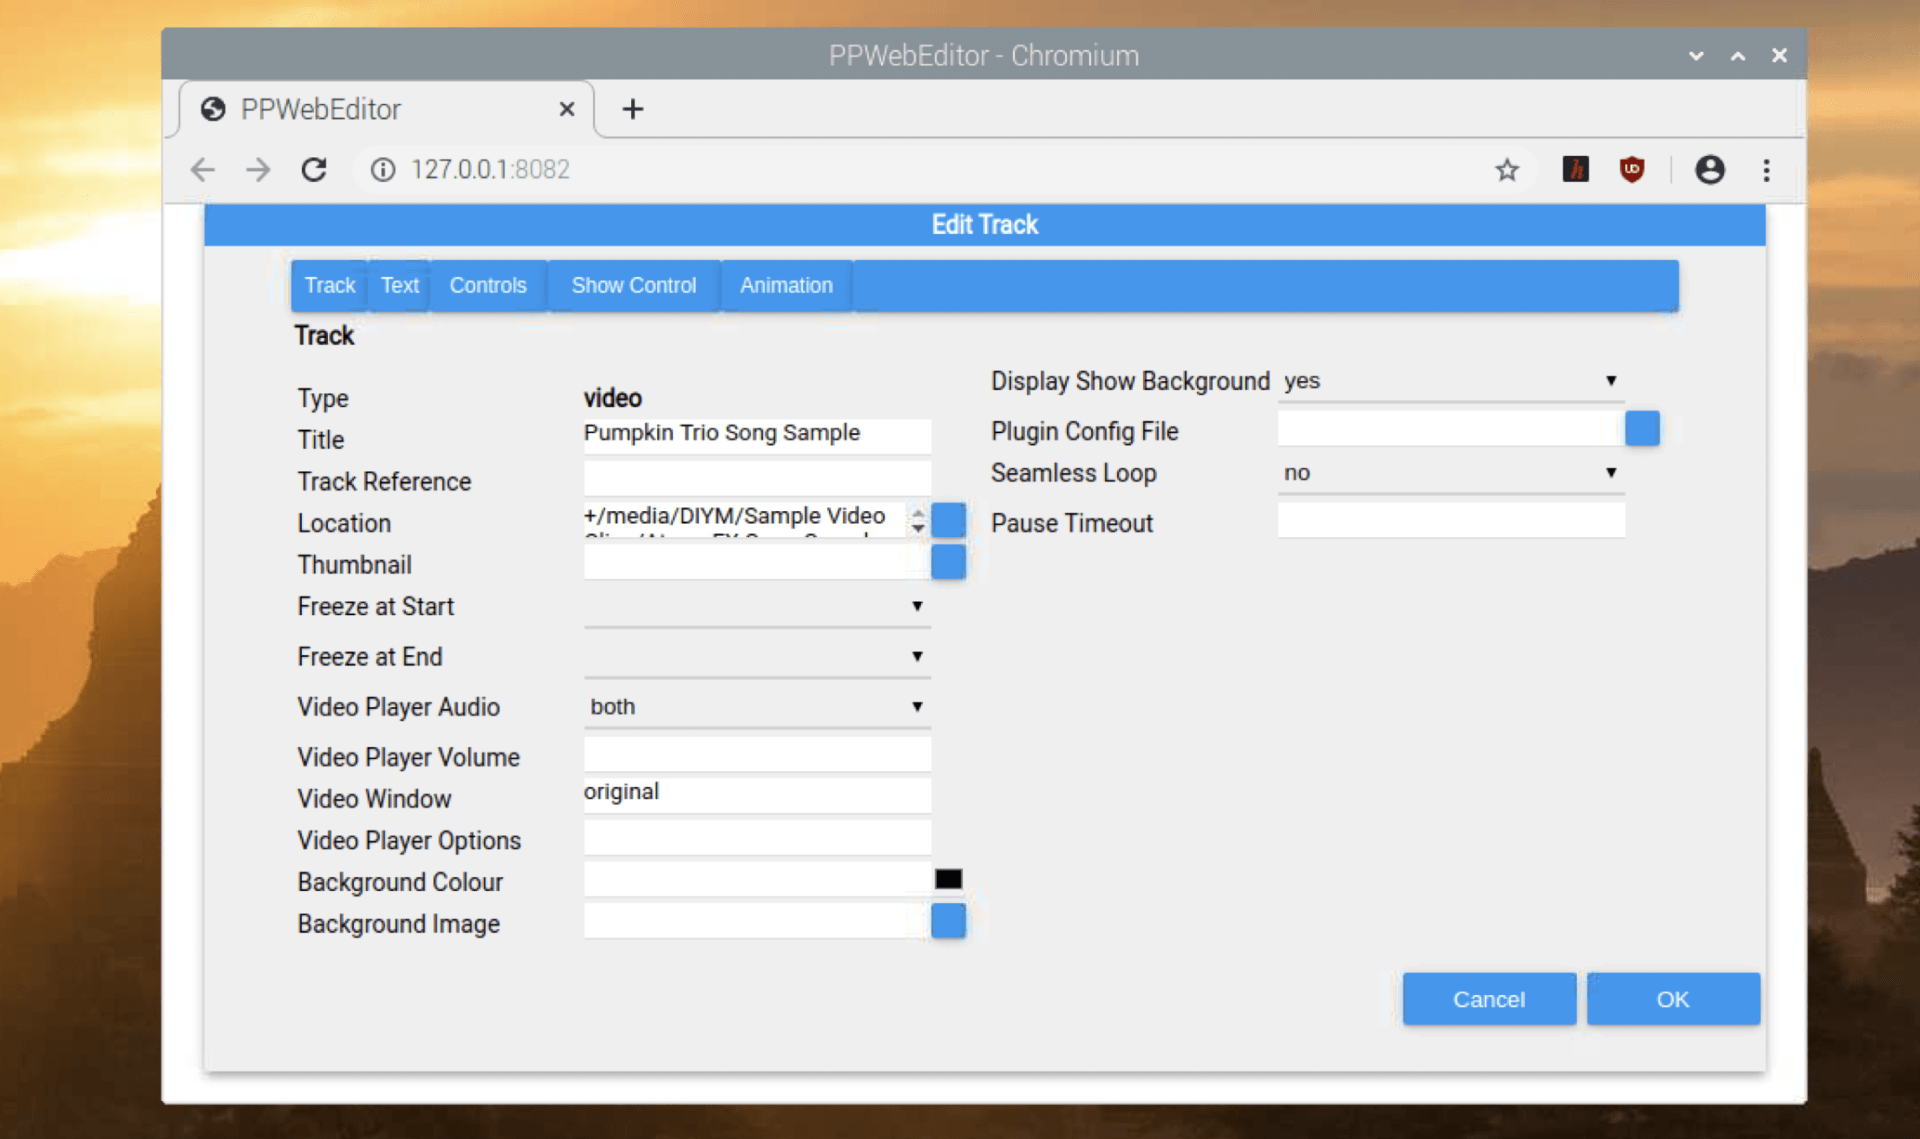
Title: Change this to a suitable title to recognise your new video file by.
Location: Press the blue button next to this field to navigate and select the video file you wish it to play
Once both fields have been updated you can press 'OK' to close the track editor.
The show itself saves any changes instantly. So you can now close the web editor and re-open your show in PiPresents to check your edits have worked as intended. Don't forget that it is set to choose a file at random so don't be alarmed if your file does not play as soon as you hit the button for the category if there is more than one track in that listing.
I encourage you to refer to Ken Thompsons very in-depth and helpful manual if you would like to further customise your show. You can find it here: https://pipresents.wordpress.com/
Comments


