
RC & Programmable Domino Laying Machine
How to 3D print and assemble your very own programmable and remote controllable automatic domino laying machine.
Who likes knocking down absurdly long runs of dominoes? I do. Who doesn't like laying them all by hand. I don't. That's why I made this. 😊
Using some basic electronics this machine can line up well spaced rows of wooden dominoes. You can drive it around corners, forwards and backwards - just don't drive into your already laid dominoes. You can enter a list of instructions to your robot via the Arduino IDE, upload with USB and then send it on it's way to follow your instructions, or you can open the phone app and drive it live via bluetooth.
List of items used in this project and where to find them:
(As an Amazon Associate I earn from qualifying purchases.)
- Arduino Uno (x1) - https://geni.us/ArduinoUno
- Micro continuous rotation servo (x1) - https://geni.us/360MicroServo
- Micro 180º servo (x1) - https://geni.us/MicroServo
- LM317 DC-DC Converter (x1) - https://geni.us/LM317
- Six AA Battery Holder (x1) - https://geni.us/6AABatteryHolder
- AA Batteries (x6) - https://geni.us/AABatteries
- 1:90 TT DC Motor (x1) - https://geni.us/1-90GearedTTMotor
- L298N Motor Driver (x1) - https://geni.us/L298N
- Limit Switch with roller arm (x2) - https://geni.us/ContactSwitch
- 1602 LCD Shield with keypad (x1) - https://geni.us/1602LCDKeypad
- HM10 Bluetooth Module (x1) - https://geni.us/HM10Bluetooth
- Rubber Bands - https://geni.us/RubberBands
- Dominoes - the ones I used (x lots) - https://geni.us/Dominoes
- 4 Way Wire Connector (x1) - https://geni.us/WagoConnectors
- Electrical ‘Hookup’ wire - https://geni.us/22AWGWire
- Filament for 3D printing - I used this cool silky silver from Geeetech: https://geni.us/GeeetechSilkSilverPLA
- Velcro Cable Tidy (for domino ejector) - https://geni.us/VelcroCableTidy
Nuts, bolts and screws needed (https://geni.us/NutsAndBolts):
- M3x6 (x2)
- M3x10 (x21)
- M5x15 (x2)
- M5x20 (x2)
- M5x25 (x1)
Downloads:
3D printed parts to assemble the machine: https://www.thingiverse.com/thing:4694940
The code to upload to the Arduino can be found here: https://github.com/DIY-Machines/RC-Domino-Machine-V1
The Rapid Domino Reloader (not yet patented) and fun accessories: https://www.etsy.com/uk/listing/1077959216
Wiring Diagram:

Programming paths with Arduino IDE
I'll explain now how to enter a preprogrammed pattern of domino lying instructions into your machine for it to automatically execute.
Our set of commands actually call functions to carry out each part of the pattern and look a bit like this example:
Every program should start with startProgramme(); and end with endProgramme();.
startProgramme() simply clears the LCD display and announces that it's starting your programme by printing 'Play programme' to the screen. It then pauses for 0.5 a second (so you can see the message on the screen) and then checked that the domino carousel is aligned by rotating it around by one station.
The function endProgramme() just announces the program is completed by printing a message to the screen.
Each line between these two functions tell the machine which direction to move and how many dominoes to lay in that direction.
The first part of the first value which represents the direction of movement and can be either ‘F’ for forward movement or ‘B’ for backwards. You can’t lay a domino when heading backwards. It’s used to help manoeuvre the machine in smaller spaces.
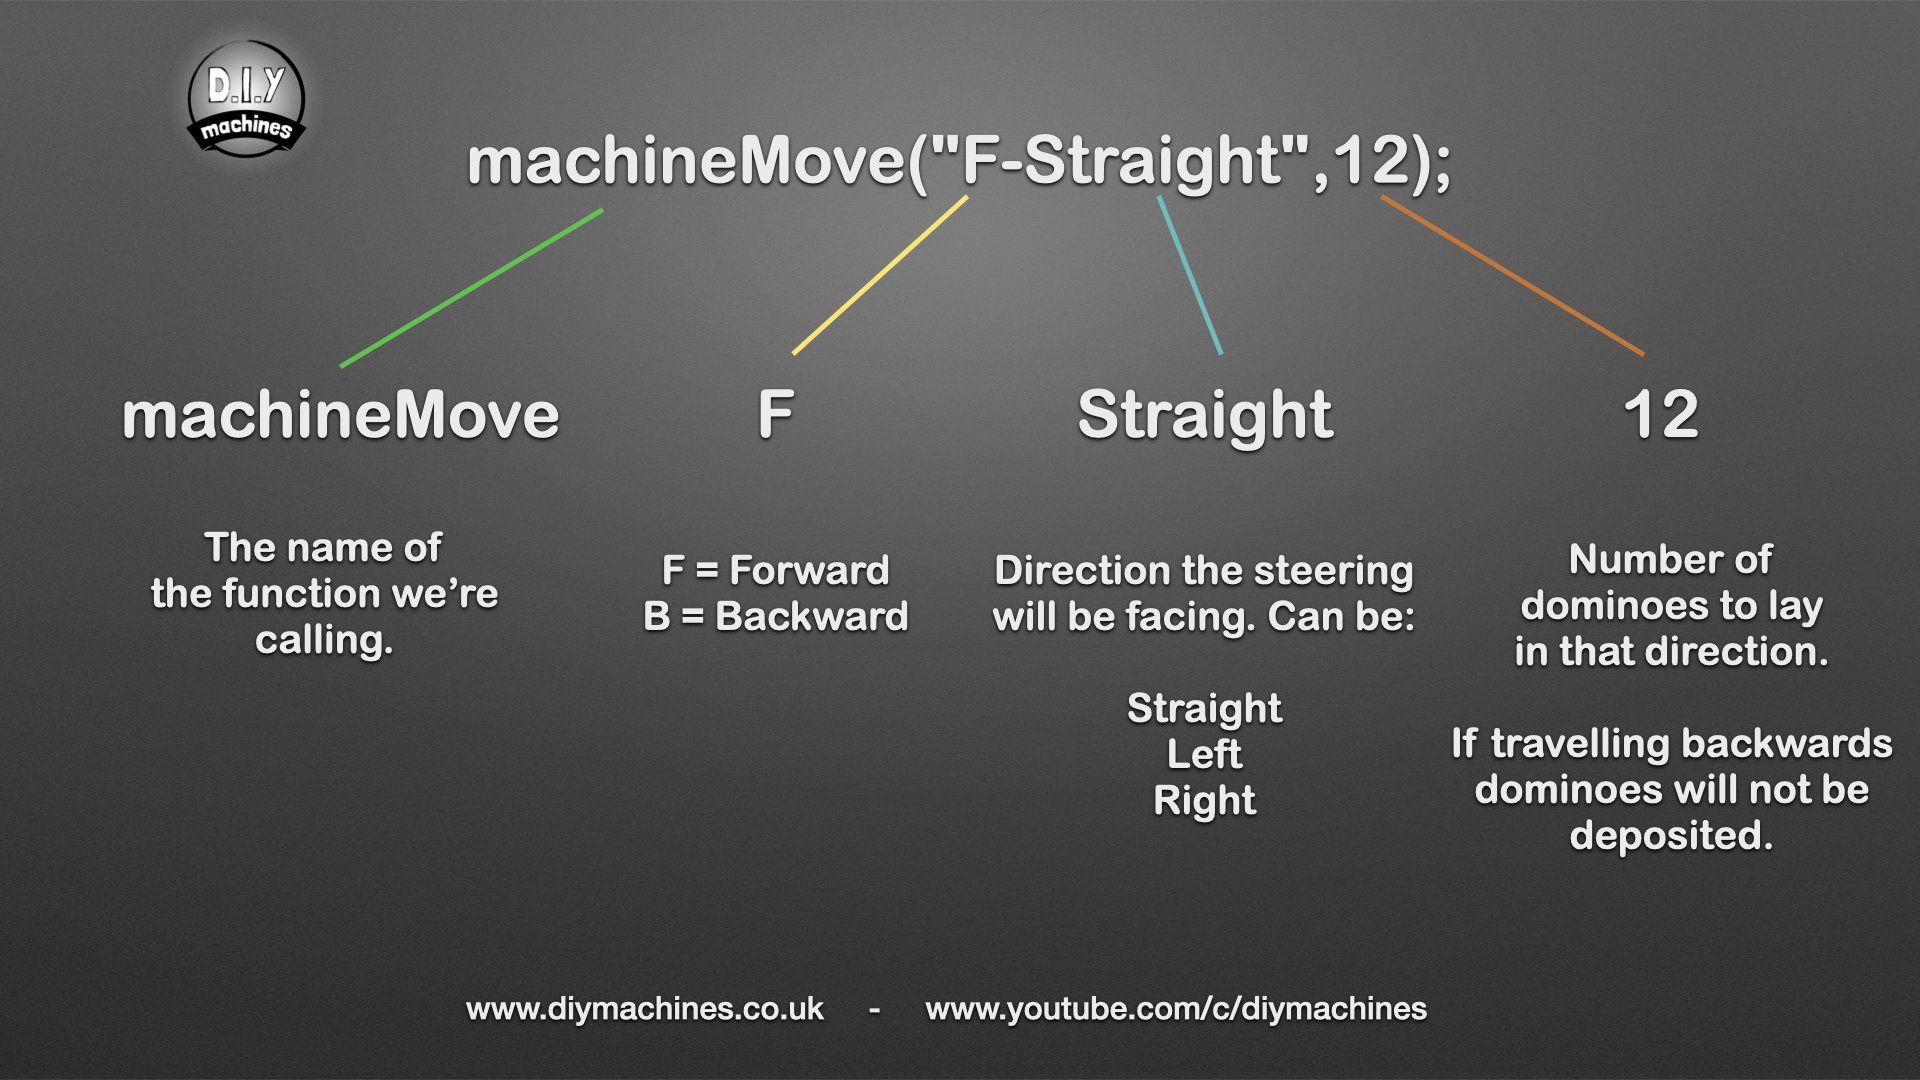
The second part of this value controls the steering. It can be either ‘Straight’, ‘Right’ or ‘Left’. This will make the front servo point the front wheels in that direction.
The second value simply tells the domino machine how many dominoes to lay in that direction when moving forwards and how far to move backwards if travelling backwards. Whilst moving backwards dominoes will not be deposited but the number entered is the equivalent distance travelled as moving the same number forwards.
You can store four of these programs in your machine alongside the bluetooth control we will be adding in the second video.
Your instructions should be stored in the main loop of our Arduino code. Here you will see a case for btnRIGHT, btnLEFT, btnUP and btnDOWN. Which correspond to these keys when you want to play it out. Below is what the switch statement looks like in the example code provided:
You can replace the contents of any of these cases with the exception of case btnNONE which should be left with just the break; line in it.
Our machine will keep track of how may dominoes are left in each stack and automatically move to the next one as required. Once the entire carousel has been emptied it will pause the program and prompt for a refill. Once refilled you can press a key to resume the laying. I found it ideal to print a second carousel so I can be loading whilst its laying. :)

There are a few more values in the code which you might want to adjust which are located towards the top of the provided code and have self explanatory comments alongside them. They are:
To execute the pre programmed code. Re-upload your sketch via USB with the Arduino IDE. Disconnect the USB and then connect the batteries to power up the project. It will ask you to temporarily remove the carousel so it can figure out where the main mechanism is in it’s cycle without damaging anything - remove the carousel if it has already been installed before confirming it's not there by pressing any key (except the 'X' which reboots the Arduino)
Choose IDE mode by pressing '1' or 'left' depending on if you have added our 3D printable buttons yet. Then simply add the carousel preloaded with dominoes and press the key which corresponds to the switch case you stored your list of instruction inside in the code.
To play the example we highlighted earlier press up.
FAQs
Comments


