
Smart Chess Board - Play online or against Raspberry Pi
Hello, I’m Lewis, this is DIY Machines, and this is how you can build your own Smart Chessboard for both local and online matches.
Though this board has a great single player mode, If you build two, and bond them together digitally you then send one to a friend or loved one so you that you can play chess together over the internet with real chess pieces and only a few seconds of delay. It’s a great way to share some time and to connect with people who are physically distant.
Take a look at the video which highlights the main features at the beginning before explaining in detail how to make your own:
Here are a few more features:
- Check your moves are legal and warn you when you don't play by the rules
- Suggest what would be a good next move for you
- Entirely 3D printable including the chess pieces
- Very cool looking LED lighting to convey the game status and provide the lighting for evening games
- Smart control panel which guides you through how to use the board with intelligent backlighting
- Small and low cost OLED screen to help guide you through using it
- Powered by USB, so you can connect it to mains or run it from a common USB battery pack for untethered play
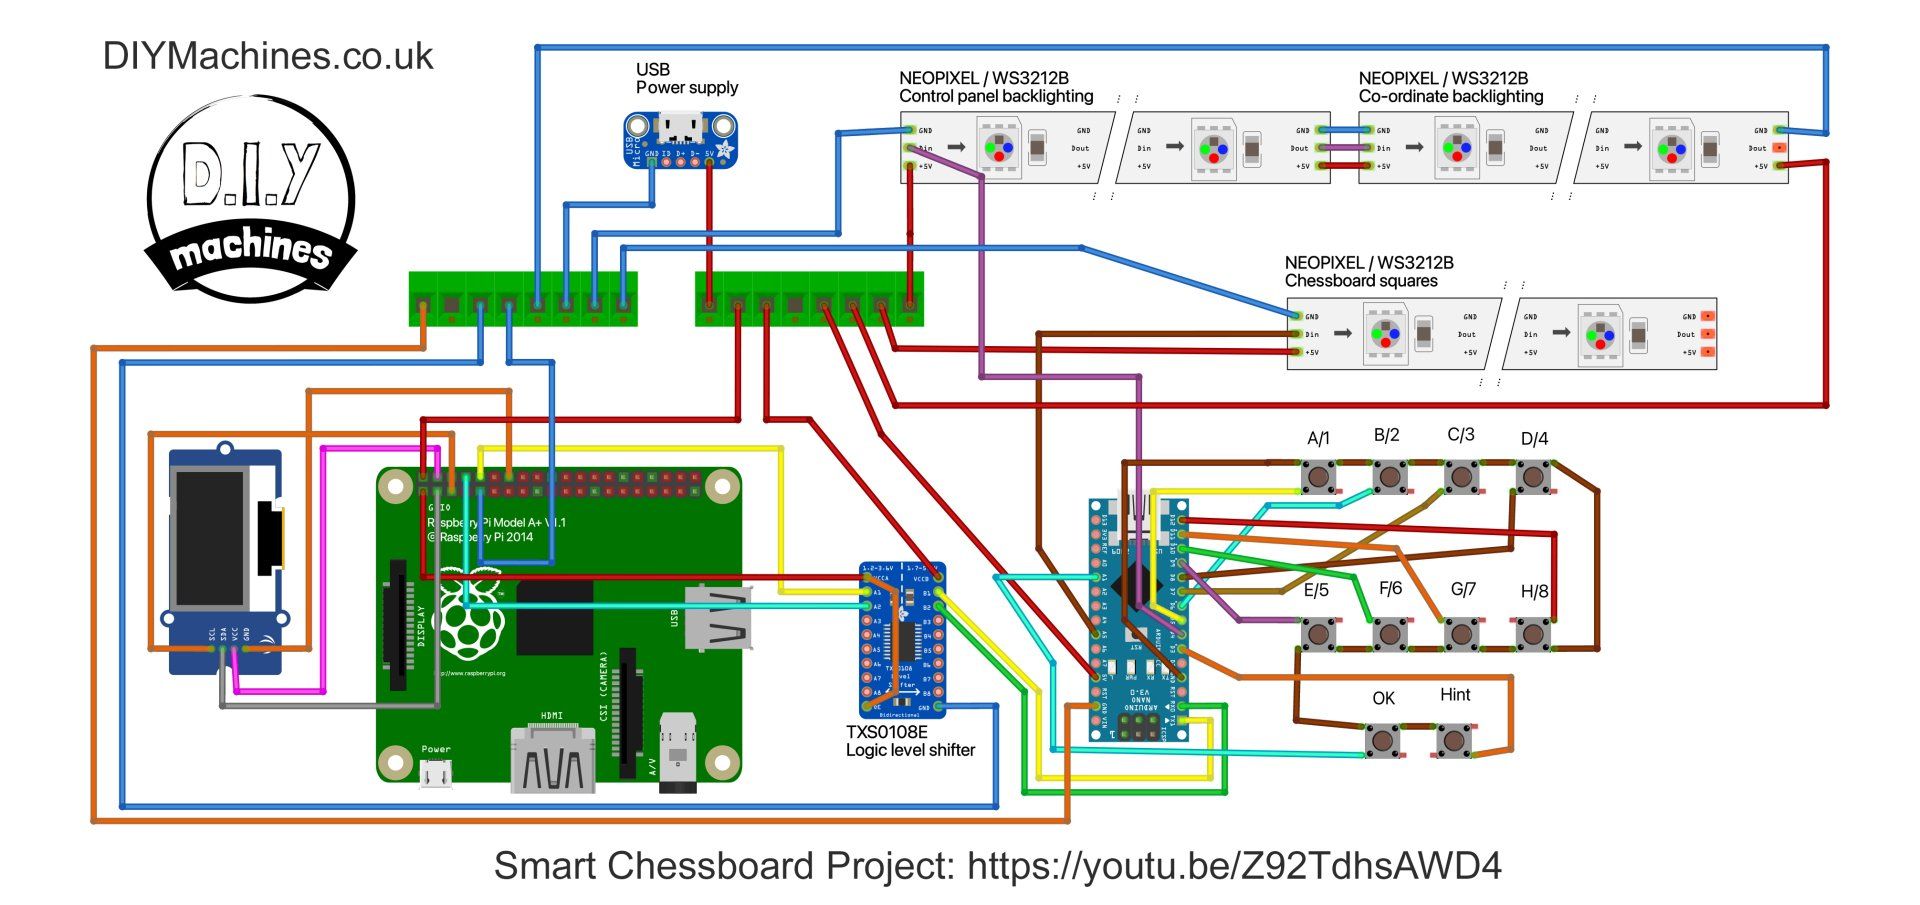
The internet connectivity, computer opponent and rule checking are handled by a Raspberry Pi, whilst the lighting and buttons are taken care of by an Arduino Nano.
List of items used in this project and where to find them:
(As an Amazon Associate I earn from qualifying purchases.)
- (x86) Neopixels/WS3212b on a 30 per meter roll. - https://geni.us/5mWS2812B30m
- (x10) 6x6x5mm tactile momentary push buttons - https://geni.us/6x6TactileButton
- (X1) Arduino Nano - https://geni.us/ArduinoNanoV3
- (X1) Raspberry Pi (Zero can cope but recommend model 3 A+) - https://geni.us/RaspberryPiAPlus
- (X1) Micro SD Card 8Gb or higher for Raspberry Pi - https://geni.us/Micro-SD
- (X1) Logic level shifter - https://geni.us/TXS0108E-Shifter
- (x2) Wiring blocks for at least 6 wires each. I used the Wago 243 series - https://geni.us/Wago-243
- Some Wire - https://geni.us/22AWGWire
- (x12) M3x6mm bolts - https://geni.us/NutsAndBolts
- (x4) M2.5 x 6mm bolts (for securing Raspberry Pi) - https://geni.us/PiBolt
- Some plastic for the printed parts (I used PLA, including this wood infused lumberjack from 3D Jake who kindly help support my project) - https://www.3djake.com
- (x1) USB female DIP board - https://geni.us/FemaleMicroUSBDIP
- (X1) 0.96 Inch OLED screen - https://geni.us/0-96OLED
Downloads:
Further down this page are the instructions for configuring the software on the Raspberry Pi.
3D printed parts can be downloaded from here: https://www.thingiverse.com/thing:4800488
Download the code from Github: https://github.com/DIY-Machines/SmartChess
Please consider supporting my projects by printing these chess pieces perfectly sized for the board: https://www.etsy.com/uk/listing/1081770177

Wiring Diagram:
Setting up Raspberry Pi:
The following steps explain step-by-step how to install the software for this project so that you van play locally on your board against the computer without requiring an internet connection as well as how to configure it to play online against another human player.
I'll guide you through:
- Flashing the Raspberry Pi OS onto the SD card
- Configure it heedlessly to connect to wifi and accept SSH connections
- Install Stockfish (the chess engine)
- Download the code I've written for the project from Github
- Install other needed third party libraries
- Configure the serial connection between the Pi and Arduino
- Set it up to start the software automatically after it boots
- Bond two boards together if your making two to play online against a friend or family member.
Installing and configuring Raspbian / Pi OS on to your SD card
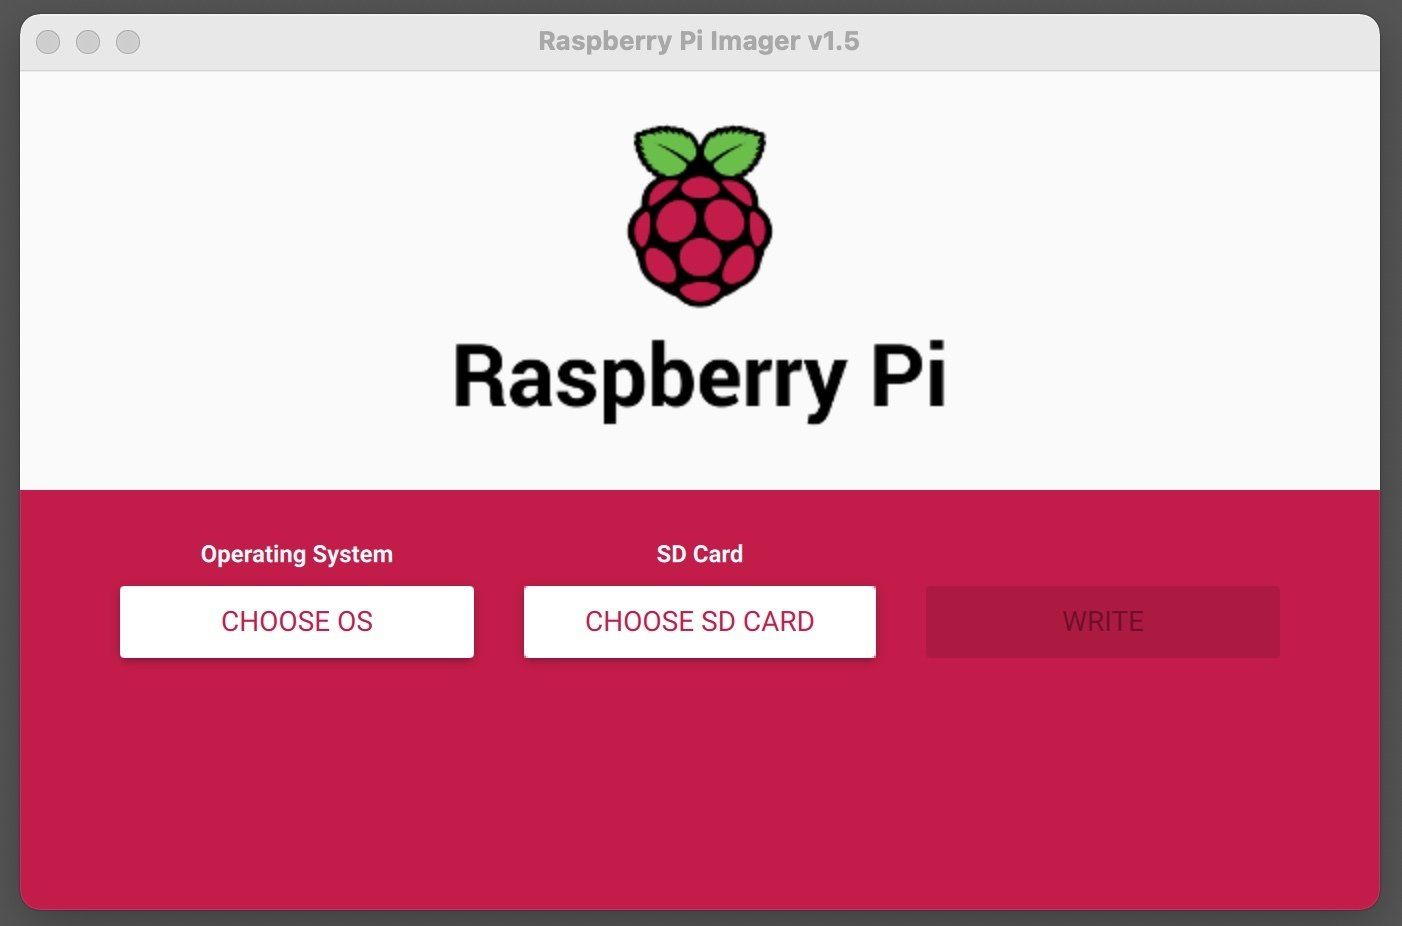
To begin with you will need to download the Raspberry Pi Imager from the foundations website: https://www.raspberrypi.org/downloads/
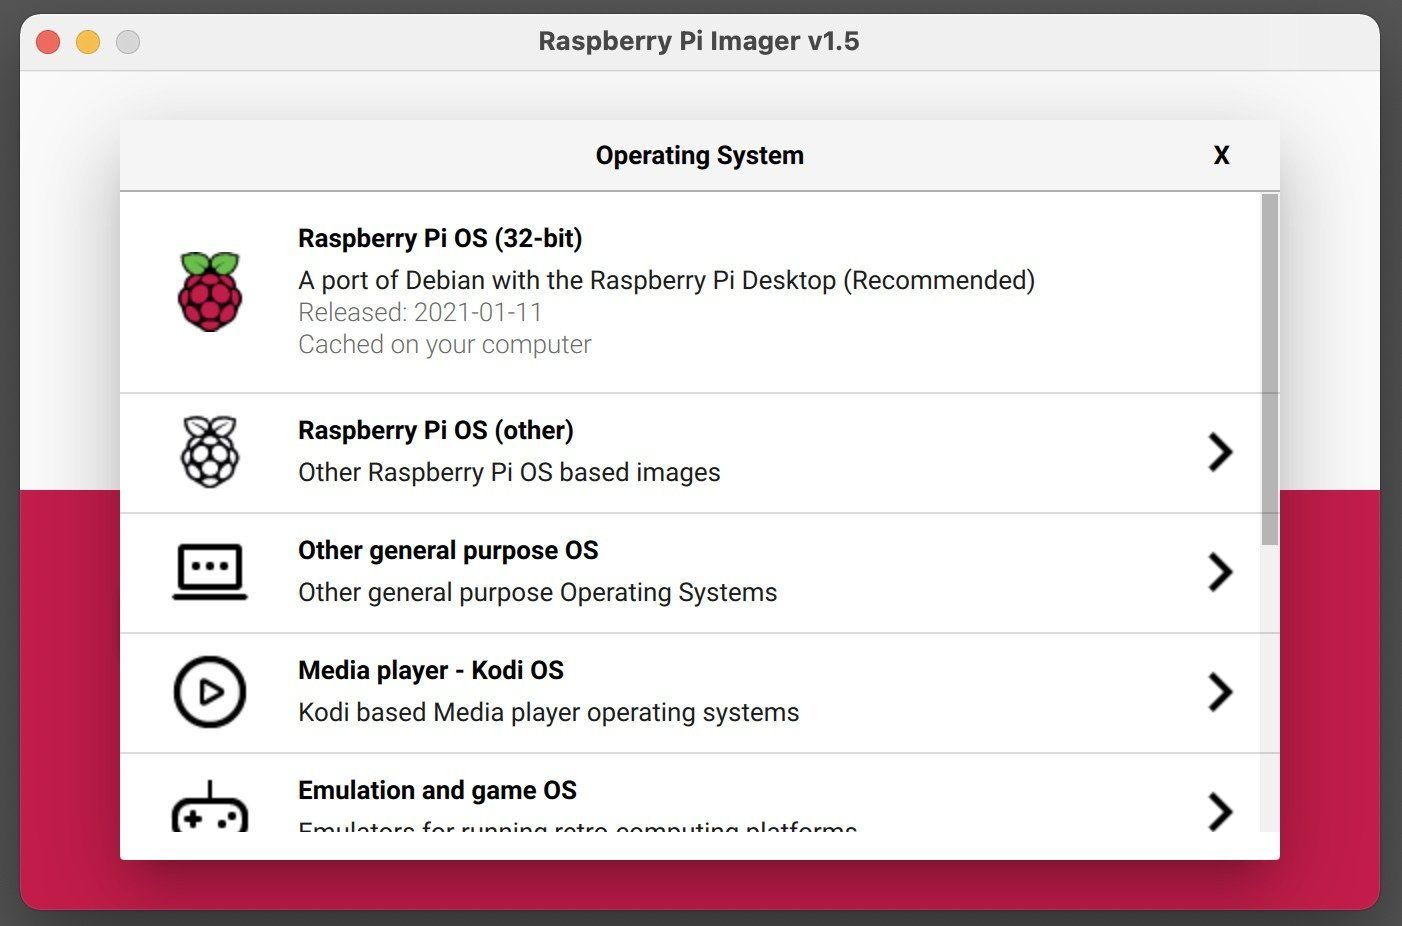
Once you have downloaded and installed the software you can insert your Micro SD card into your PC and select 'Choose OS' followed by 'Raspberry Pi OS (32 bit)'.
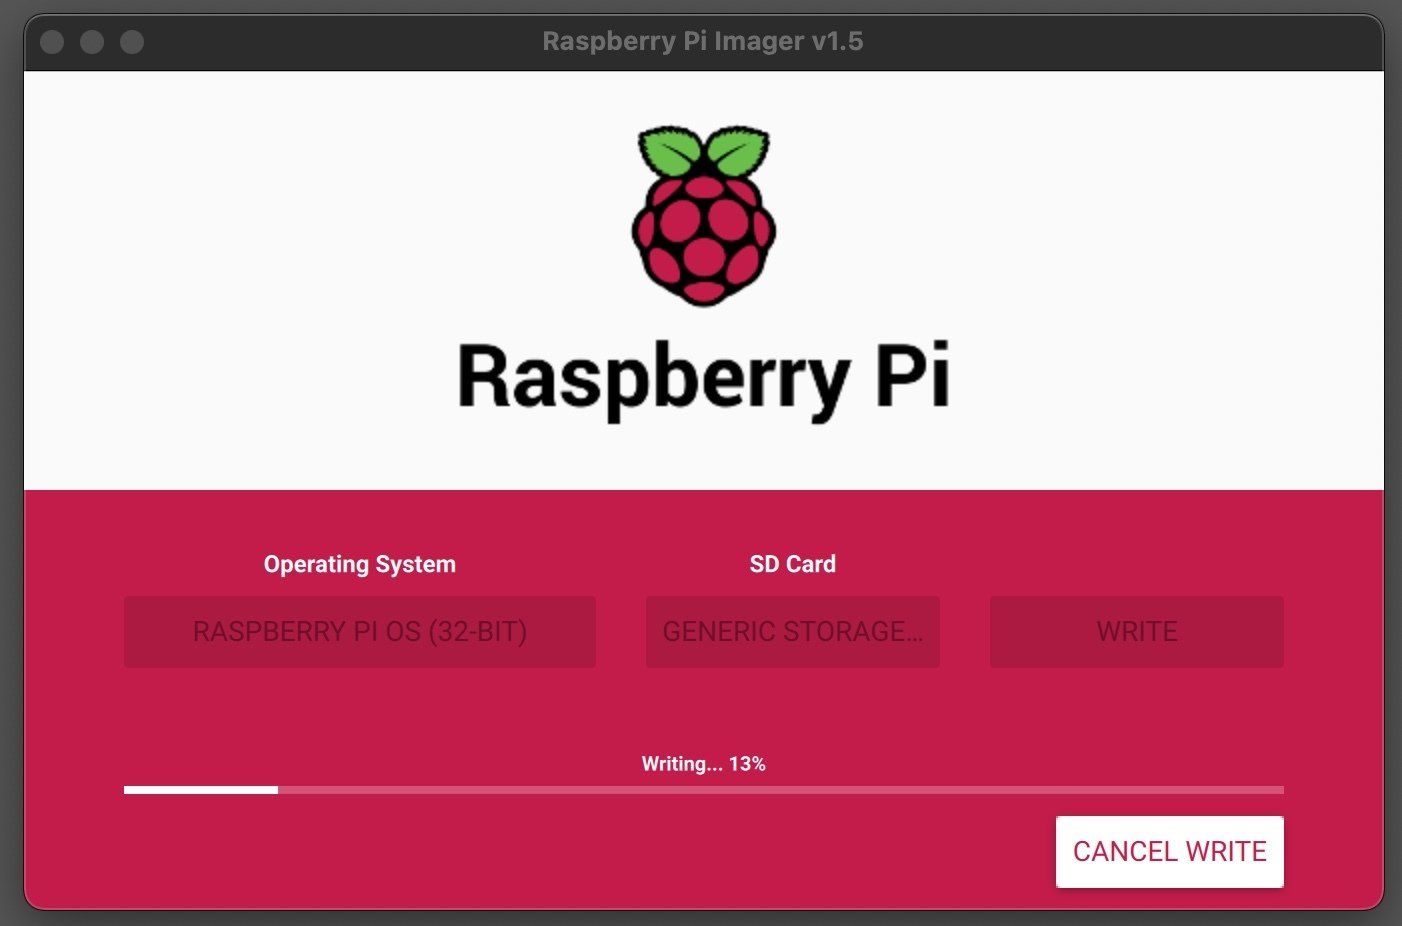
Choose your SD card and then press 'Write'. If you have not installed this OS before then the program will spend a little time downloading the image file before proceeding with writing it to your SD card and then verifying. Once completed remove the SD card and then re-insert it into your computer. You should see it mount itself with the drive name of 'boot'.
We will add two files to the boot drive to help set up the Pi headless (without needing to connect a keyboard and monitor to it). The first file is simply a blank document saved with the file name 'ssh'. This will be looked for by the Pi when it boots, when it sees it it will know to enable SSH which we will use to connect to it shortly.
To do this we also need to connect the Pi to your wifi. This time create a new text document with the filename 'wpa_supplicant.conf'. In this document add the following text:
You should change a few parts to suit your situation before saving. Set the country code to your region, if you're not sure of the correct country codes you can look them up here: https://en.wikipedia.org/wiki/ISO_3166-1_alpha-2
Also replace "YOURSSID" with the name of your wifi network and "YOURPASSWORD" with the password for your wifi network. You can then save and close the document.
Safely remove the SD card from your computer and insert it into your Raspberry Pi. Apply power to the Raspberry Pi and wait a couple of minutes for it to perform its initial startup.
Connecting via SSH
If you prefer to at this point, you can connect to the Pi with a keyboard, mouse and display if your more comfortable working with it that way. If your comfortable you can connect to it via SSH instead which is what I will be doing now. Either way achieves the same outcome.
Once the Pi has finished booting (you can look for the activity light settling down) you should be able to connect to it via SSH.
ssh pi@192.168.86.30
You will need to find the correct IP address for your Raspberry Pi. (You can try "ssh pi@raspberrypi.local").
Update the Pi
We will start by issuing the following commands one by one. This will check for and apply any updates that are available:
sudo apt-get update
sudo apt-get upgrade
The second command is likely to take a few moments. It's a great opportunity to make yourself a cup of tea. :). Once done we can install another set of software - python-serial:
sudo apt install python-serial
Install Stockfish
Stockfish is an open source chess engine. You can find out more about here if you want to: https://stockfishchess.org It is very easy to install, you just need to run the following command:
sudo apt-get install stockfish
Download the projects code
The code for this project is available to download from Github. To do this you will need a Github account. They are free to create and can be done here if you need to: https://github.com/join
When you have an account we can issue the command:
git clone https://github.com/DIY-Machines/SmartChess.git
Git will ask for your account details and then will download the projects files to the 'pi' users home directory. If you type 'ls' you should see a folder named 'SmartChess'. This is where the projects files are contained.
Install third party libraries - AdafruitIO
There are several other pieces of software we need, most of which has been written by the great folk at Adafruit. The first part we will install is to help us with connecting the boards via the internet via Adafruits Adafruit.io platform. At the terminal run the command:
pip3 install Adafruit-io
Install third party libraries - Adafruit CircuitPython
The next install is for Adafruits CircuitPython. They have a good installation guide for that which you can reference here: https://learn.adafruit.com/circuitpython-on-raspberrypi-linux/installing-circuitpython-on-raspberry-pi . The general overview of it involved running the following commands one after another on your Raspberry Pi:
sudo pip3 install --upgrade setuptools
cd ~
sudo pip3 install --upgrade adafruit-python-shell
wget https://raw.githubusercontent.com/adafruit/Raspberry-Pi-Installer-Scripts/master/raspi-blinka.py
sudo python3 raspi-blinka.py
If after running the last line the script asks if you would like to set the system default to Python3 choose yes. When it asks you to reboot you should also choose yes. After the reboot is complete you should be able to run
ls /dev/i2c* /dev/spi*
on your Pi as see it return the result
/dev/i2c-1 /dev/spidev0.0 /dev/spidev0.1
Install third party libraries - SSD1306 and Pillow Library
Installing the SSD1306 library for the screen is as simple as running:
pip3 install adafruit-circuitpython-ssd1306
To install the Python Imaging library (PIL) and the required supporting libraries run:
sudo apt-get install python3-pil
Serial Connection
sudo nano /boot/config.txt
Addd line: dtoverlay=disable-bt
sudo nano /boot/cmdline.txt
Find the following text and remove it:
console=serial0,115200
Setting the program to start automatically at power on
First we need to ensure that the desktop environment starts up even when we do not have a monitor connected. Open the Raspberry Pi configuration utility by running
sudo raspi-config
Open the display options menus and set the default resolution to the bottom option.
Whilst we are here you should also go to the interfaces screen and enable the iC2 interface. Save, exit and reboot.
Now we can set the chess program to start up automatically when the Raspberry Pi boots up instead of having to rely on having a keyboard to hand to start the show (or connecting via VNC or SSH to achieve the same).
Before we do this you will need to turn on viewing hidden item in the view options of the Pi file explorer if you are following this guide with a keyboard, mouse, and monitor attached to your Pi. You could also use the keyboard shortcut of 'Ctrl' + 'H'.

Now navigate to: /etc/xdg/lxsession/LXDE-pi/ and copy the file 'autostart' to your clipboard.
Next, navigate to: /home/pi/.config. In this folder create a new folder called 'lxsession', and inside this folder create one called 'LXDE-pi'. We can now paste our copy of 'autostart' into this folder.
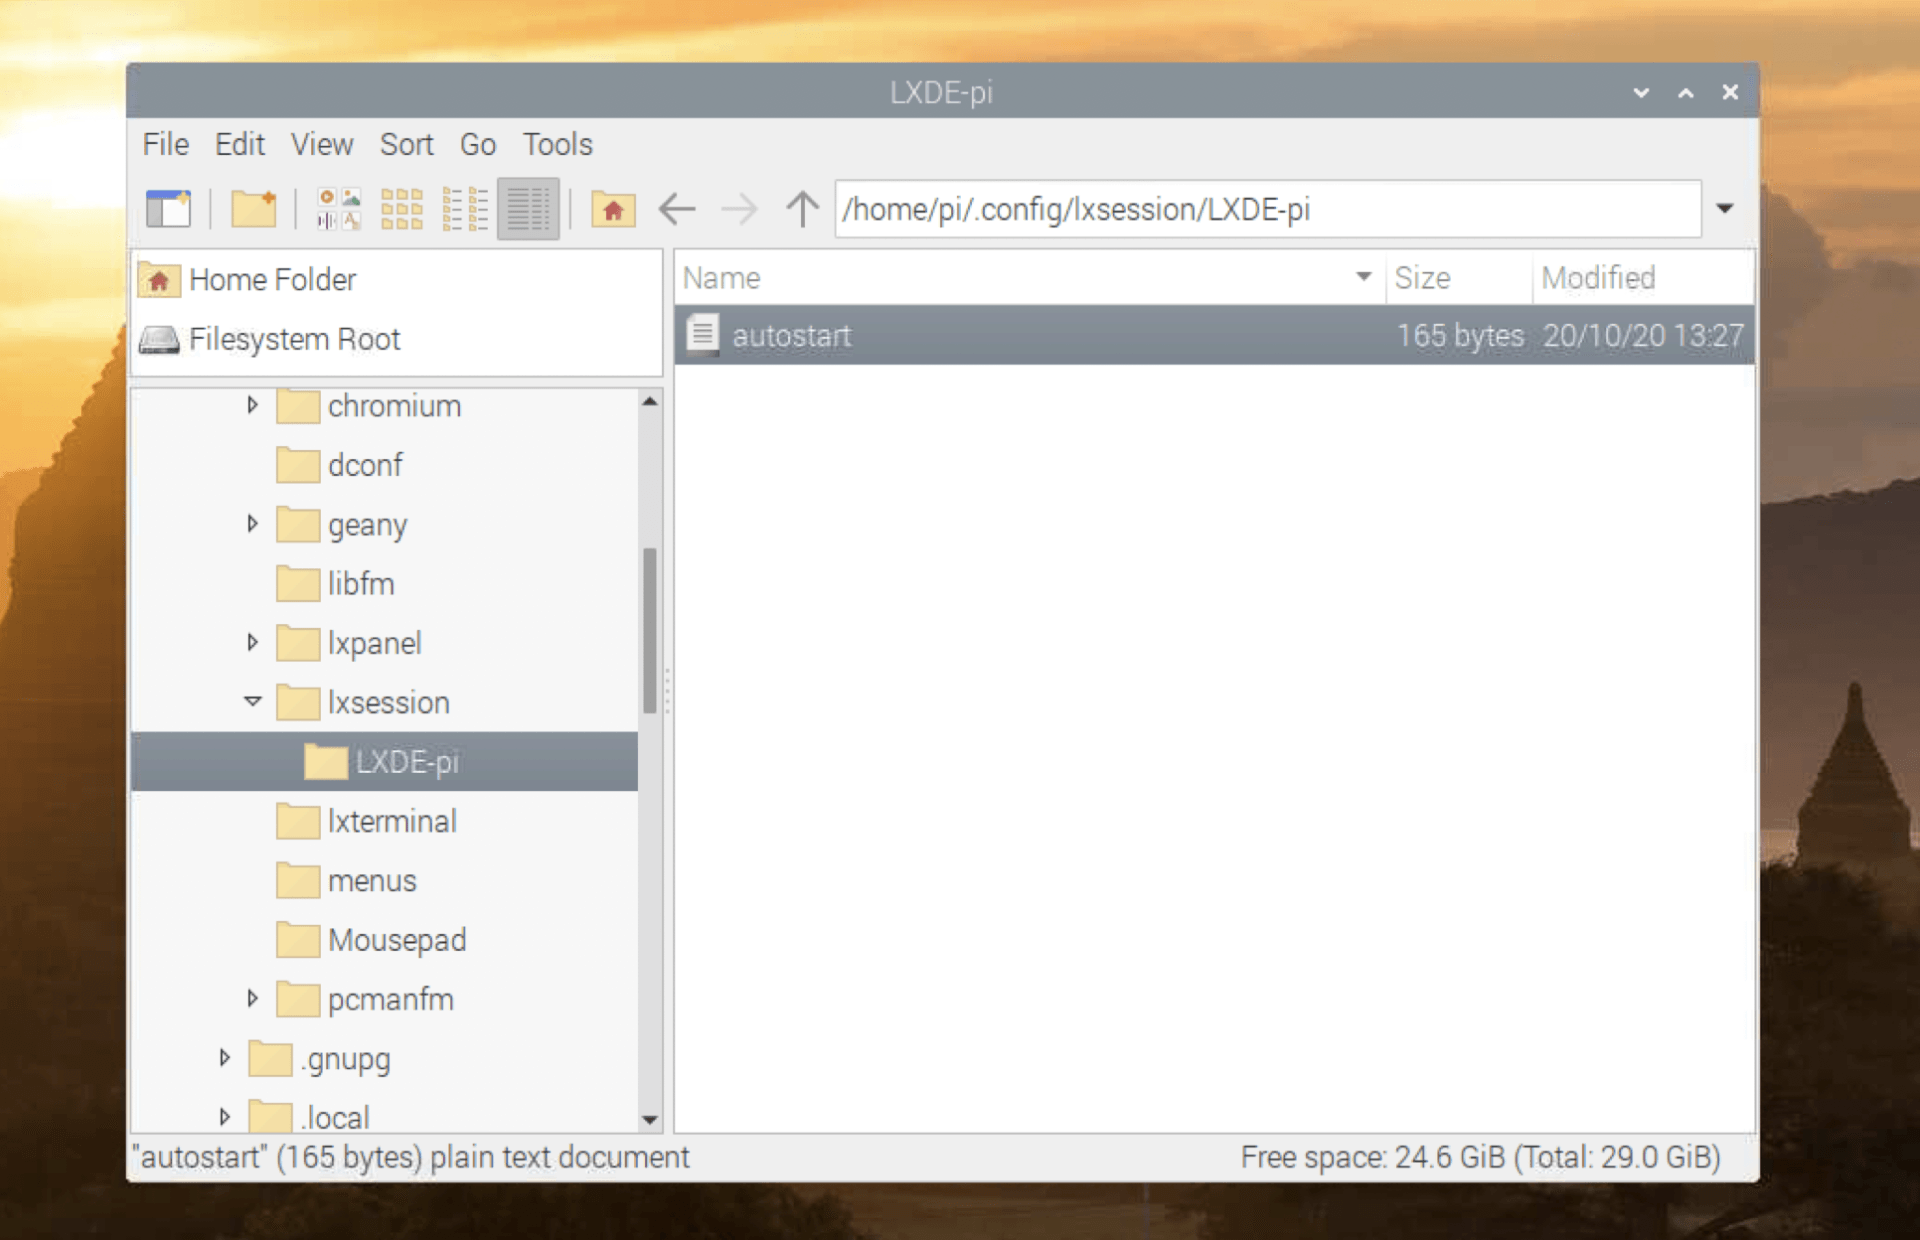
We can now open and edit the 'autostart' file found in /home/pi/.config/lxsession/LXDE-pi/autostart
You need to append the following line at the bottom of the document:
/usr/bin/python2 /home/pi/SmartChess/RaspberryPiCode/StartChessGame.py
It should look like the below after you have added the additional line we require.
Once done you can save the document and reboot your Pi. The chess software should start automatically shortly after the Pi has loaded, this can be confirmed by the text being shown on the OLED screen and the green loading sequence shown on the chessboard surface speeding up the moment the Raspberry Pi is ready to play.
Setting up online remote play
If you have made two boards and want them to play against each other remotely via the internet there are a couple more changes we need to make to the python code.
The boards will communicate using Adafruits AdafruitIO service. Their free tier has everything you need to make this work. If you do not already have an account then you can set one up at https://io.adafruit.com
Once set up, log into your account and then head to 'My Key' so that we can retrieve your unique keys.
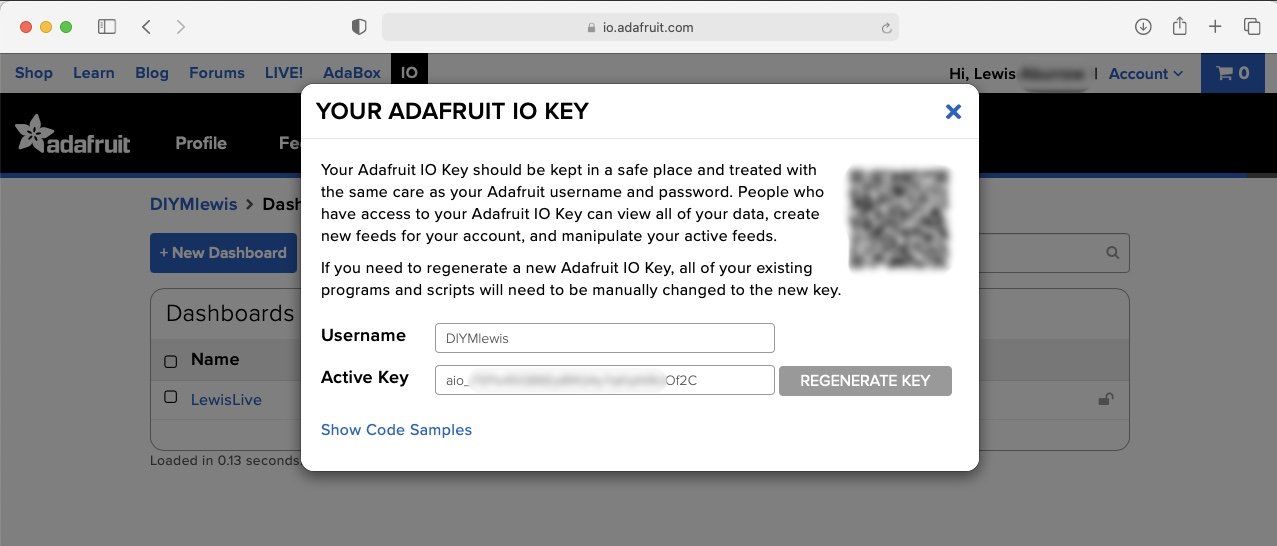
Once here take a note of your Username and Active Key. We can then open then open the Python script 'update-online.py' by issuing the following commands at the terminal on your Raspberry Pi:
sudo nano SmartChess/RaspberryPiCode/update-online.py


Replace the value found in 'ADAFRUIT_IO_KEY' with your personal key you noted earlier, and enter your user name into the value for 'ADAFRUIT_IO_USERNAME'.
You can then press 'CTR' + 'x' on your keyboard to exit the text editor, being sure to save your changes as you exit.
You can enter the same username and key on both chess boards if you are building two. The boards will negotiate who goes in what order when you choose the which colour your playing as when you switch the chessboard on. If you're building more than two they can still share the same credential but you should only have two connected for online playing at a time. Any extras are fine for playing against the computer as they do not connect online when you choose to play against Stockfish on the Raspberry Pi.
That's it. Your software is now setup. If you've not finished assembling the hardware, jump back to the video to finish: https://youtu.be/Z92TdhsAWD4
Otherwise here is a brief guide to using it...
Quick start user guide
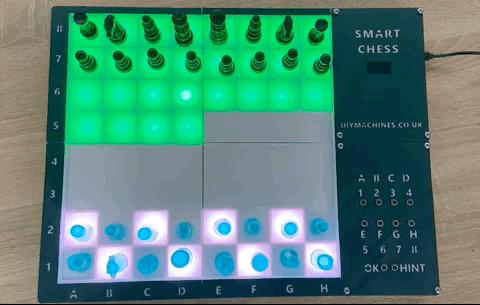
When you first start the smart chessboard by connecting power to it, the chess board will show a growing trail of green squares whilst the Raspberry Pi boots. Once it has finished booting and is ready for you the chess board will quickly finish the booting animation and then ask you if you want to play locally against the computer, or connect with another board over the internet.
Challenge the computer
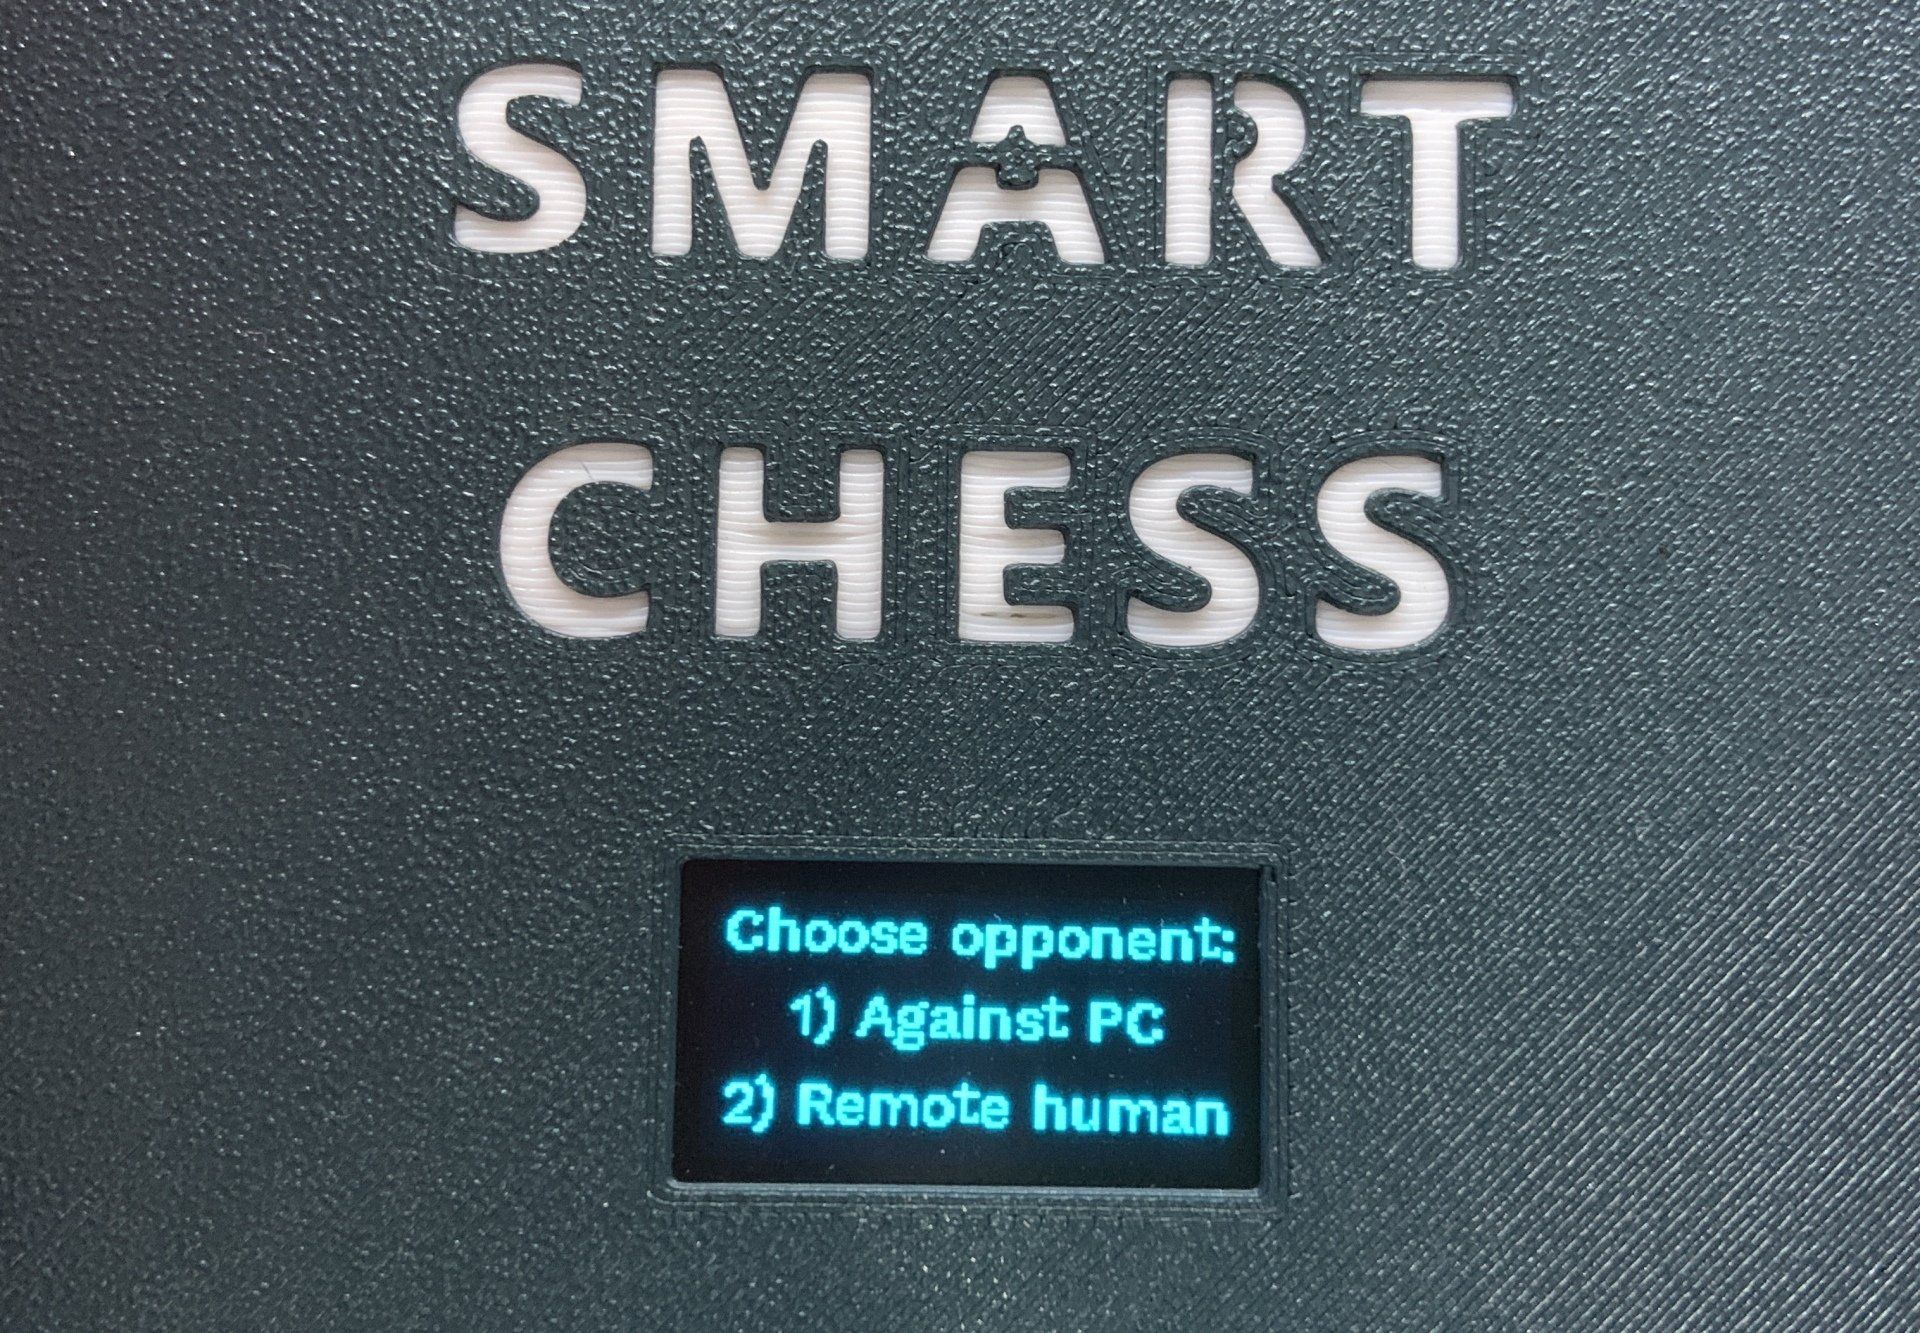
At this point you choose option one (using the keys on the control panel) to start playing against the built in chess computer or option two to start a game against a second chessboard other the internet (if you made two and bonded them together using the same Adafruit.io credentials).
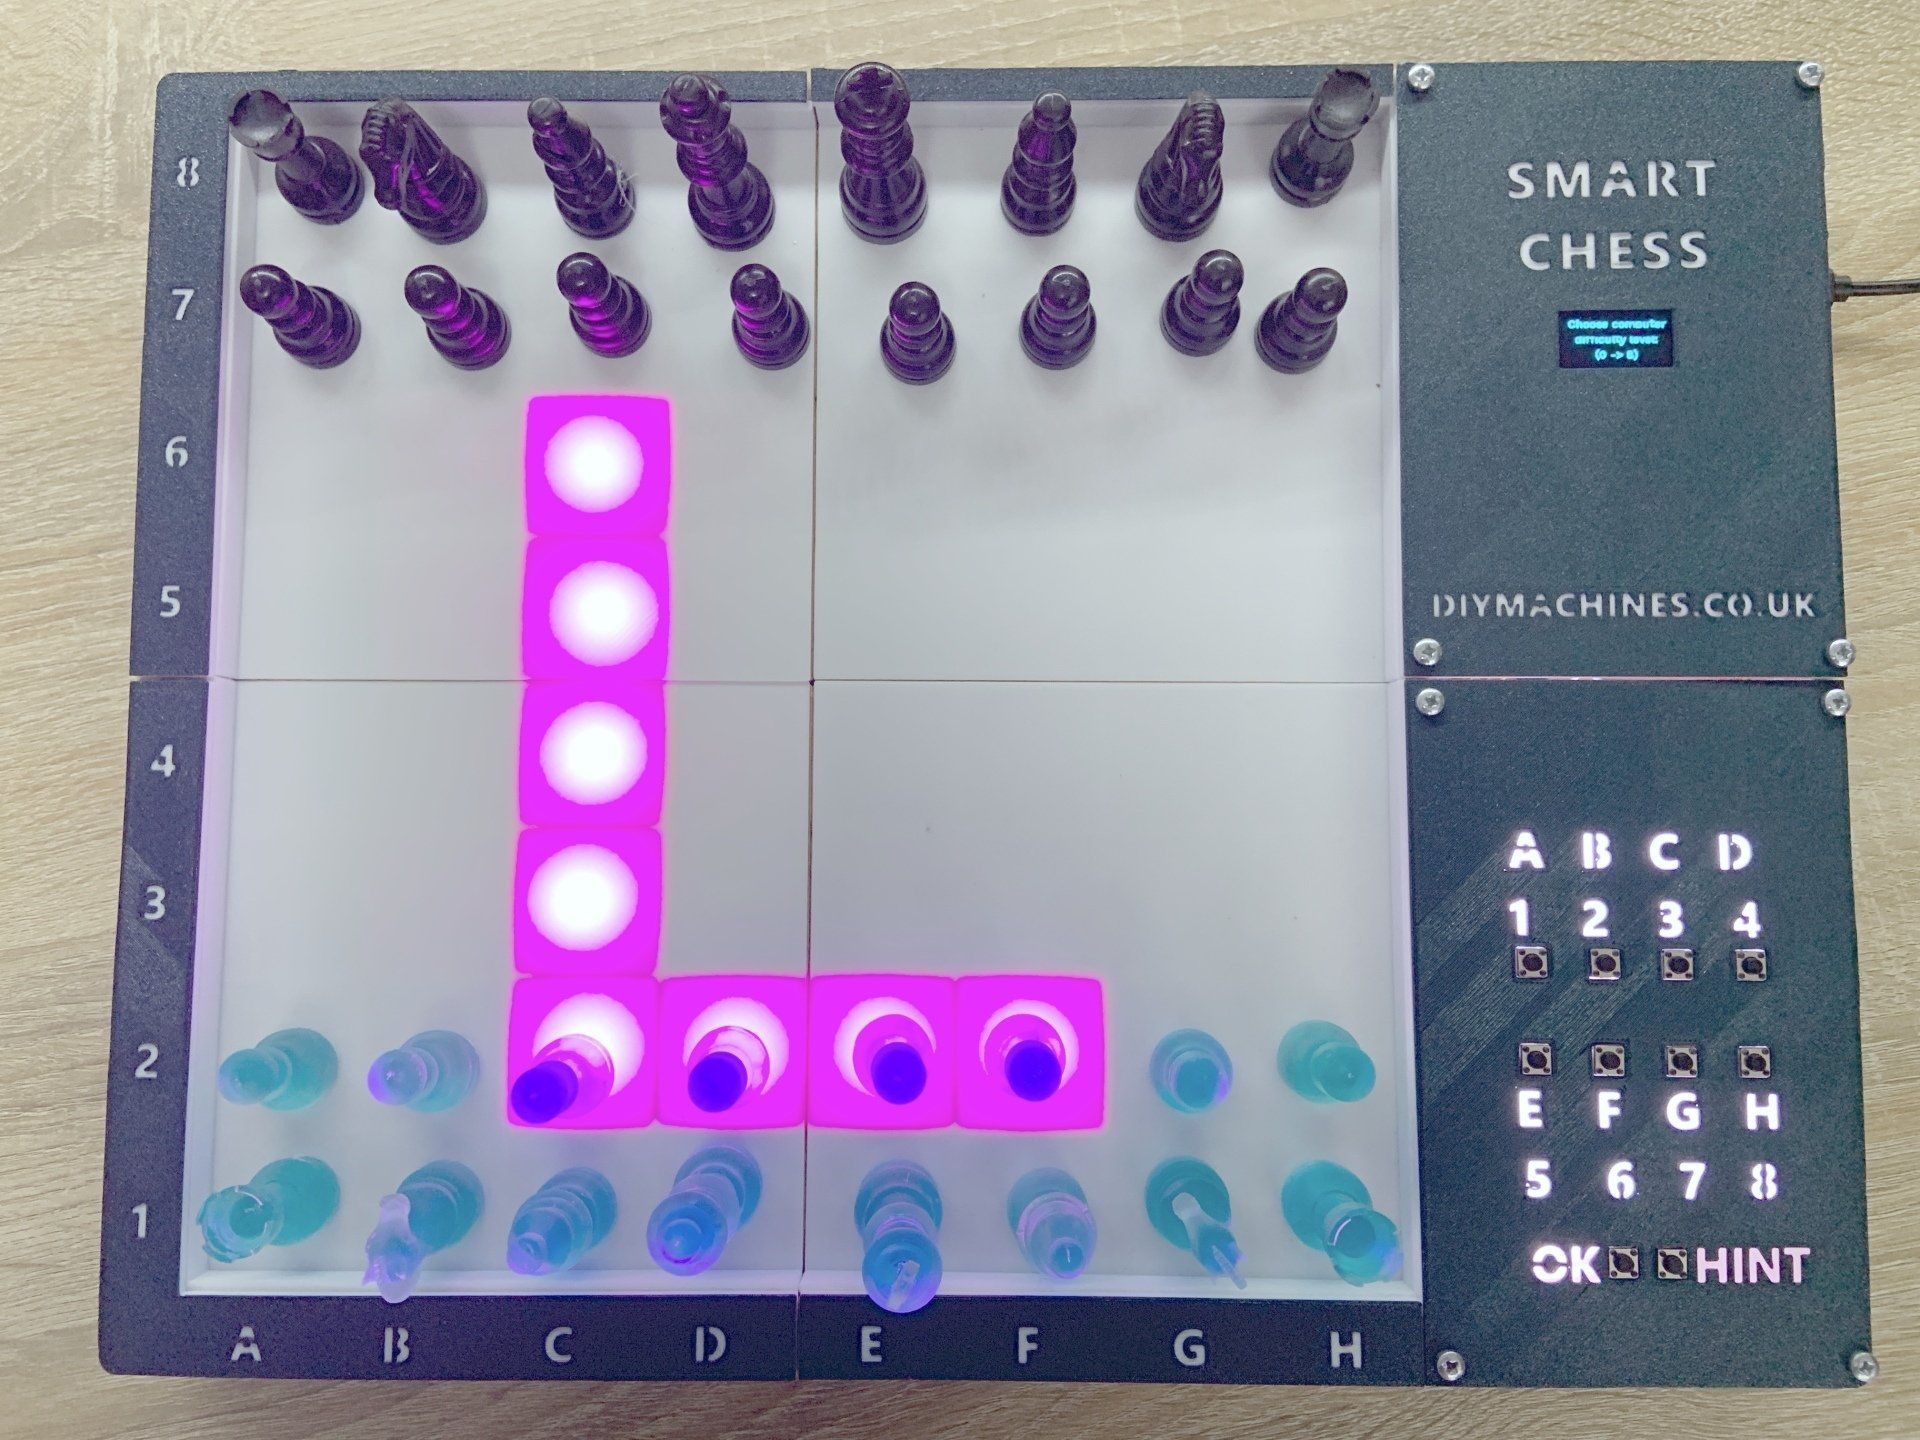
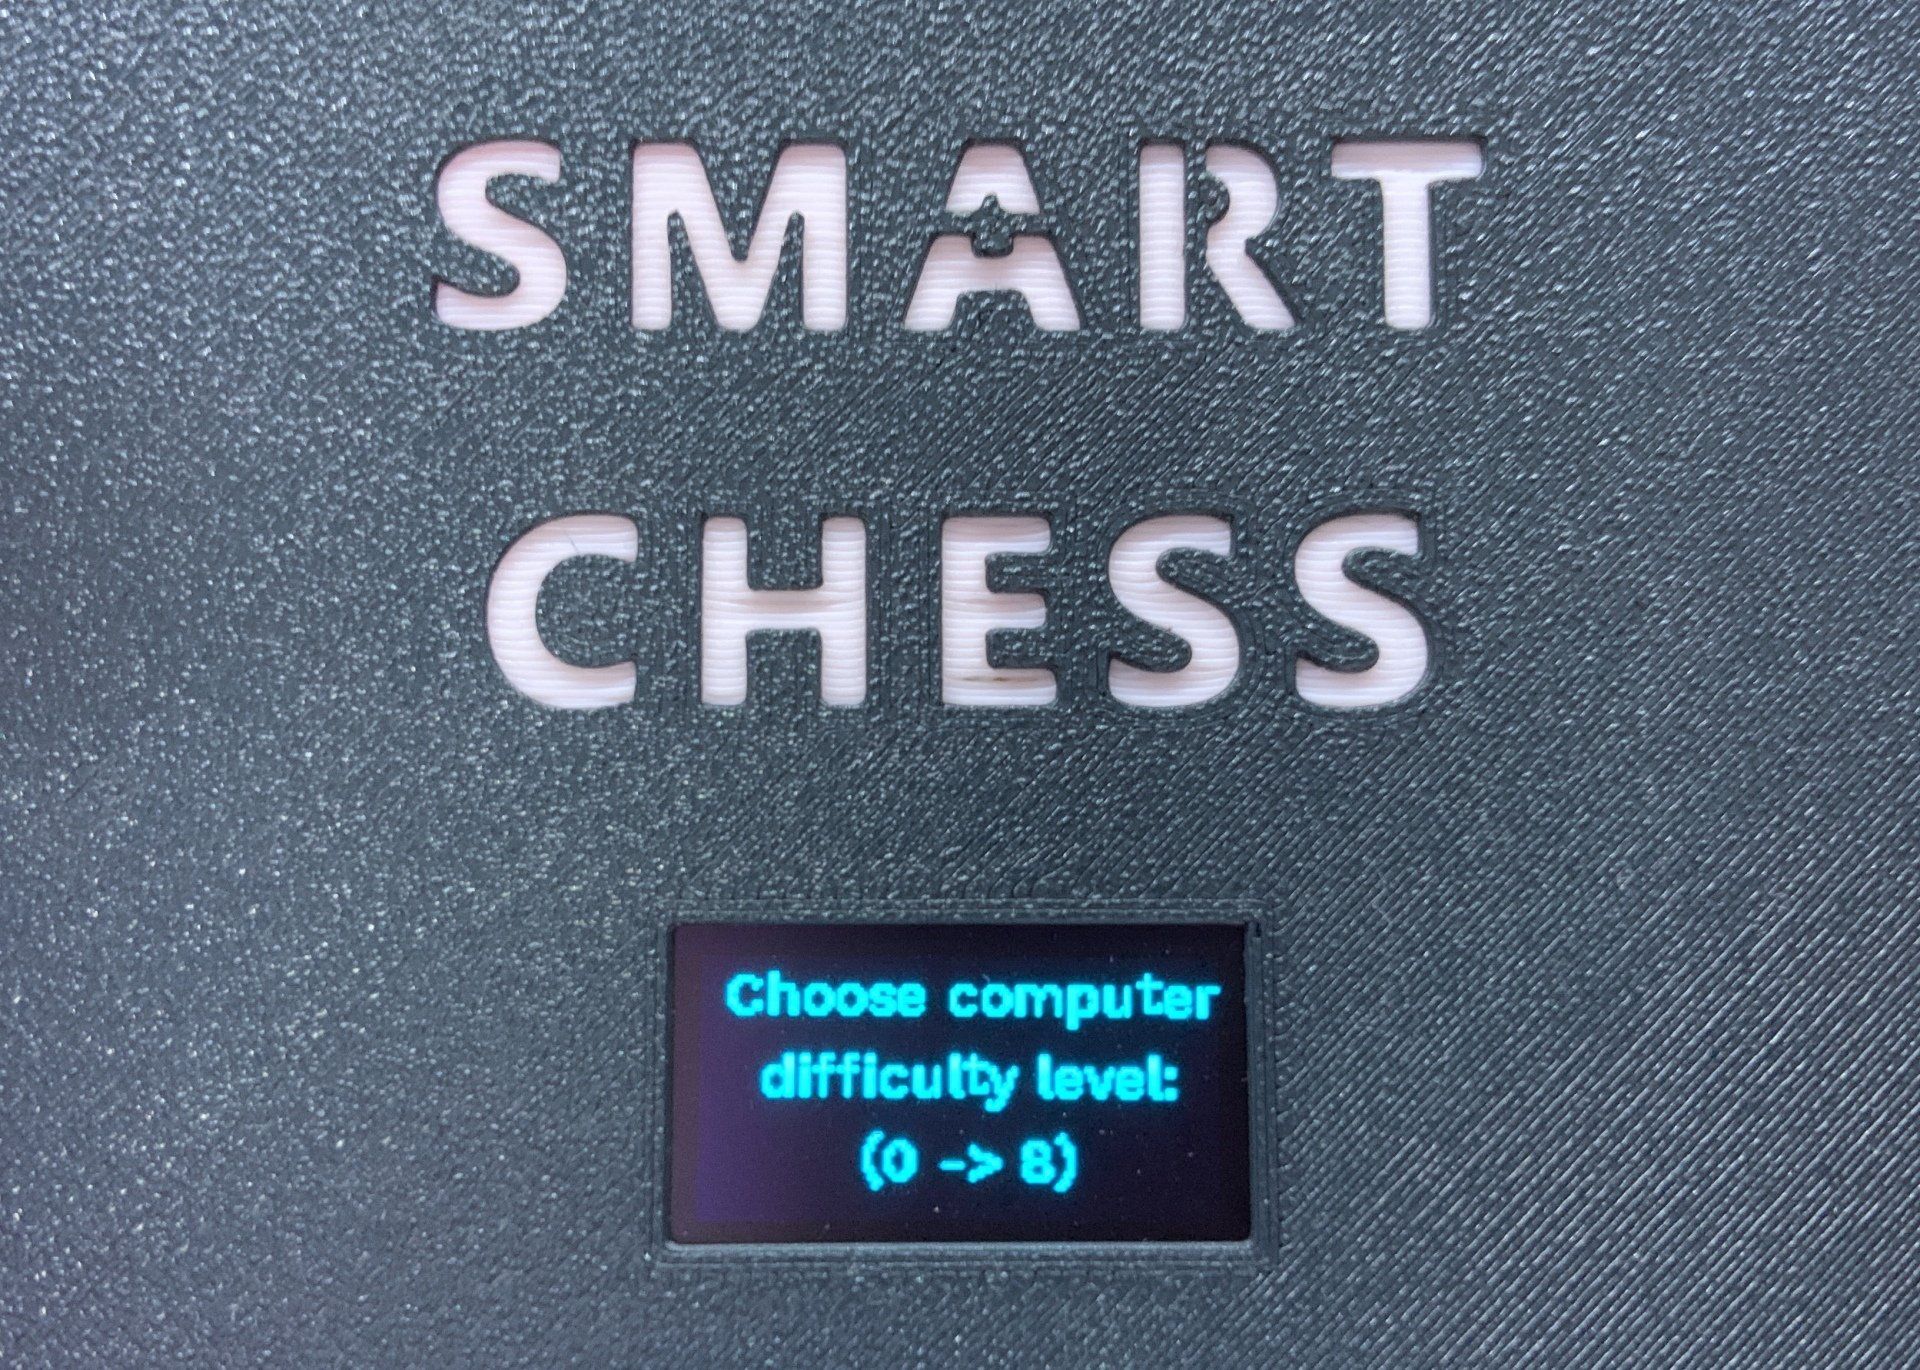
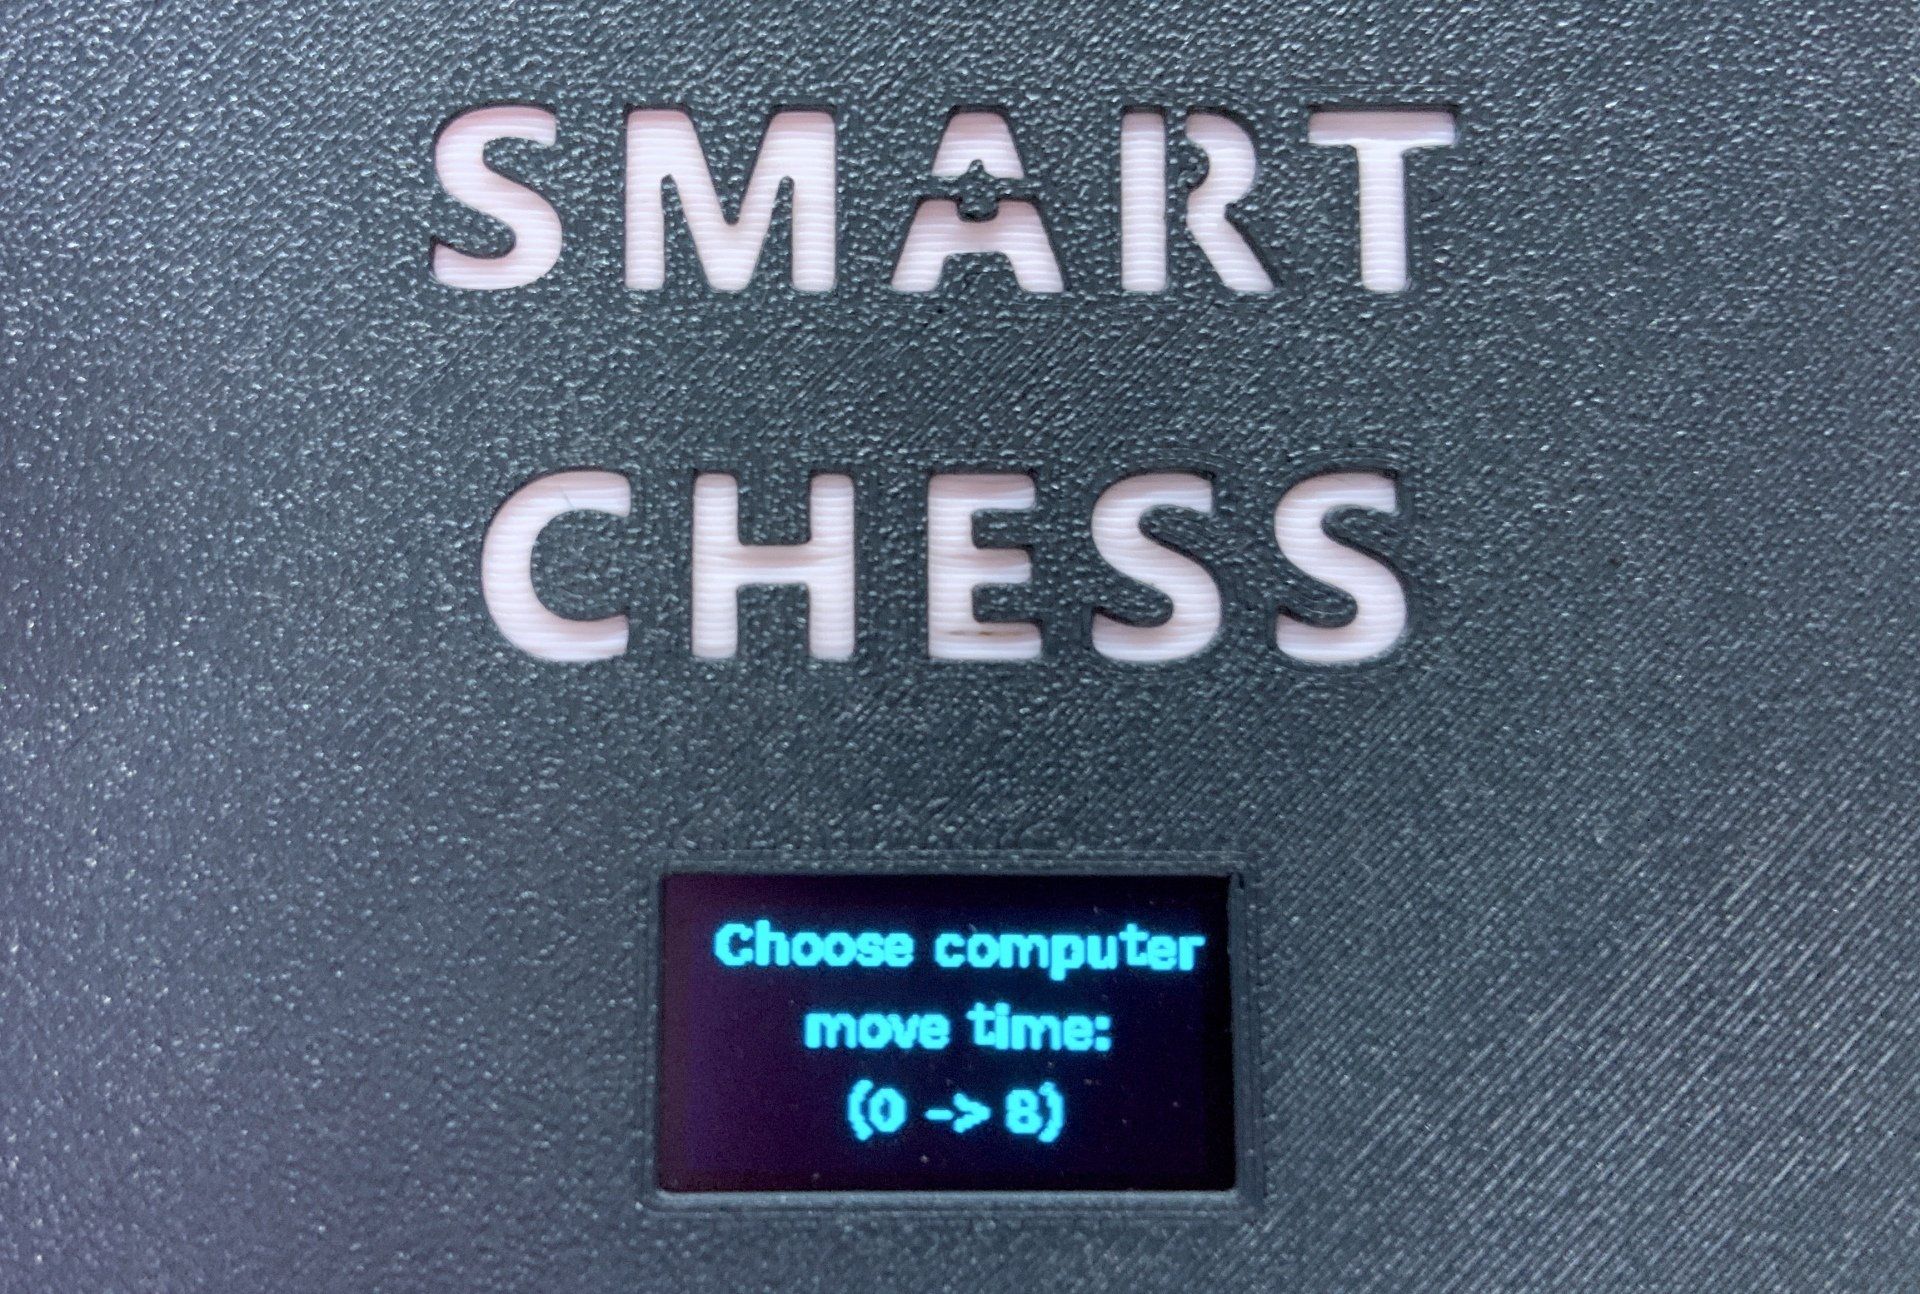
Choosing option '1) Against PC' will present you with two more options. What level of computer ability would you like to play against which you select by choosing a number between one through to eight on the panel with level one being the easiest and eight being the toughest. You are then prompted to choose a time limit imposed on the computer when it makes its decision, again it is an option between one and eight with one allowing it just a few seconds and eight allowing enough time that you might want to go for a walk and come back to see its choice of move! :)
 8)"." aria-label="A dark textured surface with "SMART CHESS" in white letters above a screen reading "Choose computer difficulty level: (0->8)"." onerror="handleImageLoadError(this)"/>
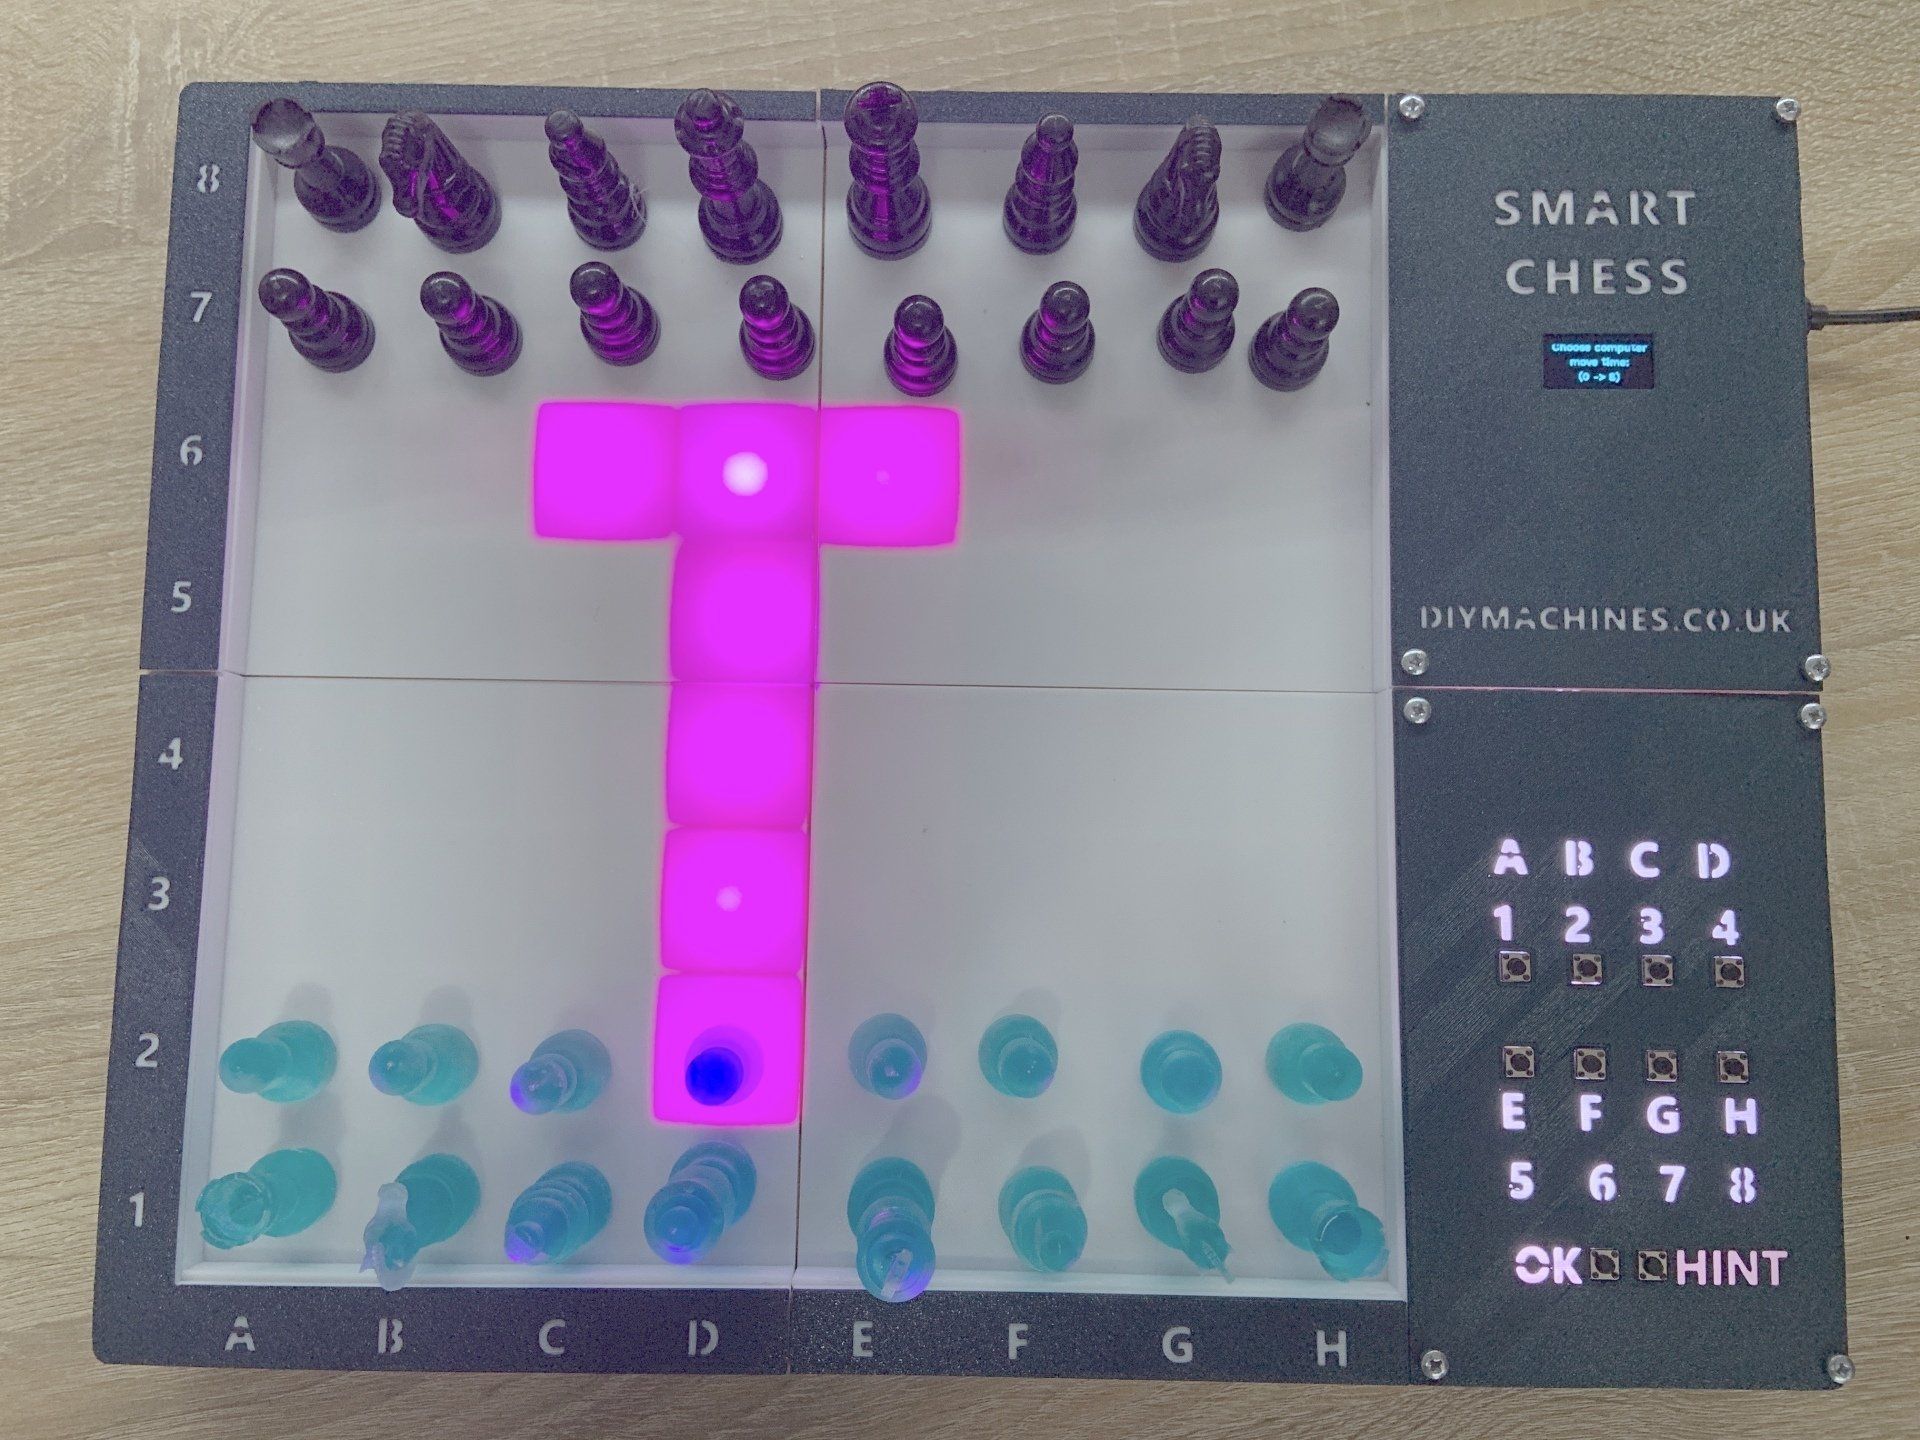
 8)"." aria-label="A dark textured board displaying the text "SMART CHESS" above an OLED screen that prompts: "Choose computer move time: (0 -> 8)"." onerror="handleImageLoadError(this)"/>
Challenging a friend or family member on a second board over the internet
If you want to play against another board then choose option '2) Remote human' after you have powered on the smart chessboard.
Next you need to let the chessboard know if you will be playing the white or black side of the game.
Frequently Asked Questions (FAQ)
Comments:


